Replaces
Part Details
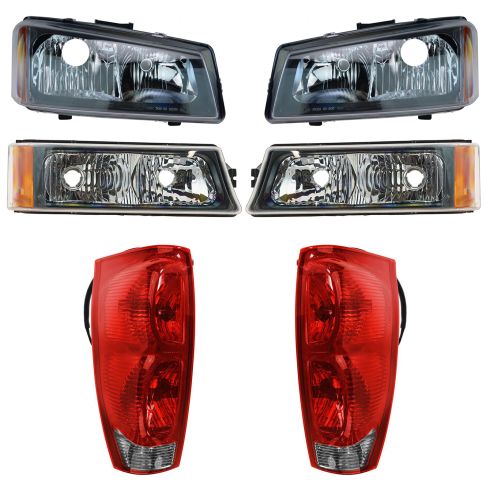
Complete Repair in One Purchase - Stop searching for parts individually and complete your repair with a customized kit or set from DIY Solutions.
High-Quality Parts from Trusted Brands - DIY Solutions' kits and sets are selected from the best automotive brands and include hard-to-find and even obsolete parts you may need for your vehicle.
Guaranteed Fit - DIY Solutions ensures its selected parts are quality-tested to guarantee fit and function.
Assemblies may include halogen or incandescent test bulbs that should be replaced before installation.
Features and Benefits
Item Condition:
New
Attention California Customers:
WARNING: This product can expose you to chemicals including Chromium (Hexavalent Compounds), which is known to the State of California to cause cancer, and birth defects or other reproductive harm. For more information, go to www.P65Warnings.ca.gov
Lifetime Warranty
This item is backed by our limited lifetime warranty. In the event that this item should fail due to manufacturing defects during intended use, we will replace the part free of charge. This warranty covers the cost of the part only.
FREE Shipping is standard on orders shipped to the lower 48 States (Contiguous United States). Standard shipping charges apply to Hawaii and Alaska.
Shipping is not available to a P.O. Box, APO/FPO/DPO addresses, US Territories, or Canada for this item.
Expedited is available on checkout to the United States, excluding Alaska, Hawaii.
Final shipping costs are available at checkout.
Created on:
Tools used
Brought to you by 1AAuto.com, your source for quality replacement parts and the best service on the internet.
Hi, I'm Mike from 1A Auto. I hope this how to video helps you out and next time you need parts for your vehicle, think of 1AAuto.com. Thanks.
In this video, we're going to show you how to service the head lights. We're going to show you how to replace head lights if you want to buy a new set from 1A Auto. We'll also show you how to just change the bulbs if that's all you're looking to do. You may need to change your head lights if they're clouded or faded or cracked or chipped or damaged in any way. If they are damaged or you want to replace them, just go onto to 1AAuto.com and you'll find a new set of great head lights for your truck and we'll get you back on the road seeing clearly.
Open up the hood by pulling the lever here. Reach under the center of the hood. You'll see a little lever right here. Push it towards the center of the truck and lift up. Head lights are pretty easy. There's actually a little lock bar right here. Pull it up out of the clip. Then you might have to work it back and forth. You should pull it towards the center of the truck. This pulls right out and then your head light tilts back out. And right in behind, your head lights are connected. You don't have to have the battery disconnected. As long as the truck's off, there's no power going through here, just pull back on these tabs and push off the connectors, then your whole assembly comes out.
And if you're just looking to change the light bulbs, at this point, all you have to do is turn the light bulbs counter-clockwise, pull them out and put new ones in and then reconnect the bulbs and then go from there.
If you've had some damage or your lights are clouded or faded, the new light from 1A Auto is going to go in there, just like the original. It plugs in. The bulbs plug in, just like the originals. And on the bottom, there are 2 tabs that go in the slots here. You feed it in, behind the grill. Then peek back in there, until you can see those tabs going into their own spots. And once they're in, you can line it up right here, push it back in, put the pin in and through. If you just push it through, it locks down in place again. And as it's a new light, peel off the plastic.
We hope this helps you out. Brought to you by www.1AAuto.com, your source for quality replacement parts and the best service on the internet. Feel free to call us toll free, 888-844-3393. We're the company that's here for you on the internet and in person.
Tools used
Hi, I'm Mike from 1AAuto. We've been selling auto parts for over 30 years! We're dedicated to delivering quality auto parts, expert customer service, and fast and free shipping, all backed by our 100% satisfaction guarantee. We've created thousands of videos to help you install our parts with confidence. That saves you time and money, so visit us at 1AAuto.com, your trusted source for quality auto parts.
Pull down your tailgate. Then there's two Phillips screws that you need to remove: one down here and one up here. Once those are off, it should just pull back. If you're just looking to change your bulbs, each one has a little tab on it that keeps it from twisting. Push the tab, twist counterclockwise, come out, and then you'd pull the bulb straight out. On the bulb is a number. This one's 3157K, that's what you use to figure out the new bulb.
If you're looking to change your whole tail light because you want to replace the old ones, or it's been broken, just remove all the sockets.
The original taillight from the vehicle is dirty, and a lot of times they so big they get broken pretty easily. The new tail light from 1A Auto is exactly the same as the original. It has the mounting pins like the original. It comes with the clips, and it comes with a new harness. And a lot of times the problem is these get wet or corroded, so this new harness will help you with those problems. The new light from 1A Auto is going to fit, function and look just like your original.
You have to kind of get the harness under your vehicle a little bit, but it connects right down here. Both sides are the same. A lot of times, you can pull down and back and bring the connector down. There may be a red safety tab in here that you'd have to pull out. You'd pry it with a small screwdriver, and then you want to press on this tab here firmly while you pull it apart. Sometimes they can be kind of a real pain. There's a whole bunch of stuff here. I don't know. It looks like it's dirt. Just use a pick, or a small flat blade screwdriver to pull it out of there. That could inhibit this connector from opening up. Then clean off the connector.
Good things to use are maybe an old toothbrush or paper towels. We're actually going to use some quick-drying electrical parts cleaner, and just get that connector cleaned off as much as possible. Pull our old harness up and out. Feed the new harness down in. Make sure it goes all the way down through there and then two tabs on the side go into alignment holes there, and use your two screws and re-secure the light. Bring your connector down, reconnect the harness. It should go nice and easy, and click, and then you basically slide this part of the body harness onto this tab.
Thanks for watching. Visit us at 1AAuto.com for quality auto parts, fast and free shipping, and the best customer service in the industry.
Tools used
To open the hood on this 2005 Avalanche, open your door. Pull the release. The secondary release is actually under the emblem here. Push it to this side, and lift the hood up. To change this headlamp, you first have to remove the turn signal lamp. Reach down, push this tab in. Push this tab in right here, pull it out. Now, we're going to pull the headlamp away from the grill, off the tabs that it's mounted on. Push this in. Turn it counterclockwise to remove the bulb and socket. Turn the marker light bulb counterclockwise to remove it.
There are two pins, L-shaped pins, one here and one here. I'm going to unlock those to remove the light. I'm going to use a flat-bladed screwdriver to pop it out. Pull it straight out. Same thing over here. Pull it straight up and out. Put those aside. Headlamp is free. I'm going to unlock the connector on the lamp on the bulb and push it down. Pull it off. I'm going to undo the other side. I'm going to pull the clip or the lock on it away from the headlamp, and I'm going to push down on the connector at the same time to pull it off. Then, you can lift the light up and slide it out.
Here's our old yellow and discolored headlamp. It's all pitted from going down the road. You can't really see that well out of this. This is our new one from 1aauto.com, perfectly clear. You're going to have great night vision with this. It comes with two new bulbs, and look at the old one. It has the same style of mounting and the same shape. It'll fit great and look great.
I'm going to take our new head lamp. I'm going to feed that up like that. That has the adjustment for it. I'm going to plug in our connectors. Place it into the little mounting area. We'll reinstall these L-pins. This one will slide down just like that, and I can move it around a little bit to line it up. You flip it over and lock it in. Same thing with the other side. You need to wiggle the headlamp a little bit to get it in there. You want to flip it over and lock it. The headlamp is installed.
Now, reinstall your turn signal lamp. Turn this clockwise to lock it. Install the side marker bulb. Turn it clockwise to lock it. Put these tabs into the radiator support. Push this up and in. If you need to adjust the aim of the headlamp, you can turn this screw in or out.
This is a basic tutorial on how to aim the headlights on your vehicle. Find the axis of your headlights. This is usually indicated with a small dot or the headlight bulb size on the lens. If not, it's the actual center point of your headlight bulb. Transfer this mark to a vertical wall with a preferably dark color that'll allow you to back up 25 feet. Pull up and find the center line of your vehicle, as well as the center line of your headlight axis.
Mark the wall with the height of the headlights and a straight line going across at that axis height. Back your vehicle up 25 feet from the wall to the front edge of your vehicle's headlights. Turn your headlights on, and locate the adjusting screw, usually on the back side of your headlights. You'll want to rotate this until the passenger hot spot or focus of the beam is approximately two inches below the line and the driver's side is four inches below the line. We change the heights on each side so you can still get a good beam to the off side of the road on the passenger's side and have the driver's side low enough to not blind oncoming traffic.
Thanks for watching. Visit us at 1AAuto.com for quality auto parts, fast and free shipping, and the best customer service in the industry.
Tools used
Brought to you by 1AAuto.com, your source for quality replacement parts and the best service on the Internet.
Hi, I'm Mike from 1A Auto. I hope this how-to video helps you out, and next time you need parts for your vehicle, think of 1AAuto.com. Thanks.
In this video, we're going to show you how to service the lower front light. This is the side marker light, the signal light, as well as your daytime driving lights. We'll show you both changing the bulbs, as well as if you want to replace it with a whole new assembly from 1A Auto. If you go for it, a new set of lights on the front end of your truck will take miles off, make it look a whole lot better, and help you see better at night. You won't need any tools for this. You may want a flat blade screwdriver.
Open up the hood by pulling the lever here. Reach under the center of the hood, you'll see a little lever right here. Push it towards the center of the truck and lift up.
The headlights are pretty easy. There's actually a little lock bar right here. Pull it up out of the clip. You might have to work it back and forth as you pull it towards the center of the truck. This pulls right out, and then your headlight tilts back and out. Right in behind, your headlights are connected. You don't have to have the battery disconnected. As long as the truck's off, there's no power going through here. Just pull back on these tabs and push off the connectors, and your whole assembly comes out.
Now if you're just looking to change the amber signal bulb, it's right here. There's a little tab. Press down, twist counterclockwise, and that comes out. Twist back in to lock it. Do the same thing, here, with your driving light: on the little tab, push down, twist counterclockwise, and that can come out. I've pulled that out for right now.
If you want to remove the whole assembly, just push the little tab right here. Push this tab towards the outside of the truck. Most of the time I'm able to push this tab just with my fingers and pull the light out, but it's possible you may want to use a flat blade screwdriver, here, to help you push on the tab, and then even twist it a little bit to help pry that tab from the body of the truck. The whole thing comes out. Disconnect here. Your marker light is down here, just twist it counterclockwise, pull that out, and the whole marker comes out.
Just to show you, here, on these bulbs, I just pull right out of their sockets like that, and they go back in.
Reinstall the new light from 1A Auto. It's going to go in just like the original. Put your marker in first. Push through the signal bulb, and your other bulb. There's a tab right here on the inside, make sure it goes into the radiator support. Then just watch this tab go right in, and it snaps right in place.
f you had some damage or your lights are clouded or faded, the new light from 1A Auto is going to go in there just like the original. It plugs in. The bulbs plug in just like the originals. On the bottom, there are two tabs that go into slots here, so you kind of feed it in behind the grill, and peek back in there so you can see those tabs going into the right spots. Once they're in, then, line it up right here. Push it back in, put the pin in and through, and just push it through until it locks down in place again. Then, for the new light, peel off the plastic covering.
We hope this video helps you out. Brought to you by www.1AAuto.com, your source for quality replacement parts and the best service on the Internet. Please feel free to call us toll-free, 888-844-3393. We're the company that's here for you on the Internet and in person.
877-844-3393
Monday - Friday 8:00am - 9:30pm ET
Saturday - Sunday 8:00am - 4:30pm ET
Specify your vehicle's year, make and model to guarantee fit.
This part doesn’t fit a . Select from parts that fit.
If your vehicle isn't listed, search Headlight Assemblies