Replaces


Part Details
Attention California Customers:
 WARNING: This product can expose you to chemicals including Lead and Lead Compounds, which are known to the State of California to cause cancer, and birth defects or other reproductive harm. For more information, go to www.P65Warnings.ca.gov.
Lifetime Warranty
This item is backed by our limited lifetime warranty. In the event that this item should fail due to manufacturing defects during intended use, we will replace the part free of charge. This warranty covers the cost of the part only.
FREE Shipping is standard on Orders shipped to the lower 48 States (Contiguous United States). Standard shipping charges apply to Hawaii, Alaska and US Territories. Shipping is not available to Canada.
Expedited is available on checkout to the United States, excluding Alaska, Hawaii and US Territories as well as P.O. Boxes and APO/FPO/DPO addresses. Final shipping costs are available at checkout.

Created on:
Tools used
Brought to you by 1AAuto.com, your source for quality replacement parts and the best service on the Internet.
Hi, I'm Mike from 1A Auto. I hope this how-to video helps you out, and next time you need parts for your vehicle, think of 1AAuto.com. Thanks.
In this video, we're going to show you how to replace an exterior door handle on this 2011 Chevy Silverado 1500. It's a similar process on a large variety of GM SUVs and pickup trucks from 2007 to 2012. The tools that you'll need for this is a flat blade screwdriver, a 10mm socket and ratchet with an extension, and a pair of needle nose pliers.
Using a flat blade screwdriver, you want to remove these three panels. The one behind the door handle, this door pull handle panel, and that triangular panel at the top there. Once those are removed, you'll see there are three 10mm bolts here. We'll fast-forward as he removes those. You want to remove this little panel under this handle right here. Pry that out with your flat blade.
Now you want to remove these two 10mm bolts right here. You want to pry up that switch panel and disconnect these harnesses. Just push in the tab on the top and pull back on them. For this lead there's a tab on the back of it. You want to pry out that tab and then the clip will actually pull up and out. Now pull your lock up and there's a little panel right here, just a little clip. You want to pry that out with the flat blade screwdriver. Once you pry that out you can lift that right up and off.
Now you can start prying off the door panel. Reach behind it and give it a sharp pull to release those clips. You want to do this all the way around the panel. Once you do that you can lift it off and then you want to tilt it. Now if you go in behind the door panel here, you'll see this door handle cable door here. Using needle nose pliers, push the clip inward and you can pull that up and out. Carefully remove your water shield. We did speed the video up. You want to remove it nice and slow. Do your best not to rip or tear it.
Now you want to remove this 10mm bolt right here, and you want to release this yellow clip. And then up, further up in the door, there's this little red tab here. You want to push the rod away from it towards the outside of the door. To open that clip, you literally just pop it open. This one, like I said, push it straight back. We'll fast-forward as he removes that bolt. Now remove this cap and that 10mm bolt in there. Pull the handle out. and then push it forward a little bit. and then it's kind of a little bit moving it back and forth, up and down a little bit to get it to release out from the door.
As you can see, there's nothing wrong with our old door handle, so we're just going to show you how to do this. You would remove that rod and then install it in your new door handle, and then remove this clip. This clip holds the lock cylinder in. Use a flat blade screwdriver and pry it out. You could also use a pair of pliers. Pull it out, and then there are two ways to put it back together. You see the lock cylinder comes out. Put the lock cylinder into your new handle.
You could either do it this way, then put the clip in, or you could actually put the clip in first and then snap the lock into the door handle with the clip in it already. To reinstall the door handle, you want to put that rod back down through the door. Slide it back and push it into place. We'll fast-forward as he replaces and tightens up those 10mm bolts. You want to re-clip those rods back into place and replace that rubber cap.
You can put your water shield back. Make sure that the wire harnesses and the door cable are pulled through. You want to make sure that these door panel clips line up in those holes, and that these hooks line up in these slots. Now you want to take that door handle cable, put it back into its clip. Pull back on it and feed it into that little spot there and run all your harnesses up through where the door switch panel is.
You want to make sure that this lock tab goes up through the door panel. You want to align the door panel up on the window sill. Then once it's lined up, you can push in the clips all the way around. Take your lock, slide it back onto the tab there, and reapply that little square clip. We'll fast-forward as he replaces the two 10mm bolts under this handle here, as well as the 10mm bolt behind the door handle. Now reconnect the harnesses to the door switch panel and push it down into place. We'll continue to fast-forward as he replaces that pull handle and the two 10mm bolts to secure it. Now you want to replace those four trim panels.
We hope this video helps you out. Brought to you by www.1AAuto.com, your source for quality replacement parts and the best service on the Internet. Please feel free to call us toll-free, 888-844-3393. We're the company that's here for you on the Internet and in person.
Tools used
Brought to you by 1AAuto.com, your source for quality replacement parts and the best service on the Internet.
Hi, I'm Mike from 1A Auto. I hope this how-to video helps you out, and next time you need parts for your vehicle, think of 1AAuto.com. Thanks!
In this video, we're going to show you how to replace the rear outside door handles on this 2007 Denali. It's the same process for any 2007 to 2013 Yukon Denali, as well as the SLT, and Tahoe LTZ. It's also probably the same procedure or a similar procedure for rear doors on the Yukon XL, Suburban, as well as the four-door Sierra and Silverados with the LTZ Denali or SLT trims.
Items you'll need include handles from 1AAuto.com, small and regular flat blade screwdrivers, 10mm socket with ratchet and extension, and a door panel clip tool or putty knife.
Disconnect the battery. You want to open up the driver's door, pull the hood release lever, hit the safety hatch, move it to the right, and then lift the hood up, and the battery is near the rear of the engine compartment on the passenger side. There's a 10mm nut on top of the negative battery cable. Loosen that 10mm nut and pull the battery cable up and off, and then put it to the side so it won't contact the terminal again.
Open up either rear door. The procedure is the same for both. You need a small flat blade screwdriver, and you'll pry out that square clip, pry out this panel under here, and I am just using one hand, so it does drop to the ground, one hand holding the camera, one hand working the screwdriver. Then there is also a little panel underneath here that you pry out. Once you have that panel out, it'll expose a 10mm bolt there, and then there's another 10mm bolt to remove down here.
Use a small screwdriver and pull up on the walk knob and pry that clip out, and it comes up and off. I'll fast-forward here as I remove those two 10mm bolts. Use a plastic trim tool or a rag and a flat blade screwdriver, and pry up on the switch panel. You kind of pry up in the center and then you pull it up and it locks. The clips are on the front and the rear. Once you get the center up, you just kind of work it into the front, and then work it into the rear. It comes up and off and then the harness just has a tab on it. You press the tab and unplug it.
Use a rag to protect your paint and a door panel clip tool, or you could use a putty knife, but you work either the tool or the knife in underneath the clip. You'll basically feel that you slide it through and you can feel the plastic clips, and then you pull out and release the clips, and I usually do this for two or three of the clips on the back side. Then you can work your hand underneath and release the rest of the clips.
Once the clips are released, you pull the panel up and off of the window ledge clip. If your door panel has never been off before, the water shield, the white water shield you can see is a black clip holding it to the door panel. There's probably three or four of these little black clips. You can see how you try to use the clip tool or a screwdriver to pry the clip out. Eventually, I just end up grabbing ahold of the clip and the water shield at the same time and pull them out. Again, you'll have to do this probably three or four times if your door panel has never been off before.
We'll need to undo the door handle cable clip. There's two little clips that hold the cable in. I'm just prying with a small screwdriver to release those clips. Here's a better shot of them as they come out. You pull it out and up out of the handle, and then the door panel comes right off. I do find one more of the clips that clip the water shield to the door panel and release it. Carefully pull the water shield back and release the adhesive and expose the inside of the back part of the door. You want to unclip the door lock rod, see the yellow clip right there, reach up with your hand, try and get a good shot here, and you just pull on the outside edge of that clip and release it and pull the rod out.
You want to remove this round rubber grommet. You push from the back side and pull it off, and then there is a bolt up in there as well as another bolt that holds the door panel. 10mm socket, ratchet, and extension, and go right in through and undo those two bolts. Now the handles slide forward and out. You'll want to remove the latch rod from the old handle. Just kind of twist it and pull it up and out. Then install it in to your new handle. Install the new handle, just pull on the protector plastic back, put the rod down in, and then might need to pull the handle out a little bit as far as just the handle part out, but you can slide it up in there, and then you push it on to the door and slide it back to lock it in place.
Reach up and start the bolts in to the back of the handle. You can see it's easy enough to get your hands up in there, and you can even get them up into the back side, too. Start the bolt in and then tighten them up. Tighten them up nice and firm, don't overtighten them. You don't want to strip the thread. Reach in, put that latch rod back in place, and then lock the clip in place. Be sure your door is unlocked. You can test it out.
Install that rubber grommet and press the shield back up in place. To reinstall the door panel, get it close, put the ball of the cable into the door handle, then pull the cable around and clip it in. Move the panel close to the door, make sure that the harness comes up through, and then make sure that the door lock goes up through the hole there, and then you kind of lift the panel up and push the top on and set it down into that window ledge clip, and then you can kind of look in behind, make sure that the clips line up. Once you have everything lined up, then you can reset the clips.
Make sure that you pull the lock knob up and then put the lock trim on there. Set that, make sure you leave it unlocked, and then reinstall the two 10mm bolts that hold the panel in place. I'll fast forward as I do that. When you tighten these, tighten them up firm, you don't want to tighten them, though, and make sure you have the harness pulled up through, put the two trim pieces in place. The upper one, you want to put the rear end first and then snap the front end. It snaps in at the front first on me, so I have to pull it back out, and then put it in correctly. Again, the back towards the back goes in first, and then front snaps in, and then reconnect the harness and snap the switch panel down in place, and then do a little test.
Then reconnect your battery, and then you should be all good to go. Put the negative battery cable back on the post and 10mm socket, ratchet, and extension, then tighten it up.
Thanks for tuning in. We hope this video helped you out. Next time you need parts for your car, please visit 1AAuto.com. Also check out our other helpful how-to and diagnosis videos.
Tools used
Hi, I'm Mike from 1A Auto. We've been selling auto parts for over 30 years. We're dedicated to delivering quality auto parts, expert customer service, fast and free shipping, all backed by our 100% satisfaction guarantee. Visit us at 1AAuto.com, your trusted source for quality auto parts.
We're going to actually hit our dome lamp override, which just turns off the dome lamp. Then we're going to start up here at the corner. You can use a plastic trim tool, but I can just get my fingers behind here, pull straight out and off. You want to avoid pulling it this way, because as you can see this broke off in there. It still has two clips left though, so it'll secure fine. Then we're going to remove three other trim panels. And behind the door handle, put a small screwdriver in here, pry the bottom out and bring that out. You can see a 10mm bolt there. Then behind the door pull, use a small screwdriver to pull that out. Two more 10mm bolts are in there. Then your door lock, you want to kind of pull up a little bit and pry with a small flat blade screwdriver. That comes up and off. Make sure you retrieve that little piece if it flies out. If this comes out, just retrieve it and don't put it all the way in. Just put it like that. Additionally, you need to pull up your trim panel, plastic trim tool available on 1AAuto.com and put it in the back and pull up.
Okay, and then work it in at the front as well. You can see there's two clips at the front and rear. If you don't have a trim tool, but you have strong fingernails, you can get it out, and then just pull straight up on front as well. Then there's four harnesses to disconnect and you might have more. If you have more options, just press the tabs and pull out. Use a 10mm socket with ratchet and extension, and remove those three 10 mm bolts. These ones may stay in there after you get them loosened up. And in that case, they'll just fall down, and you can retrieve them after you take the door panel off.
Now, there's a series of clips around the edge. I usually start at the top, pull straight out, and just work your hand down. Pull firmly. Then the bottom and the side, and then door panel can come up and off. And then you'll want to disconnect your door handle, which is a matter of pressing on the tabs. There's two tabs, so press one, pull through, rotate around. Press on the other one. That allows you to move that back, bring it up and around, and your door panel comes off.
We're going to take our window master switch, and we're going to plug it back in so we can put the window up. These plugs here are coded, meaning they have little slots that line up, so they'll only plug in one way because we've only got three plugs, but there's more than three spots. This has some ears here that match up with this connector here. The same thing for this one. It only matches with these, so if you try to put in the wrong ones, it won't fit. You got to find the right. It will slide in. I'm just going to turn the ignition on and put the window up. Then we turn the ignition off. You can unplug this switch again so it's not dangling and in your way. Just put it aside so it doesn't get broken.
Now, to get to the bolts that are on the backside here, we have to pull this water barrier off. It's got some sticky like strip caulk stuff. Just peel it off. It'll just go back on there. If it's really sticky, you can take a razor blade and just cut it as you're pulling it away, but just gently work it off, so you don't rip this foam. For the most part, you can reuse this. It will still be sticky, but you may want to get some new strip caulk to put on here when we replace it, so just be aware of that when you take it off.
The first thing we're going to do before we loosen the outside door handle is to undo it from this lock rod while it's still attached to the car will make it a little bit easier. We'll use a flat headed screwdriver. There's a little lock tab. Just got to kind of push it out and at the same time, and try to pop it off. See if I can get another hand in there just like this. There it is. It's a little tricky, but once you get it, it pops right off, so now that's nice and free. Now we need to get to the two bolts that hold the outside door handle on. There's one in here. There's one underneath this rubber cover. We're just going to use our plastic prying tool to just pop this cap off. Just put that aside so you don't lose it. Then we take our 10 millimeter socket and ratchet, put it through that opening in the door panel. I'm going to start to loosen it. Try not to drop the bolts in there, but door the door panel's pretty wide open if you drop it. Now we're going to do the other 10 millimeter bolt. Now what you want to do with your hand that you're not using with the ratchet is just put it on the outside door handle so it doesn't fall as you loosen it.
To get this door handle out now, we have to slide it to the front, and then lift if out. I may have to go around the backside and help feed it out. It's got another little tab, so if you twist it down, and then you need to feed out. Disconnect it from this arm here. There you go. That's how you remove the door handle.
Now we're going to reinstall the door handle. You start by fishing in the door lock actuator rod. Then you want to connect it to this one. That just pushes over like that. You need to sort of maneuver it in. This you can push, it's spring loaded, to get it to go under there.
Now, remember, there was a hook on the back of this. It kind of has to go to the forward position a little bit and then slide back. That's installed from the outside. Now we need to go to the backside and install the 10 millimeter bolts that hold it on. The torque for the little bolts that hold the door handle on is 53 inch-pounds. If you don't have an inch pound torque wrench, just make sure you tighten them very gently. Use your wrist, not your arm as you tighten them down. As you just feel them to get tight, you should stop, because if you go too far, they will strip out the plastic or crack the plastic.
To put these 10 millimeter bolts back through the door, to help you not drop them into the door while you're trying to feed them in there, you can take a little bit of blue masking tape and just sort of tape them so they stay in there. Just fold that over so it fits through. You just have to fish it in.
See, the hole is basically straight in from this opening. I recommend doing this by hand first to make sure you don't cross thread them. You'll just feel it. Just hold your hand on the outside door handle so you don't push it out, and just start to thread them in. The torque on these is going to be 53 inch pounds, so I'm just going to thread them in as strong as I can by my fingers, and then I'll come back with the torque wrench once I have the other side in. We got the other bolt in. Have to feed it around the window regulator cable. That one feels pretty tight. Now I'm going to take our inch pound torque wrench I've set to 53 inch pounds. That's it. It doesn't take a lot of torque. Now that these bolts are tight, you're going to take that grommet, put it back in the hole. All right, after you reinstall the door handle, you now need to reconnect the door handle actuator rod to latch the actuator assembly. That's just going to slide in here. You just kind of roll it up and over. It will lock down.
All right, now we're ready to install this back on the door handle. Just going to feed our wires through for the door switches and mirror. See the little channel that it was in. You just sort of push it down in.
First, you want to just make sure that your bolts come out and you retrieve them. There are two tabs here that just go right in to the door and rest conveniently so that's supported. Then you can put this up. Make sure you have four harnesses that poke up through the opening, here, or more if you have more options on your truck. Then reconnect your cable, slide the ball in, pull out, and push.
Make sure all your harnesses are up and through. Now that your cable's on, this ridge actually needs to go down into this channel here. So, hit the panel up into place. A little higher, you see it slides down. It should go down even. This should come right up through your lock rod. Then, if you look back in, you can actually see this pin here lines right up, and you can just go right around and lock the pins into place. So we want to be able to take these bolts and put them in. They’re a little bit loose, though. So, if you just take a piece of painter's tape, put it on the head of the bolt, stuff your socket on there, and it stays much better. You can guide it right in and start it out. If the painter's tape does stay behind, it's not a big deal, but tighten it by hand first to make sure it's in, and then tighten it up.
This one is pretty easy to get into place. Put the lockdown on. Snap that in place. This one, the round side goes underneath. Put this into place. Switch panel, these all only go in one way. So, like this one won't plug into there. It won't plug into there. It'll only plug into there. Then this one will only plug into there. This one can go in place. The last one, again, it has three tabs. One of ours is broken. Make sure it goes right straight in, kind of look in behind.
Thanks for watching. Visit us at 1AAuto.com for quality auto parts, fast and free shipping, and the best customer service in the industry.
Tools used
Hi, I'm Mike from 1A Auto. We've been selling auto parts for over 30 years.
What's up, guys? I'm Andy from 1A Auto. Today, I'm going to show you how to remove and reinstall an outside door handle on this 2008 Chevy Silverado work truck. If you need parts for your vehicle, click the link in the description and head over to 1AAuto.com.
Open the door. We're going to remove this window crank. We need a window crank removal tool, so we're going to position the window crank in this position right here. Take the tool. If you want to put it in the same location that it was, you could mark it before you take this off. Then we can get this, just slide this down. There's a little pin, little clip we have to remove. Just push it down and then it slides right off.
To take this lock button off, I'm just going to use a pick tool. Just get in behind here and slide that little walk piece off. Slide the button off. Next underneath here, I'm gonna take a trim tool. Just slide under here. You can use a pick also. Get underneath there. Slide this cover off. Next, we're going to take this cover off. Take my pick tool or trim tool, slide that cover off. There's a clip right there, a clip right there. We're going to use a 10mm socket, extension, and a ratchet, and there's three bolts. One bolt here and two bolts there. Take those out. Might have to hold this handle up a little bit to get this bolt out. Take that bolt out. Oops. We'll just use a magnet to take that bolt out.
Next we're going to take this trim piece off, just use my trim tool. Get it behind here and pry. It's just clips that hold us on. Three clips hold that on. Next, I'm going to use a trim tool. I'm going to pop those clips holding the door panel on. Just go around the perimeter of the door panel and pop it off. Once those are all popped off, it should be able to release right there.
We're going to need to release the handle cable right here. There is two ears on the bottom of this door panel so you can put it in service position so that you can leave it there while you're working. All right. To take this cable off the inner door handle, I'm just going to use some needle nose pliers. Get in there, just get a squeeze. There's a tab, a couple tabs. I'm going to squeeze on the cable. That will release. Sometimes if you twist it a little bit it helps out. Pull the cable, slide it off, and then there's a ball on the end of the cable. This is where the two tabs are. You just need to squeeze these two tabs, just like that, to release it. Now I can grab the door panel and just slide it out. If you rolled your window down, we're going to roll it up at this point. I'll just take the handle off.
Next, we're to take this inner vapor barrier off, or installation off. I'm just going to slide this. Some sticky adhesive is attaching it to the door. Generally, it peels right off fairly easily. Just being careful not to rip this. If it does rip, you can use some tape to tape it back together. Just fold it down out of the way. I'm going to take these two plugs off first, we'll just use a trim tool. Pull those off.
All right. We want to disconnect these rods that go from the door handle to the door latch. There's a little yellow retainer right here that holds it on. Need to grab with your fingers on the back side. We're going to slide it out, pop it off just like that, and that rod will come off. Then for the top rod that goes to the lock cylinder, I'm just going to take the rod and I'm going to push it towards the outside of the door. Sometimes this is a little bit tricky. I'm going to try using a pick tool to get in here and twist it.
There's two 10mm bolts that I'm going to take out. One through this whole, just use a 10mm socket, extension, and a ratchet. Take that one out. Then also through this bottom hole over here. Slide that one out. Now I can go from the outside. Just grab the handle, just slide it towards the vehicle a little bit. Just pry this out a little. You can slide the handle right out.
To take this lock cylinder off, I'm just going to take a straight blade screwdriver, just a little clip retainer holding on right here. Just pry that that way a little bit and I can push straight through just like that. Slide the lock cylinder out. Reinstall the lock cylinder, just push the lock spring back in. Take it, just push it, lock it back in place. Make sure the lock cylinder is all the way down.
So on this handle, this piece actually broke. This is the rod that goes into there, so this piece would need to be replaced. We're going to slide this back into position, slide that rod down here. I'm just going to open the handle a little bit. Slide that in just like that. Once that's in, I'm going to pull it back towards the vehicle a little bit and it'll slide in towards the outside of the vehicle. Okay. Now we'll take the 10mm bolt and slide this into position here. Right there. Snug that up. We're going to take the other 10mm bolt. It's going to go through this hole, in right there. We'll snug that up. Now I'm going to put these caps over the holes. Just push them back in just like that.
Then on the inside, this rod is going to go to the door lock cylinder. You're going to get it lined up. There's like a V and it's going to go in the middle of the V. You grab it and just pull. Lock it into place. We're going to push this into this retainer. It's like a door, you open the door. This is going to get lined up right there. Once that rod is in there, then close the door. Make sure that's latched. You can grab the handle and just make sure that operates properly.
Now, slide this into position. Pull the cable through here like that. There's a hole right here that the door has a pin that goes through there, so get that lined up. That looks pretty good. A lot of times on these door panels, this little bracket breaks off the door panel. Right here. It's a common problem. It's not something that's extremely crucial for putting the door panel back on, the door panel will stay in position even with that broken, so don't worry about that too much. We can take the door panel and make sure this lock rod goes through that hole right there. That's good right there. Get this little door pin in the hole on this side. That's in position. Make sure the rest is there. Once all the pins are lined up, you can start pushing it on.
I'll reattach this. If you had a foam insulator, you would put that in there now. This vehicle doesn't have one, Line these pins up, lock that in place. We're going to take these two bolts right underneath the handle. Use our 10mm socket, extension, and ratchet. Just get that one started and then I'll get the other one started. Snug it up then I'll snug up the other one. Down below here underneath the handle, get this bolt in. We're going to tighten it down. Snug it down.
Take these two covers. This one's going to go down below. There's a little pin right there that goes through that hole so you know which direction it goes. Get that in position. Lock it in place. This one is going to go in this position. There's a pin little slot there. Lock that in place.
All right. Now I'm going to install the new crank handle. Remember this washer? It's going to go on the back side. Just put this into position. Put it on the same way that you took off the old handle. Get it lined up. Make sure it's locked in place and it's good to go.
Then we'll take this lock button. Make sure this lock rod is all the way up. Take the button, slide it into position, and then push down on the lock part. Make sure it works properly and you're all set.
Thanks for watching. Visit us 1AAuto.com for quality auto parts, fast and free shipping, and the best customer service in the industry.
Tools used
Brought to you by 1AAuto.com, your source for quality replacement parts and the best service on the Internet.
Hi, I'm Mike from 1A Auto. I hope this how-to video helps you out, and next time you need parts for your vehicle, think of 1AAuto.com. Thanks!
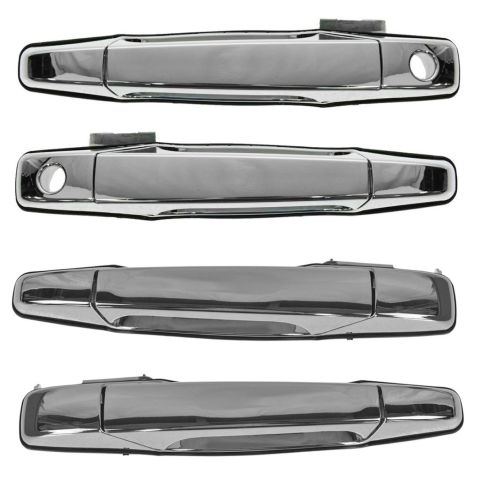
This is a 2007 Yukon Denali. This procedure is pretty much similar for Yukon Denali as well as the Sierra Denali, Yukon and Sierra SLT series, and Chevy Silverado, Tahoe, and Suburban LTZ series. As you can see here, our handle broke at the front mounting point, and the chrome is bubbling up. This is the original handle. This is pretty common for these vehicles. Whether you're looking to replace them because they're broken, or maybe you want to upgrade to black handles from chrome handles, you're going to need new handles from 1AAuto.com, a small and regular size flat blade screwdriver, 10mm socket with a ratchet and extension, and you'll need either need a door panel clip tool or you can make a putty knife work to pry the door handle off. If you're doing the driver side, you also may need a pick tool additionally.
Disconnect the battery. You want to open up the driver's door. The hood release lever has a safety latch. Move it to the right, and then lift the hood up. The battery is near the rear of the engine compartment on the passenger side with a 10mm nut on top of the negative battery cable. We'll loosen that 10mm nut, pull the battery cable up and off, and then put it to the side so it won't contact the terminal again.
Open up whichever door you want to remove. There's a little square clip on the door lock that you want to pry out with a small flat blade screwdriver. Then use a small flat blade screwdriver to pry that panel out. Then there's a little panel in behind the door handle that you pry out. This is the same for either front door, and then you'll see there's a 10mm bolt there and two behind the door pull. Use the small flat blade screwdriver, pry out that square clip, pull that up and off, and then use a rag to help protect the paint and pry out the triangle that's at the top of the door. It pulls straight off, and then use a 10mm socket and ratchet with an extension and remove the three bolts. Use a screwdriver and a rag just to protect the door panel. Pry up on the switch panel, work your finger underneath, and pull it straight up. You pull it some, and then pry up in the front. The clips are located right at the front and right at the rear, and the harnesses are all connected with a connector that has this little tab that you press. Pull the connector down and out. You need to release the clips that hold the panel in. I've got a door panel clip tool and a rag again to protect the paint.
Work the panel clip tool underneath and around the clip, and then I'm going to put the screwdriver between the clip and a rag and pry out on the clip tool. You can hear it pop the clip out and I'll just repeat that. I usually try and get the first four on the back side and once you get those, then you can usually work your hand underneath to a point where you can feel where the clip is, and then pull firmly, and you'll release the clips. If your door panel has never been removed before, you'll need to remove the water shield from the door panel. There's a black clip, you can see there, that I'm trying to pry out. There are usually three or four of these on each panel, so you try and pull the clips out, or you can pull on the water shield and either pull the clip out of the same time or pull the water shield from around clip. Again, there's usually three or four of these on each panel. If your door panel has already been off though, a lot of times, they've already been removed. Now, pull the door panel up and out, and it's connected with the door handle cable. Looking in behind, there are couple of tabs that hold the handle cable in to the clip. Release the tabs, and then you can pull the cable out, and then out in the ball like that, and your door panel is separated.
Carefully pull your water shield back, and be careful not to rip or tear it. You'll want to pull it down far enough so that you can reach up in there to access the bolts, as well as sometimes you'll drop a bolt, so you want to be able to reach down into the bottom of the door just to recover anything if you need to. It's held on by two 10mm bolts, so you can see through the hole. There was one there where the arrow points, and then, moving back, there's a plug that covers this hole. Once you take the plug off, you can see the bolt right there, 10mm socket ratchet and extension, and you look in there and remove those two bolts. Now, the front one on my handle is broken, so you're going to see later I try and get it out there, but then I realize that the bolt is just spinning. I'll take the rear one out. Then you can reach right up there and grab a hold of those bolts so they don't fall down.
To remove the handle, you pull it forward a little bit, and you pull the handle out so it comes down and out. Then you just twist it up and off the rod, moving it back and forth, and then angle it up and off the rod. Like I said, the front one on mine, the plastic had broken, so I'm just going to grab hold of the plastic, pull it off the nut, and it's out. On the driver side, you'll run into a little bit of a difference here. Everything up to this point is pretty much the same, but basically on the driver side, the lock cylinder is connected to another rod. You can see that red clip, and you see that rod just popped out of there. It doesn't usually happen that way, but what you can do is if you can get a little screwdriver in there, you can remove that rod from that clip. The other thing that you can do is if you can't get the rod out of the clip, there is a clip that holds the lock cylinder in place, and I just removed the handle the same way.
I'm just showing you if the handle, if your rod's still stuck in there, the clip that I'm removing right now, you can get a pick in there while the handle is still in the door. You get a pick in there and pull the clip off that I'm pulling off right now. Once you pull that clip off, if you pull it off with a pick while the handle is still on the door, then you can slide the lock out and get the handle off.
The original handle on top, our new handle from 1A Auto on the bottom just with the plastic on it. All the armatures is the same and the mounting points are all the same. It's going to fit just like the original.
Install the new handle. To avoid fingerprints, I left the plastic on there, but I make sure I pull it from the mounting surface and then down onto the door latch rod and twist it into place. Then you have to just push the rod down a little bit and put the handle into place. Then, there's a hook more towards the rear that you want to hook in and then slide it back, and you might need to give it a little tap just to get it into place. Now, you can reach in and start the two 10mm bolts that hold the handle in place. 10mm socket and ratchet with extension, and tighten up those two 10mm bolts. Be careful not to over tighten as you could break the handle again. Then put your water shield back in place, and then run a little test to make sure your door is unlocked, close the door and open, and you can that protective plastic.
To reinstall, there are two larger clips at the bottom that you put into the door, and it will support the door panel while you reinstall the cable. Insert the ball of the cable into the handle, and then move it around and clip it into place. Make sure that you pull up all the harnesses through the opening. Then you lift the door panel up and push it back and down onto the window ledge clip. The entire top of the door goes in the clip, and then once you have the window ledge secured, then lock in the clips all the way around. Make sure you pull the door lock up and put the door lock knob back in. Slide it down on there, and then push the clip. Put the mirror insulator back in place. I like to load bolts into the socket and then put them into place. I'll just fast-forward here as I put all three of them in and tighten them up. Put the triangle back in place, the panel behind the door handle, and the panel behind the door pull. All the harnesses are color-coded and they only plug in one way. Re-plug those in, and then put the switch panel back in place. Reconnect your battery, then you should be all good to go. Put the negative battery cable back on the post, and 10mm socket and ratchet, and extension, and tighten it up.
Thanks for tuning in. We hope this video helped you out. Next time you need parts for your car, please visit 1AAuto.com. Also check out our other helpful how-to and diagnosis videos.
Tools used
Hi, I'm Mike from 1A Auto. We've been selling auto parts for over 30 years. We're dedicated to delivering quality auto parts, expert customer service, fast and free shipping, all backed by our 100% satisfaction guarantee. Visit us at 1AAuto.com, your trusted source for quality auto parts.
I'm just going to hit the dome lamp override switch to shut off dome lights, just so we don't run the battery down. Open up your door, and using small flat blade screwdriver or a small trim tool, remove a couple panels: one in behind your door handle—just twist lightly and pull that out; there's one right back in here, right in the middle—pull out and off; then the door lock knob, pull up on it lightly, and try and pry this center clip out at same time. Comes up and off. If you have good fingernails sometimes you can just pull up and off on that. You could also use a trim tool available on 1aauto.com. Put it underneath, pull straight up, make sure you pull up on the front. Somebody was not that careful on this one, and you can see they actually broke off the tab from the trim. Then you'll want to disconnect your power window switch, just a little tab here. Pull and disconnect. Then we'll remove three 10 millimeter bolts: one here and then two down underneath where your door pull is. 10 millimeter bolts, remove them with a 10 millimeter socket ratchet and extension. A lot of times these ones won't come all the way out, and that's okay. You can retrieve them when you get the door panel all the way off.
You'll want to use a trim tool. Once you get in there, you can see in behind there and see where the clips are. Got one here, roughly here and here. Pull out firmly, and work your way around. Then my bolts have popped out here, so I'll make sure I collect those. Once I'm sure I'm all the way around, lift up, and out. Then on here there's a couple of little tabs. I'm going to push the tab, pull out a little bit, twist it around, push the other tab. Push that through and out, and my door panel comes out. You can see there's actually clips on the padding here. It's still clipped on in a couple of spots. Just push those off.
Okay, we're going to remove the outer rear door handle on the Suburban. You could probably do it by just folding this vapor barrier down and getting in here, but we're going to pull it back so that we can make sure you can see it. To pull this vapor barrier off, it's got some butyl tape on here. Sometimes it'll peel off real easily. If it doesn't, I've got a razor blade here to help just cut it off a little bit. There you go. Put this aside so it doesn't get destroyed. Going to remove this rubber grommet with a plastic prying tool. Take our 10 millimeter socket. We remove this bolt that is holding on the door handle. I've got it loose. I'm going to try to take it out without dropping it inside the door panel. There we go.
Now we're going to remove the other bolt that is holding on the door handle. Inch in through here. All right, we've got this one loose. Oh, that one fell in. It landed on the door bar here. Before you take the door handle off, you've got to remove or unhook the clip that's on the actuator here. It's this yellow-ish, orange looking clip. Cut a little tab. Take a small, flat bladed screwdriver. Push open. It'll pop off. Now we can go to the outside of the door to remove the door handle. With the bolts and the door lock actuator rod removed, you're going to slide this handle forward. Then we're going to work it out of the door panel. It's going to come with the rod. That's how you remove the handle.
We're just going to clean this up a little bit before we install the handle back. Okay, so you take your actuator rod, you're going to feed it into the door opening. Do a little bit of maneuvering. Might have to open the handle because it'll move. Because it'll move this piece, it'll help you install it. There's some locating pins you're going to find. That's installed from the front. Now we need to put the bolts in and reconnect the actuator rod.
You need to reconnect the actuator rod because it's a little yellow clip. Kind of get it straight up and down. Press the rod in there, and then if you just sort of roll it up and over, it'll clip in. Kind of put a little bit of blue tape on this bolt to help hold it to the socket so I don't drop it. Go through this hole here. Sort of very gently thread this in. This is just a metal insert going into the plastic door handle. You don't want to over tighten these. You can break the door handle. Just as you feel them get tight. Install the second bolt. Just as it gets tight, stop because you don't want to break it. Reinstall the grommet. Now that we're all set working inside the door, we can reinstall the water vapor barrier. Just going to feed the wires through. Sort of find the general area as where it was. The butyl tape on there was still pretty sticky, so just kind of push it back down.
You have these longer, larger basically kind of teeth that hook into the square holes down there. Preliminary line everything up. Just make sure your harness goes up and through, and then reconnect your door handle cable in. and pull it out, push it in.
Again, just make sure that that harness is up through. You want this groove to go into the channel here, so lift up. Lift up, push down, and make sure your door lock is up through, your harness is up through, and then you should be able to see it nice and close to the door. There's a large line of pin up here. Once everything is good it'll go in about that far away, and then you can just set all the pins. You just need a pair of pliers, reach in, bring your lock back up. Put your three 10 millimeter bolts back in. One here, and then these two, and load into your socket. If you put some tape or painters tape on it might help hold them in place. I'll just put those in place. Reconnect the switch, feed the harness down in, and make sure you put this in correctly. Then your three pieces of trim, the one in behind the door handle, snap it in place. This one can just go down in place. This one make sure that the little tab is out. Put it down on, lock into place. That's all set.
Thanks for watching. Visit us at 1AAuto.com for quality auto parts, fast and free shipping, and the best customer service in the industry.

DHA36357
