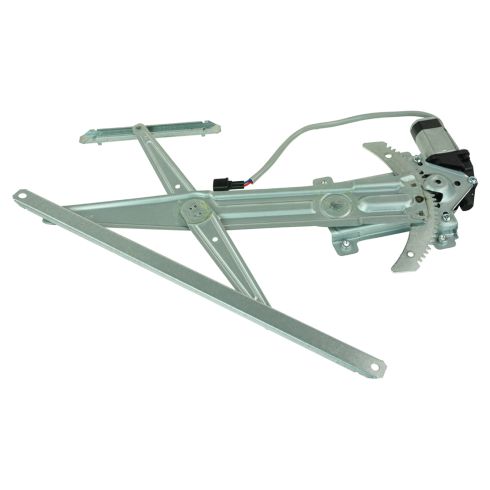
1AWRG01304-Chevrolet GMC Isuzu Front Driver Side Power Power Window Motor & Regulator Assembly TRQ WRA51948

Replaces
2007 Isuzu i-370 Front Driver Side Power Power Window Motor & Regulator Assembly TRQ WRA51948

Product Reviews
Loading reviews
4.71/ 5.0
28
28 reviews
Colorado window regulator
July 12, 2017
I'm happy that I now can open my window thanks to 1A auto good quality , good price and fast derevery . Did expect I have it the next day.
perfect
July 18, 2017
Effect fit to truck. Extremely fast delivery. Well satisfied
Wanted to say you guys are awesome
August 4, 2017
I Wanted to say thank you for your prompt delivery of my window regulator for my 2007 Chevy Colorado. I had it within about a week. This is about the third or fourth thing I have ordered and received on a quick timely manor. I'll continue to order my posts from you all in the future.
Sincerely Ronald Johnson Sr
Perfect
August 12, 2017
Watched there video, ordered the regulator, 1 hour and 15 minutes later it was done. Worked perfectly, I'm a happy man
January 6, 2018
Got good works good slight difference from original easy to install
Simple fast and easy
May 13, 2018
Just installed a window regulator and motor It was pretty simple and inexpensive. Im impressed with 1aauto. Good job 1a
Windo regulator
July 16, 2018
Product came quickly. Only issue was one of the studs on the assembly actually came as a threaded hole. Not a problem, just took a screw off the old unit and used it.
Best parts best price
August 14, 2018
The part was easy to put on with there online instructional video and it works like great just cost half the price compared to a dealer or parts house thanks 1 a auto
Works like a charm
August 17, 2018
Service was great video helped a ton could not be happier window did not work for two years did it myself with your help thanks a lot Dave Gibson
Window regulator
August 31, 2018
Ez to install works perfect excellent on line videos. Will be back
My automatic window repair.
October 21, 2018
My son and I ordered a power window regulator to replace the one in his truck. We watched the 1aauto instructional video and went to work. We took the door apart, removed the old regulator, and installed the new one. We tested the new one and it worked perfectly. We reassembled the door and everything runs smoothly. The replacement part and the video helped us have the confidence to take on the project. I thank you 1aauto for the outstanding part and video. But more importantly, I thank you for the time my son and I got to have completing this project successfully !!
easy to work with
November 8, 2018
The part fit perfectly, but what makes this a five-star review is that 1A sent over a youtube tutorial on how to replace this myself. Having someone walk me through step by step was invaluable. I will use 1A for all of my auto needs going forward.
Perfect
January 4, 2019
Perfect fit, perfect price, and it works perfectly. Prompt shipping. I am as so pleased to have a working window again. Now I kick myself for putting it off. Installation video showed exactly how to do it, and it was easy. Thanks!
Great, heavy duty parts, easy installation help, and quick delivery
January 9, 2019
I was very satisfied with the window regulator and the overall performance of 1A Auto. I was able to watch a video with the link that was sent with my part to show me how to disassemble the old part and assemble the new part. Delivery was very quick. Got my part in before the rain came just like I had hoped for. Also the part I ordered for 1A Auto was cheaper than what I would have had to pay at any local auto parts store and any other website. Thanks 1A Auto for helping me in a time of need!
Installed and works great
May 1, 2019
I installed this on a 05 Chev Colorado. The install was easy and it works great. Needed one bolt as the original had a bolt attached to the regulator and the after market does not. No big deal. It came packaged nicely and all parts were intact.
May 1, 2019
Part fit perfect,would reccomend this wind regulator to anyone needing to replace one
May 8, 2019
It came when they said the box was not damage,the part was in great condition I would use 1A auto again
Bad part
June 21, 2019
The regulator gear broke off after a month.The spot welds didnt hold up.Would not buy again.
Window guide and new motor and door handle for Colorado PU
August 5, 2019
All the parts came in when expected for a good price and all were just what i ordered.
was just what i needed
March 26, 2021
was easy to put in if i had to but again i would from you
January 19, 2022
Works good
Easier than I thought.
August 17, 2022
Went to the dealer and received a seven hundred dollar plus figure to replace my window regulator for my electric window on my 2005 GMC Canyon.
Contacted 1A Auto and received the correct part and how to install video. Seventy five dollars for the part and a hour of my amateur labor and Im good to go.
Smooth operator
October 10, 2022
Simple to replace, was concerned about compatibility because it was missing the spring the original came with. Replacement was simple, just a few bolts to remove. Total time to replace was about thirty minutes.
Perfect part, easy installation
December 8, 2022
This was way easier then expected.
The video made by 1a was on point.
The part was right and fit perfectly.
Thanks for saving me hundreds!!! 1A Auto!!!
December 29, 2022
Fits like a glove.
Slightly different from OEM but got the job done
August 15, 2023
I have a 2004 crew cab Chevrolet Colorado. The driver window was getting stuck in places and I had to push or pull on the window while pressing the window switch to get it moving again. Thankfully 1AAuto had a replacement part and a great how-to video to install it. I'm not really mechanically savvy but with the video, installation was simple and <1 hour.
As to the part itself, it had some variances to what I replaced - there was a spring/coil on the original but not on the part I got. I guess it wasn't needed because it still works fine. Also, the original had 1 of the four mounting bolts fixed. The replacement part didn't take that into account so I luckily found a bolt in my possession that worked fine
March 17, 2024
Everything worked good but came with no hardware
August 13, 2024
It was very good
Customer Q&A
Will this work on 06 chevy colorado?
April 21, 2018
Isuzu is a registered trademark of Isuzu Motors Ltd. 1A Auto is not affiliated with or sponsored by Isuzu or Isuzu Motors Ltd.
See all trademarks.


