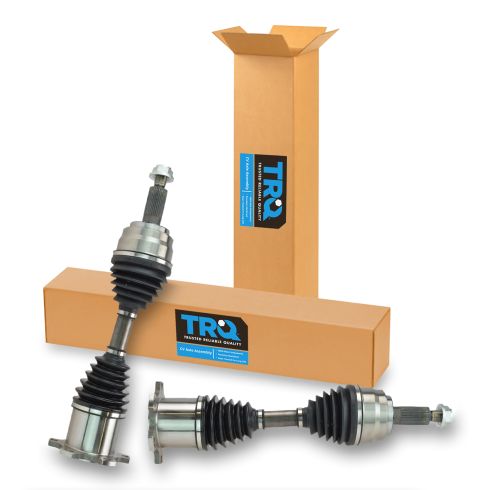
1AACS00088-Ford Lincoln Front Driver & Passenger Side 2 Piece CV Axle Assembly Set TRQ CSA82453


Replaces
2001 Ford Expedition Front Driver & Passenger Side 2 Piece CV Axle Assembly Set TRQ CSA82453


Product Reviews
Loading reviews
3.92/ 5.0
24
24 reviews
Excellent
April 1, 2017
I used to have some vibration in the front end..but now I don't,my truck runs smoothly, the part looks nice, so far so good
CV axles
September 19, 2017
It's a little to tell yet since they were just installed the other day, however since being installed they appear to be working great, smoother ride than before..
All parts fit
October 19, 2017
Parts were shipped Wii key and presented no installation problems
Packaging Issues
October 20, 2017
The packaging for these CV axles was terrible. They arrived split open and looking like they got run over by a truck, luckily the damage to them was cosmetic and I was able to use them. Better packaging for large heavy items would be great.
Christmas gift
December 26, 2017
I received these as a Christmas gift, but have not had time to install them... They arrived according to schedule.
Cv Axle
February 7, 2019
The axels fit perfectly, replaced on my 2003 F150 trick with
260000 miles on it. The quality looks excelent. They arrived in good condition and on time. Thank you.
CV Axle
May 15, 2019
Had put this off for years due to installed price quoted and was unable to use 4WD on my 99 F150 but after finding great price here thought I'd tackle it myself after watching the video.
After removing the original part laid it side by side with new part and freaked out when I noticed missing hole for cotter pin and 3/4" too long. Called CS and Sean said part shipped seemed right so he promptly sent me instruction for quality review. Got a call within an hour from Ian in quality explaining that missing hole is a design change where lock-nut obsoleted need for cotter pin & explained that length is reduced when compressed. Finished job on schedule, passed test drive.
Great service guys! Thanks Sean & Ian.
Axles work well
June 17, 2019
Front drive axle installed very well,took care of my binding problem
Recieved with axle grease all over due to cap not secured!
December 15, 2019
Recieved with axle grease all over due to cap not secured! It was a huge mess. The box was longer than the axle itself so it left an 8 in gap inside that allowed the product to shift back and forth thru shipping and being the product was not secured. The silver cap that holds all the grease in the axle was all over and was a huge pain to clean up and wasted valuable time. I left an email to 1A but no credit for my time loss or any response. I had to tap the cover into the axle and secure what was left in the axle. Other wise it was a perfect fit.
2nd times the charm
June 23, 2020
I bought some cheaper version trying to save money and ended up having to replace them in less than a year. Bought these and they seem to be higher quality and look to fit much better. So far they are working great!
F150 Front CV'S
August 11, 2020
Ordered my CV axles and they fit correctly. With no problems installing everything lined up correctly. Would recommend your parts and ordering from you for any other parts I need. Highly pleased. Thank you for the quick delivery as I was able to get my truck back on the road timely manner.
September 30, 2020
parts arrive quickly. Everything went on without much hassle. I would recommend and will use 1a auto
Nice replacement parts at a very good price, compared to the dealer.
January 4, 2021
I ordered these replacement axles along with replacement bearing/hub assemblies for my 1998 expedition. I wasn't sure I needed to replace them until I compared the originals with the new. I was afraid the new CV axles would be too long, and had to raise the steering knuckle to get them to rotate properly until I got all the bolts tight. Massive savings on the job, and I was able to do something I enjoy, without needing help. Have only driven about 25 miles, but all feels good.
Horrible quality
January 8, 2021
Installed these with brand new suspension components to go along with them, as soon as I took the truck for a test drive, MASSIVE vibration front these cheaply made axles. My truck is now inoperable and Im out 170$! Extremely disappointed. Also, the package came covered in grease from the cap not being sealed. Cheap junk
My go to company for F150 Parts
October 24, 2021
1A Auto products are top notch! Service and shipping is the best ?????? Had two axles shipped and one of the Axles shipped had the grease seal that mounts to the 4WD differential popped open. Contacted customer service and a replacement was shipped and delivered in 3 days.
Thank you so much 1A Auto for being a great company to order from!
I plan on ordering many more parts from you??????
Terrible Quality
November 15, 2022
Like a couple of the other reviews mentioned, these CV axles both arrived with the inner housing end caps pulled off and axle grease all over the inside of the packaging. Also, some of the ball bearings that are supposed to be inside the inner housing had also come loose and were floating in the packaging. I ordered these a week before I planned to replaced them. They arrived in plenty of time, but I still ended up having to go to the local auto parts store and buy different ones anyway.
May 24, 2023
Neither one of the shafts had a hole drilled in it for the castle nut cotter pin, and one of them had the grease cap come out during shipping that holds all the grease in the flange end, i tried to reassemble it but had no luck, instead i had to go to the local parts house and buy two shafts there so i could get the front end back together that day wasnt to happy since i had already put the one shaft on before i noticed there was no cotter pin hole
No holes
[{"url": "https://images.turnto.com/media/pNISJll75W64CYGsite/8b244e3b6b3cd02702e3fb5fe60d692d_1685498894336_0.jpeg", "caption": "No cotter pin hole"}]
May 30, 2023
No hole drilled for the cotter pin in both CV axles! I guess I'll have to check torque every 20,000 miles
January 23, 2024
Easy ordering online. Quick delivery and Quality parts. Will do business again.
Would recommend to anyone.
March 28, 2024
awesome, reliable, fast service.
Very nice and very helpful
March 31, 2024
I bought the front axles and bearings for my f150 heavy half ton pickup now they came quickly but in putting them on the truck next weekend I'll update this a.s.a.p.
Do not buy
August 5, 2024
Very poor quality then costumer service gives you a hard time to get a replacement
Cv Axles
September 18, 2024
Bought for 1997 f150. Installed and vibration everywhere. Was nervous to even drive. Bought beefy cv axles from another place now back to normal. Skip on these. Out couple hundred bucks for the mistake
CV Axle F150
March 4, 2025
Great packaging and ease of install. However, no machine drilled hole for my hub bolt. So just have to tq it massive per specs.
Customer Q&A
What is the gear ratio for these?
March 23, 2018
10
40-41 teeth on new gears ratios. A1 auto provided great customer services well knowledge staff will recommend them anytime to get it done right and at an affordable cost. My personal experience with A1 auto has been the greatest. Good luck.
March 23, 2018
Jose M
Will this fit the expy Eddie Bauer version? 2001 5.4L v8
March 25, 2018
Does it come with abs ring?
January 2, 2020
10
Thank you for your inquiry. This part does come with the tone ring.
January 3, 2020
Christa R
10
For these applications, the ABS sensor is built into the wheel hub bearing assembly, so there is no ABS ring on the CV axle.
January 3, 2020
Daniel F
10
no it does not
January 11, 2020
Jerry S
What is the compressed length of the axle?
March 9, 2022
10
Actual Measurements are not listed or available. Our parts are exact replacements for your vehicle's OEM parts. As long as your year, make, and model match up with our listing, these parts will directly fit and function like the originals.
March 10, 2022
Cristina P
Are these a Rzeppa or tripod type cv joint ?
April 1, 2022
10
Those specifications are not available. Our parts are exact replacements for your vehicle's OEM parts. As long as your year, make, and model match up with our listing, these parts will directly fit and function like the originals.
April 1, 2022
T I
what is difference on cv axle 4 wheel drive and regjular cv axle?
April 1, 2022
10
An axle is an axle, regardless of drive type. If you can provide us with your full year, make, model and drivetrain we can see if these are correct for you!
April 1, 2022
T I
Will this fit a Lincoln Navigator 2001 2wd ?
April 7, 2022
10
Yes, this part will fit your vehicle.
April 7, 2022
Ricale A
Does this fit the new body style 1997 f150?
April 11, 2023
10
This kit is listed to fit all 1997 Ford F150 models.
April 11, 2023
Jessica D
I have an 03F154 wheel drive with a 2 inch lift.Will They still work?
November 3, 2024
10
They worked with my 4in so I dont see why they wouldnt
November 4, 2024
Brayden B
10
These parts are not compatible with vehicles that have been modified with a lift.
November 4, 2024
Jessica D
Ford is a registered trademark of Ford Motor Company. 1A Auto is not affiliated with or sponsored by Ford or Ford Motor Company.
See all trademarks.


