
How to Fix Tow Haul Mode Button 2001-06 GMC Sierra
Created on: 2011-06-23
Watch this video to learn how to replace the tow mode button on your 99-02 GMC Sierra and other GM trucks.
-
step 1 :Remove the upper and lower dash panels
- Pull the upper trim plate off.
- Turn the key on and put the car into drive to tilt the steering column down.
- Shut the car off and remove the panel the rest of the way.
- Unbolt the 7 mm bolts anchoring the lower trim panel.
- Tilt the steering column back up.
-
step 2 :Remove the steering column cover
- Remove the two T20 Torx screws on the bottom steering column cover.
- Pull the tilt lever out and remove the bottom steering column cover.
-
step 3 :Remove the shifter lever
- Insert the tilt lever and lower the steering column.
- Remove the rubber boot around the shifter.
- Use a T27 Torx driver to unbolt the shifter.
- Tilt the steering column back up.
-
step 4 :Remove the tow haul button lead
- Use a flat blade screwdriver to pry up the clips that secure the wiring for the tow haul mode button.
- With a utility knife, remove the zip tie securing the wiring.
- Use a flat blade screwdriver to help disconnect the orange tow haul mode button lead.
-
step 5 :Install the new shift lever and tow haul mode lead
- Bolt the lever in with your T27 Torx driver
- Connect the lead.
- Wrap the vulnerable places in the lead with a Velcro wire cover.
- Zip tie the wiring back together nice and tidy.
-
step 6 :Replace the steering column cover and lower and upper dash panels.
- Replace the rubber seal around the shift lever.
- Put the upper steering column cover into place.
- Clip it to the lower steering column cover and secure the T20 Torx screws.
- Replace the lower dash panel and secure with two 7 mm bolts.
- Clip the upper dash panel back onto the vehicle.
Tools needed
-
Razor Blade / Gasket Scraper
Flat Blade Screwdriver
T27 Torx Driver
T20 Driver
Phillips Head Screwdriver
7mm Socket
Ratchet
Brought to you by 1AAuto.com, your source for quality replacement parts and the best service on the internet. Hi I'm mike Green. I'm one of the owners of 1A Auto. I want to help you save time and money repairing and maintaining you vehicle. I'm going to use my twenty plus years' experience restoring and repairing cars like this to show you the correct way to install parts from 1AAuto.com. The right parts, installed correctly. That's going to save you time and money. Thank you and enjoy the video.
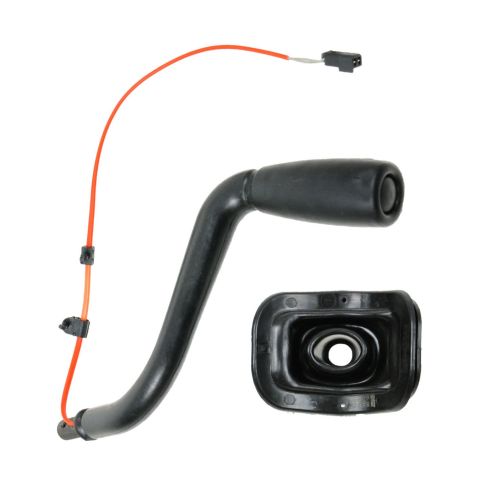
In this video we're going to show you how to remove and replace the shift lever which contains the tow haul button on this 2002 GMC Sierra. This process is basically the same from any '99 to '02 with this body style either truck or SUV. It's also similar for the '03 to '07 but taking the dash apart might be a little bit different on those vehicles. This is a common problem. Actually the wire severs as you'll - Tools you'll need are a 7 millimeter socket and ratchet or even a 7 millimeter wrench, T20 and T27 Torx drivers, a flat blade screwdriver, and a utility knife.
I apologize starting off like this. I didn't film this very well. You want to pull your upper trim plate off which you just pull off at the top. You hear me start the vehicle. Start the key on. Put your shifter down to the drive position. Tilt your wheel down and then that whole trim panel just comes right up and off. OK so you can see I've got my brake controller hanging down. Not everybody's truck's going to have a brake controller but pull it down so you can access a screw there and then one right over here next to the parking brake lever. Now here we'll speed it up and just remove those. Those are 7 millimeter bolts so you'll need either a 7 millimeter socket with a driver or a socket with a ratchet. Actually you could even use a 7 millimeter wrench as well. Now you just pull that panel right off, put it aside and then you're going to tilt the steering wheel back up for the next step. Now, once you have that apart you want to take off your bottom steering column cover and I believe there show be some T probably 20 torque screws. One up in there and then one up in there. They seem to be missing on this truck. Anyways. You can just grab a hold of this tilt lever and give it a good pull. It pulls out.
Once that tilt lever's down you can kind of push the bottom of your cover down and pull it out. Here's my new part with the orange wire. Looking under here, here's an orange wire that seems to be going nowhere. Next, what I'm going to do is, I'm going to put my tilt level back in and then tilt my wheel down. OK, then now looking up over my shifter here I can pull this boot out of the steering column cover. You'll have an easier time here if you turn the key on and move the shifter down. Up over the shifter. You can see here I have a Torx screw holding the shifter in. Now I'm using a T27 Torx bit with a driver and extension. Just remove that Torx screw. OK. Pull my shift lever out. You can see sure enough, the wire is just severed. Put my steering column back up. What I'm going to do here now is just pry out these little clips that hold the wire. There's one right here as well. Just make sure that your new wire comes with these clips in it before you pry them out. Now I'm going to use a utility knife to cut the wire tie that's around the little black wire protector. Do it very carefully. Make sure not to cut yourself and also be sure not to cut any of the wires. Now you can work your fingers in there and that black mesh wire cover just kind of Velcro's together. Just work your fingers in there and pull that wire loom out.
OK so now I fished it out and here's my connection right here. You can see the little gray tab on one side. Opposite of that you want to insert the screwdriver which pries up on a tab. I pull my wire through this wire tie here. Just actually going to do this. OK. Here's my new lever. You're going to put your new one on. Just put it through your shift boot here. I'm just going to put it - I've just got my new lever in place. I don't have it bolted in yet but I have routed the new wire. I'm just going to take a look here. Just want to see what this wire does. I believe it broke right here. That's where it's susceptible. What I've done so far down here is took this little wrap out. This little Velcro. Just have to fold it over onto itself. Then I put my lead in here. Should be able to plug it right back in. OK. It's plugged back in. OK a good sign with the key on, look at the steering wheel here. Press the button. Oh and we get a tow haul mode. Yay.
Take the little sleeve, slide it right in under here. Wrap it around the best I can here. Use a wire tie just like whoever did it before me. I'm going to fast forward here as I work to put the lower steering column cover on. You can see I kind of mess with it. Even in fast motion I'm kind of messing with it for a little while. It's not difficult, it's just a matter of getting all the - There's four pins that go up in on the corners. Just making sure everything goes together correctly and then snap it together. Now, if you have these screws, put them in. This truck, like I said, is missing them. I'll put that in. I'm going to speed up here as I basically just put the dash back together. Put the lower panel back on. Check the shift boot, make sure it's still in place correctly. Then put that upper panel back on and snap it into place. Then put the two 7 millimeter bolts at the bottom of the lower panel.
OK, this may be a little out of order but at the end just put that T27 screw into the top of your shifter so it holds it on to the steering column. We hope this helps you out. Brought to you by www.1AAuto.com, your source for quality replacement parts and the best service on the internet. Please feel free to call us toll free. 888-844-3393. We're the company that's here for you on the internet and in person.
Shop Products

How to Replace Shifter Knob 2003-13 Volvo XC90
Check out this video to learn how to replace the dingy old shifter knob on your 03-13 Volvo XC 90!
