How to Remove Broken Camshaft Position Sensor 2007-13 Chevy Silverado
Created on: 2019-07-04
How to repair, install, fix, change or replace a broken, worn out, or damaged camshaft position sensor on 07, 08, 09, 10, 11, 12, 13 Chevy Silverado
-
step 1 :Things to Try
- Grab the sensor with pliers
- Pry the sensor with a pick or pry bar
- Drill into the sensor (be careful not to drill too deep)
- Heat the area
- Drive a screw into the sensor and pry or hammer it out
Tools needed
-
Hammer
Rust Penetrant
Pry Bar
Slide Hammer
Drill
Pliers
Hi, I'm Mike from 1A Auto. We've been selling auto parts for over 30 years.
What's up, guys? I'm Andy from 1A Auto. In this video I'm going to show you how we took out a broken cam sensor out of this 2008 Chevy Silverado. If you need any parts for your vehicle, click the link in the description and head over to 1AAuto.com.
Now that the sensor broke, I'm just going to try to twist this completely around.
I'm going to try to use some locking pliers. Let's rock it back and forth. Now this piece broke off.
Okay, so most of that broke, which isn't good. I can take this metal cover off here. Just slip that out of my way. There is an O ring right here, and what happens is the engine block gets corroded and causes corrosion in there and that's why it's stuck in there. I'm going to use two picks. I'll just slide one under here, just to hold the O ring. Take the O ring off with the other one. Get that O ring off.
I'm just going to spray a little more rust penetrant in there. I'm going to try and get under where the O ring was. I'll just try to pry out. I'm going to take a couple of pry bars and try to get under where the O ring was and just pry out. Now if there wasn't so much oil in this area, I would try to heat it up with a torch. But there's a lot of oil that is leaking out of this engine.
Oh, at this point I'm going to try using a heat gun and heat up the area. It's a little bit safer than using a torch, although you still got to be cautious. So I'll just try to heat this area up.
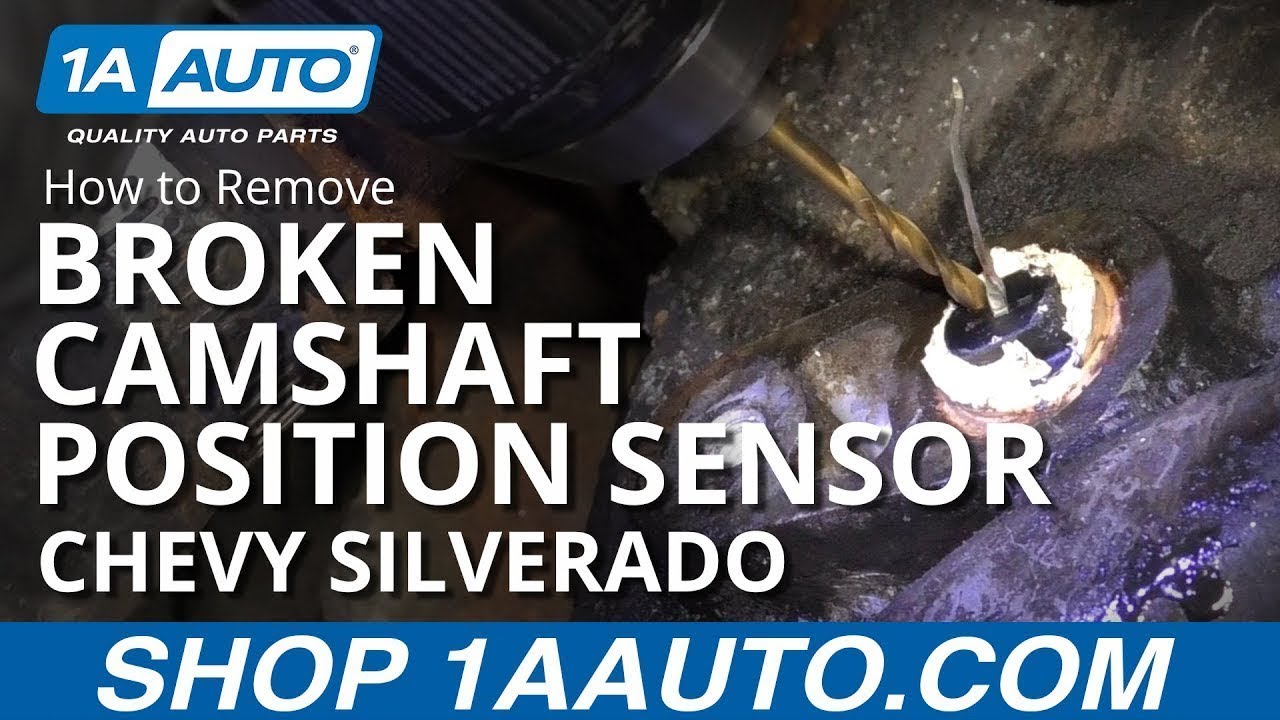
I'll use this smaller locking pliers. See if I can get it to wiggle at all. I'm going to try and take a drill bit and I'm going to drill into the sensor. You don't want to drill too deep, and you don't want to go too close to the sides. Drilling into the sensor. Drill this hole little bit bigger.
You don't want to drill too far. We don't want to hit the reluctor wheel that the sensor picks up. All right, now I'm going to find a screw that works. If you have a wood screw that would work, or this happens to be a masonry screw. We're just going to tighten this up.
That's pretty good. I'm going to need something to pry, to try to pry the sensor out. This just happens to be a trim tool. It's going to get in there and just try to pry it out. I'm just going to use a pry bar. I'm just going to use a socket so I have some leverage. Get underneath here.
Just trying to pry it out. I'm just going to try tapping this in a little bit. I don't want to tap it all the way in. Just tap it a little bit. Okay. Let's move in a little bit when I tap it in. All right. So the reason why it's stuck in there, there's a lot of rust buildup on the sensor, not on the sensor itself, but the corrosion built up on the case. So I'm just going to take a wire brush, try to get some of it off. I'm not going to get all of it off, but try to get some of it. All right.
So I'm going to try this trim tool, just pry it out a little bit as I try to spin it. So I'm going to take this little slide hammer. I actually made this little slide hammer. If you have one you can use it or you can make one too. You just took some threaded rod and some nuts and sockets. I'm going to try to hammer this sensor out.
Just spray a little more rust penetrant. All right, so I modified my slide hammer slightly. Just added a little more length to this so that I can pinch on this bolt, so it's a little more stable. And I added a little more weight to the slide itself.
Let me try again. I'm just going to tap it in a little bit.
Trying to get it out again. here, I'm just going to try to heat up the metal with the heat gun.
Let's try.
All right. So I took the part of the slide hammer apart because it's really not working too well. Just modified this so that I can get a hammer and just tap right here. See if this works. Hard to get an angle right here.
So we're going to try something different. A couple of our other attempts hadn't worked so we're probably on plan F or Q or Z at this point. So we just modified a wrench and we're going to see if we can pull this out. Let's see what happens. All right. I'm going to give this a try. All right. I'm going to try another thing. I'm just going to tap it in a little bit. Let's spray a little more rust penetrant. All right.
You can try just taking this piece of aluminum right here. You can probably take a piece of wood. And I'm just going to try to pry it out this way. See if I can get anything. Oh, it's coming out. Look it. There we go. Got it.
So we many attempts to try to get this cam sensor out. Some were working better than others. In the end, we finally got it out. If you have any other ideas of how we could have gotten this out, leave a comment below. Maybe we'll use it next time. Thanks.
Thanks for watching. Visit us at 1AAuto.com for quality auto parts, fast and free shipping, and the best customer service in the industry.

How to Replace Distributor 1996-2000 Nissan Pathfinder
How to repair, install, fix, change or replace a bad or broken ignition distributor on 00 Nissan Pathfinder
