How to Remove Front Door Panel 2003-08 Honda Pilot
Created on: 2017-08-14
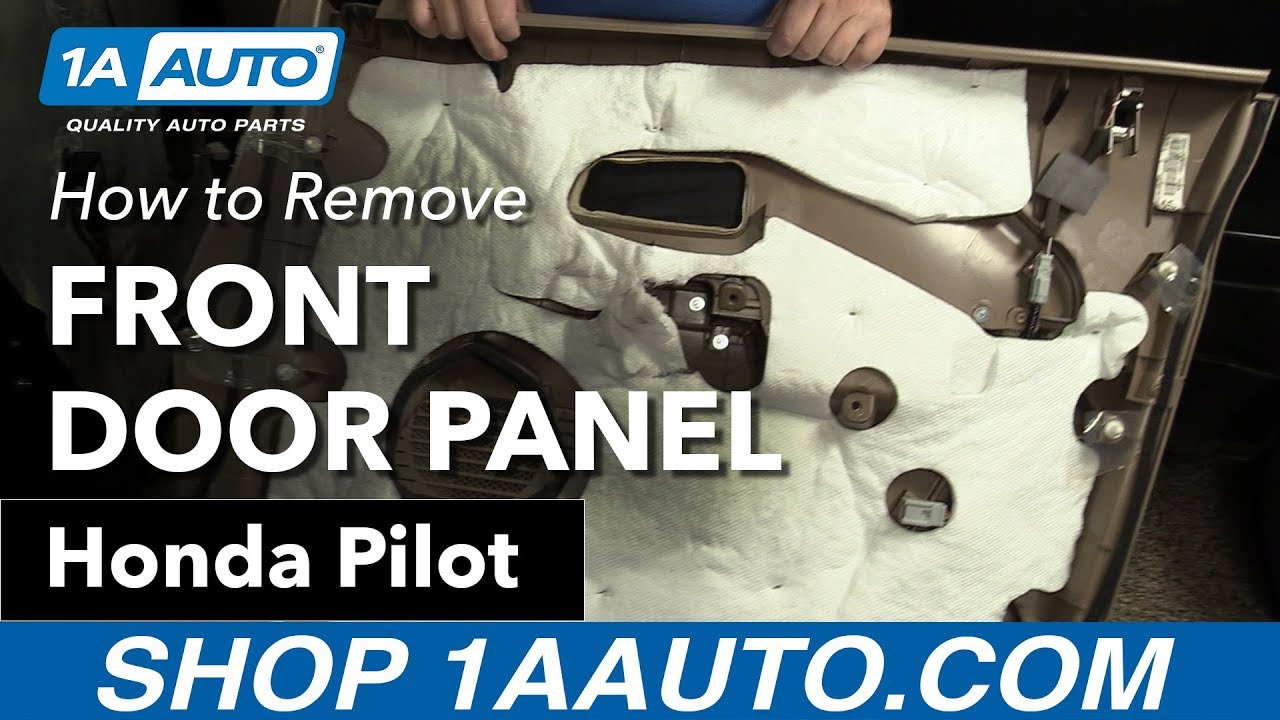
How to remove and reinstall the front door panel on 07 Honda Pilot.
-
step 1 :Removing the Door Panel
- Pry the master window switch up with a trim removal tool
- Disconnect the wiring harnesses
- Pry out the trim cover beneath the door handle
- Remove the two Phillips screws from the door handle
- Pry out the interior door handle
- Pry out the door lock rod
- Remove the interior door handle from the door panel
- Disconnect the wiring harness
- Remove the interior door handle
- Pry off the sail panel with a trim tool
- Remove the two Phillips head screws from around the door pull
- Pry out the clips around the door panel with a trim removal tool
- Unplug the light from the door panel
- Lift the door panel up and off
-
step 2 :Installing the Door Panel
- Connect the light to the door panel
- Align the clips with the slots on the door
- Press the door panel in
- Tighten the two Phillips head screws around the door pull
- Connect the wiring harness to the interior door handle
- Connect the door lock rod to the interior door handle
- Press the interior door handle into the panel
- Tighten the two Phillips screws to the interior door handle
- Press on the trim to the interior door handle
- Connect the wiring harnesses to the master switch panel
- Press the panel into the door panel
Tools needed
-
Flat Blade Screwdriver
Phillips Head Screwdriver
Trim Tool Set
To remove the master window switch from the door panel, use a plastic prying tool. You can get this from 1AAuto.com. Start by sliding the prying tool underneath the plastic, working it up. I'm going to take the other end and get over here. Just slide it out there. It has a hook on this end, that has to lift up and then come backwards. You can see the hook. Going to unplug the connectors and push the locks in. That's the lock on this end right here. Disconnect it from this lock and the connector and remove the master window switch.
Use a flat bladed screwdriver to remove the plastic trim cover on the inside of the door handle. Use a Phillips head screwdriver to remove the two screws behind the door handle. Hold the door handle open to access one of the screws. Let the door handle go and access the other screw. With the screws removed hold the door handle open, work it out of the trim panel. You have to push the material away from the switch. You now have to disconnect the control rod. Use a flat bladed screwdriver to pop it off of there just like that. That off, use the same screwdriver. We're going to pry it up and out. Our handle will lift out, you may have to ease it out one way. Disconnect the electrical connector, pushing the lock in. Door handle is removed.
To remove the trim panel above the door panel using a plastic trim tool. Remove the Phillips head screw that's on the top. With the Phillips head screws removed, I need to pop the door panel off of the clips. There's some clips around the outer edge and then lift it off of the edge of the door. So I'm going to use our plastic prying tool, work it underneath the edge. I'm actually going to use that plastic prying tool, these will all come in a set that you can get from 1AAuto.com, use our larger one. I need the smaller one to open up a gap there. Use the larger one and use it to pry against the door panel. Now I can lift it off of the edge of the door. I will feed these wires out of the back of the door panel, and then I'm going to unplug the door light. Door panel is removed.
The control unit is held in with two Phillips head screws. Remove the one on the top and the one on the bottom, and push the lock in on the connector and unplug it.
To reinstall it, plug it in, place it over the holes, and install our Phillips head screws.
Now bring our door panel back up, and reconnect the light. Going to feed the window switch harness into the door panel. Hang the top of our door on the door panel. Make sure you get the unlock and lock button into the slot here. Can be a little tricky. Sometimes you have to reach in with your hand and push it out. Just get it in there, and you can slide this over. It's going to hang on top of the door panel. Then start pushing the clips back in.
Reinstall the Phillips head screw to this bottom hole. Install the top Phillips head screw. These are just going in the plastic, as soon as I feel it get tight I'm just going to stop. Take your electrical connector, and plug it back into the door lock button. I'm going to slide this end in first and at the same time I'm going to reach my finger in and pull this control rod out. It may help to spin this clip in this direction. So I'm going to hold it out and so I've got the chrome door handle held open, I'm going to push the control rod into the grommet like that then I'm going to take my flat bladed screwdriver and just spin it around, 'cause there is a locking tab that'll go over it. Just like that so it's locked.
Now I can push the handle back into the door. Before we install the Phillips head screws for this door handle, stuff a rag in there in case you drop the screw. It doesn't go inside the door panel, going to open this door handle up. Install the second Phillips head screw. Pull your rag out. Take the trim panel—it's got two tabs on the top, a single tab on the bottom. The two tabs go at the top, slide in, click in.
To reinstall the window master switch, pull the harness out of here. This large plug goes in the back of it. Lock that in. Push these in til they snap—you'll hear them lock. This hook needs to go under this part of the door so I'm going to feed this in. Feed that in that way first. It's there—I just had to find where the clips go on the back.
Thanks for watching. Visit us at 1AAuto.com for quality auto parts, fast and free shipping, and the best customer service in the industry.

How to Change Engine Oil ANY Vehicle By Yourself BEST GUIDE
1A Auto shows the basic procedure for changing the oil on any vehicle.
