
How to Remove Front Door Panel 2004-10 Toyota Sienna
Created on: 2013-03-12
Watch this video to learn how to remove or replace a front door panel on your 2004-10 Toyota Sienna.
-
step 1 :Removing the Door Panel
- Pry off the trim piece at the front top corner of the door panel with a flat blade screwdriver
- Pull the door handle back and remove the inner door handle bezel
- Remove the two Phillips head screw inside the door pull
- Remove the Phillips head screw inside the door handle
- Remove the plug from the side of the panel with a Phillips screwdriver
- Pry up the door pull and window switch panel by hand
- Disconnect the window switch harnesses by pulling back on the plastic ears
- Remove the two Phillips screws from the door pull cup
- Remove the Phillips screw from the plastic beneath the cup
- Pull the door panel out firmly by gripping the lower part
- Lift the door panel up and off
- Disconnect the latch cables from the door handle
- Disconnect the courtesy light wiring harness
-
step 2 :Removing and Installing the Door Handle
- Pop the inside door handle out front first
- Push the back in first and push the new door handle in
-
step 3 :Reinstalling the Door Panel
- Connect the courtesy light wiring harness
- Connect the latch cables from the door handle
- Test the door handle lock
- Lift the door panel into place
- Push in the door panel clips
- Insert the Phillips screw from the plastic beneath the cup
- Insert the two Phillips screws from the door pull cup
- Insert the Phillips head screw inside the door handle
- Connect the window switch harnesses by pulling back on the plastic ears
- Push in the door pull and window switch panel by hand
- Insert the two Phillips head screw inside the door pull
- Press in the plug from the side of the panel by pressing the center
- Pull the door handle back and insert the inner door handle bezel
- Push in the trim piece at the front top corner of the door panel with a flat blade screwdriver
Tools needed
-
Flat Blade Screwdriver
Phillips Head Screwdriver
Brought to you by 1AAuto.com, your source for quality replacement parts and the best service on the Internet.
Hi, I'm Mike from 1A Auto. I hope this how-to video helps you out, and next time you need parts for your vehicle, think of 1AAuto.com. Thanks.
In this video, we're going to show you how to remove and reinstall the front door handle on this 2008 Toyota Sienna. The procedure generally should be the same for any 2004 to 2010. We show you on the driver side, but the passenger side has a similar procedure. The tools you'll need include a Phillips screwdriver and a small flat blade screwdriver.
This piece of plastic trim comes right off. You just have to pull it firmly at the top and it comes up and out. Then pull your inside door handle back, pry between the lock and this bezel, and that bezel comes right out. Now there are three screws to remove and they're all Phillips. One right in there, one down here, and then one here. Then you're going to pry out and use your Phillips screwdriver to get this plug out in the back here. I'm going to fast-forward as I remove those three Phillips screws. Then remove the small plug on the end. You need to pry it and pull it out a little bit. Then use the screwdriver to unscrew the small center plug, and then it should come out.
Then grab back here firmly. Work your fingernails underneath or your fingers underneath and pull up firm there. Then pull this back, up, and out. Your switch disconnects right here. Unplug this and there's a tab here. Push on the tab and pull back just on the plastic gears here.
I'll show you how this works. There's a well, it's already reset. This whole thing actually slides back. Once you take it apart make sure you pull this back as far as it will go. Now you see two Phillips screws right here. Remove those. This cup lifts up out of the way, and there's another Phillips screw right here. We'll remove that.
Now come down to the bottom here. Basically, grab this corner, and I'll lift up and out with this hand down here and this hand, nice and firm. This part comes up. There are two cables here; take them out of that pin there. Looking in behind here, it's a little hard to film, but you pull these cables out and they rotate and come up and out. There's one last connection right here. Press a little tab. Now, pretty simply, your inside door handle, let's see, it just pops out, front first and then the back.
Obviously, if you reinstall a new door handle, put the back in first and push it right in. Okay, reinstall the door panel. Let's connect our courtesy light first. Now, these cables pull them over and put them down in first, flip them around, and lock them in place. Down in first, lock them in place. Test, and make sure you hooked them up correctly. Get the door panel closer, and flip the cables into the little clip here.
First, make sure you push the panel against the window and slide it down into place. If it lines up there that's good. Go around the edge and set the clips back into place. Now, we can put it back together. This large screw was first. While I'm tightening that, just make sure that our window switch harness is up through, then this piece of trim next. Now put this screw in for the door handle.
Now you're going to reinstall this. Like I said before, make sure this is pulled all the way back, and the plug should go in. Put it in getting some pressure on the wires, and then push the whole cage right in and work the harness down in. Put the front in first, bring the rear down into place, and snap it in. Then it's just a matter of two more screws and trim cleat and a couple trim cleats.
This, just make sure you pull the center out most of the way, push it in, and push that to lock it into place. Then your trim panel. Put it in place, lock it in, and then this panel has got a tab right here. That goes and down and in, and push it in place.
We hope this video helps you out. Brought to you by www.1AAuto.com, your source for quality replacement parts and the best service on the Internet. Please feel free to call us toll-free, 888-844-3393. We're the company that's here for you on the Internet and in person.
Shop Products


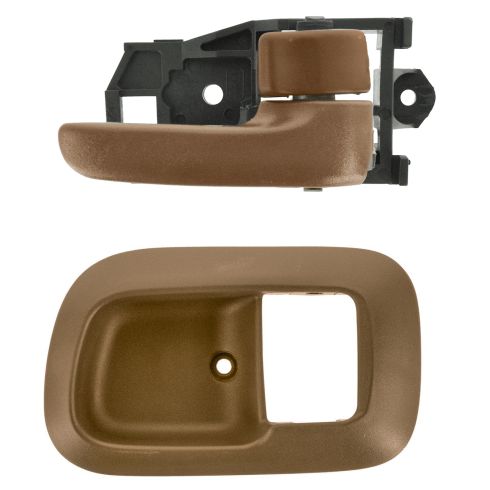
1998-03 Toyota Sienna Front Passenger Side Interior Door Handle & Bezel Kit TRQ DHA40810
Part Details:
- Oak Brown
- (1) Front Passenger Side Interior Door Handle
- (1) Front Passenger Side Interior Door Handle Bezel

How To Replace Rear Interior Door Handle 1997-2003 Chevy Malibu
Watch this video to learn how to replace an interior door handle. The experts at 1A Auto show how to replace a broken or snapped interior door handle on your 97-03 Chevy Malibu.
