
How to Replace Alternator 1998-2012 Ford Ranger 4-0L V6
Created on: 2016-08-19
Watch this video for detailed instructions on how to replace the alternator on your 98-12 Ford Ranger 4.0L V6.
-
step 1 :Disconnecting the Battery
- Locate and get familiar with the serpentine belt diagram
- Disconnect the negative terminal with a 10mm wrench
-
step 2 :Removing the Intake Tube
- Remove the Phillips head screws from the top of the throttle body cover
- Remove the 7mm bolt in the back of the throttle body cover
- Remove the engine cover
- Loosen the two intake tube hose clamps with a flat blade screwdriver
- Pry the intake tube off
-
step 3 :Removing the Serpentine Belt
- Familiarize yourself with the route of the serpentine belt
- Insert the 3/8 inch drive ratchet into the tensioner
- Turn the tensioner clockwise to loosen the belt
- Pull the belt off the alternator
- Release the tensioner
-
step 4 :Removing the Alternator
- Pull up and release the alternator connector with the help of a hooked pick
- Disconnect the exciter wire on the rear of the alternator
- Remove the 10mm bolt from the ground
- Remove the three 13mm bolts from the alternator
- Remove the clip that secures the wiring harness
- Remove the alternator
-
step 5 :Preparing the Alternator
- Remove the 10mm nut on the back of the new alternator
- Pry off the tab
- Remove the red cap on the old extension piece
- Remove the 11mm nut from the extension
- Slide the extension onto the new alternator
- Tighten the 11mm nut
- Press on the cap
-
step 6 :Installing the Alternator
- Insert the alternator into place
- Place the wiring harness tab onto the top bolt
- Tighten the three 13mm bolts to the alternator
- Torque the bolts to 35 foot-pounds
- Reconnect the exciter wire
- Reconnect the wiring harness
- Insert the ground
- Tighten the 10mm bolt to the ground
-
step 7 :Reinstalling the Serpentine Belt
- Ensure the belt is properly routed
- Pull the tensioner clockwise with the 3/8 inch ratchet
- Pull the belt over the alternator
- Release the tensioner
-
step 8 :Installing the Intake Tube
- Insert the intake tube to the throttle body and the air box
- Tighten the two hose clamps with a flat blade screwdriver
- Insert the engine cover
- Tighten the Phillips head screws to the throttle body cover
- Tighten the 7mm bolt to the throttle body cover
-
step 9 :Reconnecting the Battery
- Reconnect the negative terminal
- Tighten the 10mm negative battery terminal
Tools needed
-
13mm Socket
Socket Extensions
Flat Blade Screwdriver
Phillips Head Screwdriver
7mm Socket
10mm Socket
Ratchet
Pick
Brought to you by 1AAuto.com, your source for quality replacement parts and the best service on the Internet.
Hi, I'm Mike from 1A Auto. I hope this how-to video helps you out, and next time you need parts for your vehicle, think of 1AAuto.com. Thanks.
In this video, we're working with our 2001 Ford Ranger 4.0-liter V6, we're going to be showing you how to remove and reinstall the alternator. If you like this information, please click "subscribe," we have a ton more information on this vehicle as well as many other makes and models. If you want this part for your vehicle, it's available from 1AAuto.com.
Here are the items you'll need for this repair will include 7-13mm sockets, 3/8 drive ratchet, Phillips screwdriver, flat blade screwdriver, hooked pick, small flat blade, and a screwdriver.
Before removing any components of the serpentine belt, be sure to check that your vehicle has a belt diagram somewhere on it. Ours is still present on the upper radiator support, but you may also find them under the hood or in your owner's manual. If you don't have one available, simply look at the belt and the path around the pulleys, and draw yourself a little diagram of where everything goes to ensure that everything is installed correctly and turns in the correct direction.
The battery is located on the front driver's side of the engine bay on this truck. We're going to use a 10 millimeter socket and ratchet, or you can use a wrench, to remove the clamp on the ground side of the battery. Loosen the clamp. Wiggle it off of the terminal. Tuck it somewhere down to the side where it won't accidentally come back and complete the circuit.
We're going to remove this cover over the throttle body. Use a small Phillip's head screwdriver to remove these two screws, and a 7 millimeter socket and ratchet for the bolt in the back. Remove the cover from the intake.
We're going to use a flat blade screwdriver to loosen these two screw type clamps on our intake tube. Then wiggle the tube off of the MAF sensor and the throttle body, and remove it from the vehicle. You'll also have to remove this breather line from the back, so we'll remove the intake tube from the throttle body, and the MAF. Pull it straight off the breather, and remove it from the vehicle.
Your serpentine belt tensioner is located on the passenger side of the engine, just below the alternator. At the bottom, there is a 3/8” square drive, which we'll use the end of a 3/8's drive ratchet for. Install it into the drive, the same way you would install a socket onto the ratchet. We'll move the tensioner counterclockwise to release tension from the belt. Unhook the belt from the alternator pulley.
We're going to use a hooked pick to pull up and release the tab from the large connector of the alternator here. Remove that. You may want to use it to hook and release the connector down here as well. This is a single wire. We'll disconnect those two parts. Remove the power wire with a 10 millimeter socket and ratchet. Remove the power wire from its stud.
Remove these three 13 millimeter bolts for the socket ratchet extension. Support the alternator while you remove the last bolt. Remove the clip that secures the wire harness. Remove the alternator from the vehicle.
Here we have our old alternator that we removed from our 2001 Ford Ranger 4.0 and our new part from 1AAuto.com. As you can see, these alternators are exactly the same, with the exception of this little extension that we're going to have to change over onto our new alternator to make it easier to access the power. We have the same mounting locations. We have the same three pin connector, as well as the same single wire exciter. They are both a 130 amp alternator, and they have the same pulley on them as well. We have to change this extension piece from our old alternator onto our new one to make it easier to get power onto the alternator.
We use a 10 millimeter socket and ratchet to remove the nut from the new part. It is very likely that this part will break. Pry it up with a flat blade screwdriver. Watch for those pieces of debris to make sure that they don't fall into the alternator. See, ours did break on the way off. Remove this red cap on this extension piece. You may need a small flat blade screwdriver. Using an 11 millimeter socket and ratchet, remove the nut. This piece simply slides out. Slides into the new alternator. Reinstall that 11 millimeter nut, and the plastic cap. Now our alternator is ready to go into our truck.
Drop the alternator back into place. Start the lower bolts here first. Remember to place the tab for the harness under the top bolt before installing. Tighten them down with a 13 millimeter socket and ratchet. Torque these bolts to 35 foot-pounds.
Reinstall the wire and the three pin connector at the top. Lay the power wire over the mounting stud. Reinstall the 10 millimeter nut. Tighten it down with a 10 millimeter socket and ratchet.
Ensure that your belt is properly routed still and that it is not fallen partially off any of the pulleys. Use your 3/8” ratchet to remove tension from the tensioner. Install your belt over the alternator and remove your ratchet.
Reinstall the breather line in both ends of the intake tube to the throttle body and the air box. Tighten down the clamps with a flat blade screwdriver. Reinstall the engine cover.
We'll tighten down the front two screws with a Phillips head screwdriver and the rear with a 7 millimeter socket. Reconnect the negative terminal. Tighten the clamp back up. 10 millimeter socket and ratchet or wrench. Ensure your connection is tight. You're ready to go.
Thanks for tuning in. We hope this video helped you out. Next time you need parts for your car, please visit 1AAuto.com. Also check out our other helpful how-to and diagnosis videos.
Shop Products
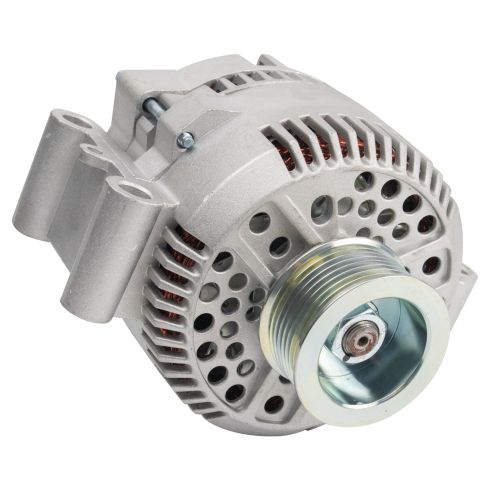
Ford Mazda Alternator TRQ ALA94414
Part Details:
- Yes
- 12 VDC
- 130 A
- Serpentine
- FORD
- Clockwise (Right)
- No
- 74 mm
- No
- 6
- 49.5 mm
- Internal
- Yes
- No
- 2.91 in
- 1.97 in

How to Replace Alternator 1998-2000 Chevy Blazer S10
In this video, 1A Auto shows you how to replace a broken or bad alternator in a 98-00 Chevy Blazer S10.
