How to Replace Alternator 2003-08 Ford Crown Victoria
Created on: 2017-02-20
How to replace the alternator on 03, 04, 05, 06, 07, 08 Ford Crown Victoria.
-
step 1 :Disconnecting the Battery
- Disconnect the negative battery terminal with an 8mm or 5/16 wrench
- Place the terminal off to the side
-
step 2 :Removing the Engine Cover
- Remove the engine cover with an open ratchet
-
step 3 :Removing the Serpentine Belt
- Familiarize yourself with the route of the serpentine belt
- Insert the 3/8 inch drive ratchet into the tensioner
- Turn the tensioner clockwise to loosen the belt
- Pull the belt off the alternator
- Release the tensioner
- Pull the belt off by hand
-
step 4 :Removing the Alternator
- Pry up the wiring harness
- Lift up the boot
- Remove the 10mm nut and ground
- Remove the four 10mm bolts at the top of the alternator
- Remove the plate
- Remove the two 10mm bolts at the bottom of the alternator
- Lift the alternator up and remove it
-
step 5 :Installing the Alternator
- Insert the alternator and bracket into place
- Tighten the two 10mm bolts at the bottom of the alternator
- Tighten the four 10mm bolts at the top of the alternator
- Connect the wiring harness
- Connect the ground
- Tighten the 10mm nut
- Press on the boot
-
step 6 :Reinstalling the Serpentine Belt
- Loop the belt around the crank pulley
- Bring it under the water pump
- Bring it around the belt tensioner
- Bring it under the A/C Pulley
- Bring it around the idler pulley
- Bring it around the power steering pulley
- Pull the tensioner clockwise with the 3/8 inch ratchet
- Pull the belt over the alternator
- Release the tensioner
-
step 7 :Installing the Engine Cover
- Install the engine cover with an open ratchet
-
step 8 :Connecting the Battery
- Connect the negative batter terminal with an 8mm or 5/16 wrench
Tools needed
-
1/4 Inch Ratchet
Socket Extensions
Flat Blade Screwdriver
8mm Socket
10mm Socket
3/8 Inch Drive Ratchet
In this video we're going to be working with the 2004 Ford Crown Victoria 4.6 liter V8. We're going to show you how to remove and replace your vehicle's alternator, which is a very important part of the charging system and keeps the vehicle's power while running.
If you like this video, please click subscribe. We have a ton more information on this and many other vehicles. If you ever need parts for your car, you can follow the link down in the description over to 1aauto.com.
Here are the items you'll need for this repair.
Your battery is located at the front passenger side of your engine bay. Using an 8 millimeter or a 5/16 wrench, loosen the clamp on the negative side of the terminal. Once you've removed the negative battery terminal, isolate it away from the battery so it doesn't accidentally reconnect while we're working.
Using an open drive on the end of a 1/4 inch ratchet extension, loosen up this screw at the center of the engine cover. Lift it up, slide forward, and remove it from the vehicle.
Before removing your serpentine belt, be sure that the path is indicated somewhere in the engine bay, either on the original sticker like ours has here, or if yours is missing, simply take a marker or paint pen and draw one somewhere under the hood. Using the open end drive of a 3/8 ratchet, place it into the square inlet on the serpentine belt tensioner and rotate clockwise. Remove the belt from the pulley. Carefully release the tension. Remove your ratchet, and take your belt off the rest of the way. It's a little tricky to get it off this idler pulley here, so be careful not to cut it on this piece of steel. The rest should come off pretty easily.
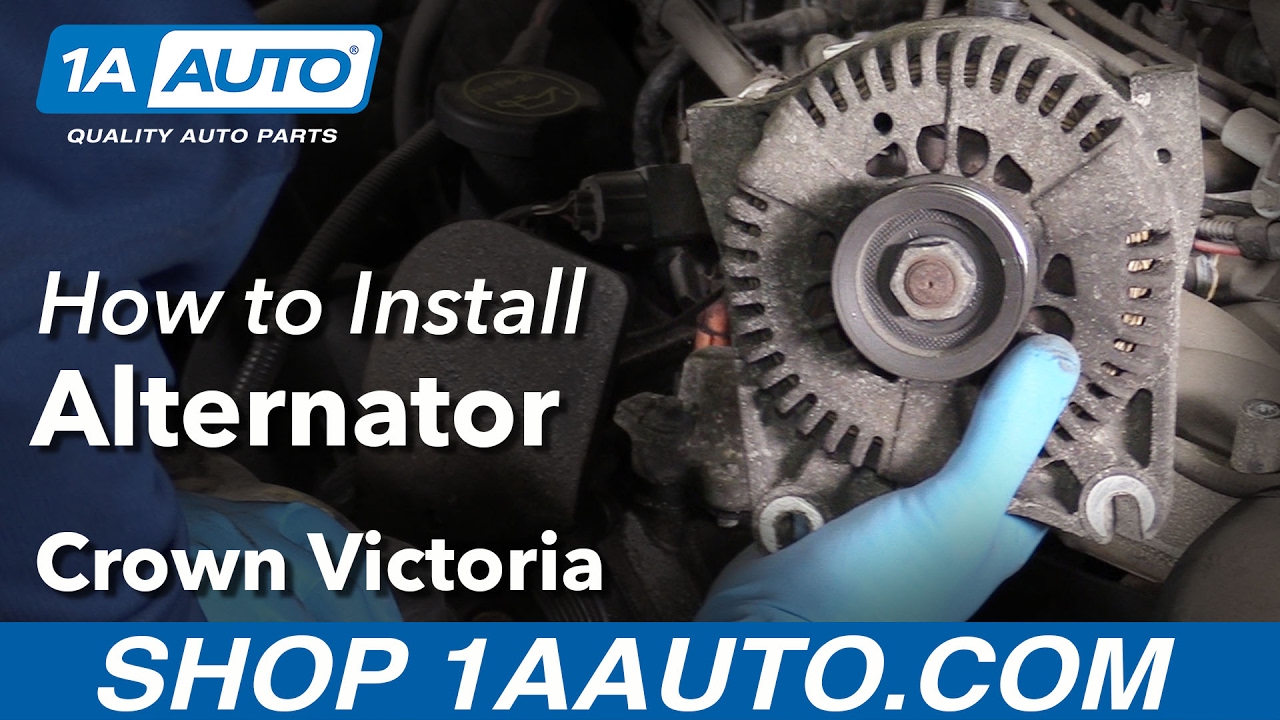
Your alternator is located here at the top of the engine, dead center. To remove we'll pry up a little, because this connector's stuck. You may be able to do this by hand, but lift up on that tab and remove it. Then lift up on the boot for the power lead and remove the 10 millimeter nut underneath. We'll do this using a 10 millimeter socket and ratchet. Remove the power lead, and regardless of whether we're replacing the alternator or just removing it to get it out of our way for another job, we'll reinstall that nut on there just to make sure we don't lose it.
Remove the four 10 millimeter bolts at the top of the alternator going back to the intake manifold as a stiffener. We'll crack all of these loose with our 10 millimeter socket and ratchet, and remove them and the plate the rest of the way by hand. We'll also need to just pop this connector off of our power lead, and lay that off to the side. Using a 10 millimeter socket and ratchet, I've used a longer ratchet here than we did before because there's a lot more torque on these, we'll remove the two 10 millimeter bolts at the bottom of the alternator. You may need a small extension to help get your socket past the water pump pulley for the driver side lower alternator bolt. You don't have to remove the two bottom 10 millimeter bolts, as these are notched on the alternator and you can simply slide it up once they're loose. Once the bolts are loose, you can lift up and slide the alternator off of them to remove it from the vehicle.
Reinstall your alternator onto the studs. Reinstall the top bracket. We'll start these screws in finger tight. We'll then tighten down the backs fully. Once the rear bolts on the top bracket are in place we'll tighten down the bottom bolts. We'll then tighten up the two 10 millimeter top bolts and reconnect the electrical connector as well as our power lead. Tighten the 10 millimeter nut with your socket and ratchet and reinstall the boot.
Install the serpentine belt first around the harmonic balancer, or the crank pulley. Be sure that it's seated on there fully. I'll now take the passenger side of the belt and route it under my water pump, back up over the top of the water pump. From here, it'll go over the top of my tensioner pulley, under my A/C compressor on the bottom passenger side, through this tight little gap here, and over the idler pulley. I'll then go to the bottom driver's side and ride the belt around my power steering pump. I'll put some tension on it by hand, make sure that everything is seated properly on its pulleys, and then use the drive of a 3/8 ratchet in the square opening of the tensioner, and turn that clockwise to relieve the pressure, and install my serp belt over the top of my alternator before releasing the pressure and removing my ratchet. Double check that your routing is correct, and that the belt is fully seated on all pulleys before starting the vehicle.
Reinstall your engine cover by sliding it back over the hooks in the front and placing it over the stud at the top. Reinstall the nut and tighten it down with a 1/4 inch drive extension.
Reconnect the negative battery terminal, and tighten it back down with your 5/16 or 8 millimeter wrench. There's no need to crank these down; just go on there until it's nice and snug.
Shop Products

Ford Lincoln Mercury Alternator TRQ ALA94416
Part Details:
- Yes
- 12 VDC
- Serpentine
- 135 A
- 6
- FORD
- Clockwise (Right)
- No
- No
- 45 mm
- Internal
- Yes
- No
- 1.77 in

How To Replace Alternator 2004-07 Jeep Liberty
Watch now and learn how to replace the alternator on your 04-07 Jeep Liberty.
