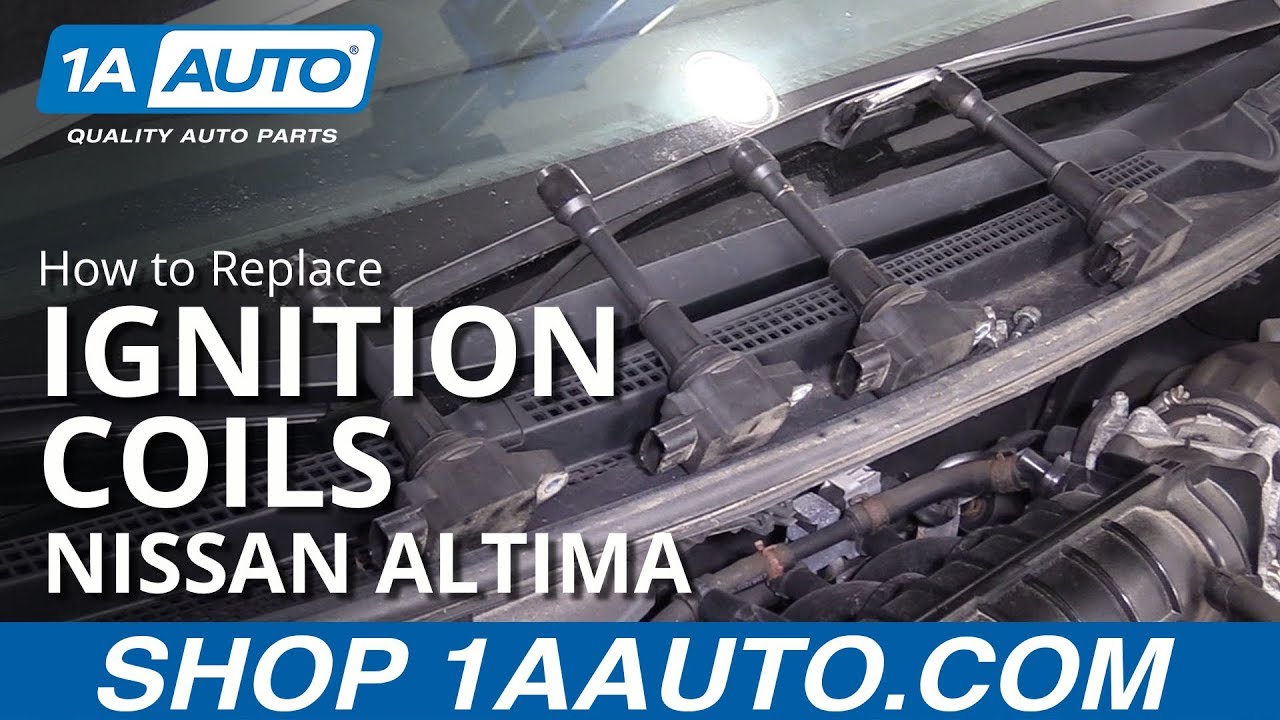
How to Replace Coils 2006-17 Nissan Altima
Created on: 2019-05-16
Watch this video to learn how to replace broken or misfiring ignition coils on your 06-17 Nissan Altima. Our 1A Auto mechanics will show you how.
-
step 1 :Removing the Ignition Coils
- Remove the three 5 mm allen bolts securing the engine cover
- Remove the engine cover
- Remove the electrical connector from each of the four ignition coils
- Remove the 10 mm retaining bolt from each of the four ignition coils
- Remove each of the four ignition coils, making sure to set them down in their cylinder order
-
step 2 :Installing the Ignition Coils
- Apply dielectric grease on the boot and gasket of the ignition coil
- Insert the ignition coil into the spark plug tube
- Align the ignition coil bolt holes
- Install the 10 mm bolt
- Repeat for the remaining ignition coils
- Tighten all four 10 mm bolts
- Reconnect the four electrical connectors
- Replace the engine cover
- Replace the three 5mm Allen bolts securing the cover
Tools needed
-
5mm Hex Wrench
Socket Extensions
Flat Blade Screwdriver
10mm Socket
Ratchet
Len: Hey everyone. It's Len down at 1A Auto. Today we're going to be working on a 2010 Nissan Altima. We're going to be replacing coils. It's a very simple job and I'd like to be the guy to show you how to do it. If you need any parts, you can always check in to 1aauto.com and feel free to smash that like button. Thank you very much.
Okay. Now we've got our hood open, we're going to go ahead and use our 5mm Allen head socket and we're going to remove three bolts. There's one here, there and there. Start at whichever one you want, but basically we're taking them all completely out. All right. So, we'll get the last bolt out. Feels pretty good. We can go ahead and lift up on this. If it feels like it's stuck, more than likely one of the bolts didn't come all the way out. If you want, you can remove these completely from the cover, but I'll just leave it in and set this aside and we can move on to our next step.
Now what we're going to do is we're going to pull off all our coil wires. This is your spark plug coils. They sit on top of where the spark plug is going to be. So what we're going to do is we're just going to squeeze this little tab. If for some reason you don't have the finger strength for it, you can use a small screwdriver. We're just going to squeeze it, try to pull. If it seems like it's stuck, like I said, we can try to use a small screwdriver. That's okay. You can hear a little click. Pull that right off.
Next, you want to look inside. This is where it makes the connections to the spark plug coil. If you see green or brown or any other color but shiny metal, that's going to be an issue. So at that point you would want to replace this. Coming down the line, I'm just going to go ahead and remove this one. Same thing. You can try to squeeze that. If you can't pull on it, you can use two screwdrivers if you need to, but you can also give it a little pry to separate it. Try to give it a tug just like that. If for some reason you can't get enough pull because this is secured, you can remove these clips. You just use some little pliers and then you can pull it off. I'm not having too much of an issue, so I'll continue. I'm going to go ahead and do the rest of these too.
Okay, so I've got all these off. I inspected them. But something that I did want to mention is, as I told you, if you wanted to take this out so you could get it easier, it's very simple. You can use some pliers. I have these in my hands so this is what I'll use. I'll just give it a little squeeze from side to side and pull it away. I would do the same for this and that'll give us plenty of slack. Just give it a little squeeze it. Give it a little pull. Look at that. So if you did need more slack, you were having an issue getting it off, that's all you'd do. You just squeeze those two tabs from side to side. Very simple. And then give it a little tug.
Next, we're going to remove these 10mm head bolts. You can use a ratchet. You don't need an air gun. That one, we'll put it out of the way where we won't lose it. And do this to all four. Like that. I'll show you what they look like. All four are the same. They don't look like they're rusted or rotted or anything like that that we'd need to replace. So we're clear to put these aside and we'll move on to removing these coils.
To do this you can just give it a little shake side to side. Do them all if you want. They feel good. And then lift it up. You're going to inspect right in here, see if you see any funny colors, rainbow colors are bad. You want to look for metal. And then right along here, this is a seal, keeps moisture out. Make sure that that's not cracked, dry rotted, swollen. This looks great. We're going to do the same thing for all four of them. When we pull them out, we're going to keep order of which one goes where. You don't want to put this one here, that one over there. We're just going to go like this, we'll pull them out, we'll go right in a straight line. It's easy to remember.
Now it's time to reinstall our coils, so what I like to specify is to make sure that we've already checked to make sure that the seals are good, and I want to make sure that I put a little bit of dielectric grease. I'm going to come along the outside right along here. A little bit along the inside. That's what the spark plugs are going to go into. And then I'm going to come along the top right along here. What this is going to do, it's going to make sure that moisture doesn't get past. Any debris will get caught on the dielectric. And also, so the next time that you go to do the spark plugs on this or a tune up of any sort, it'll come off nice and easy. We're going to do the same process for all four coils and then we're going to go ahead and install it.
So I'll just show you that. You can see that there's a little lip right here so the coil knows where to sit. It can't turn any further. We can grab one of our bolts. They're all the same so you don't have to worry about which one is which. We're going to go ahead and screw that in a little bit, and we'll do the same process for all four coils. I'm going to go ahead and install the last screw, bolt, whatever you want to call it. Finger tight. Now we're just going to go down the line and we're going to snug them all up. You don't need to use a long handle ratchet. This is what I have in my hands, so I'm just going to hold it down low. We don't need very much torque. We're just going to snug it. Just like that. Same. Down the line.
Our next step would be connecting our wires to our coils. If you wanted to, you could use a little bit of dielectric grease in here. For this application I'm not gonna worry about it. Just go ahead and lift it. Listen for the click. Going down the line. Okay. If you happen to have removed these clips, you can go ahead and put them in now. Now using our 5mm Allen head socket, we're going to go ahead and reinstall these bolts. As you can tell they're all the exact same. So first we'll get our cover on. We want to line up the holes. We remember where they all are. Just get that settled on there. I can see all the holes right through, so we can start these in by hand if you'd like.
Give them a couple threads. We don't want to tighten any of them down completely until we get all three in, at least started. And that's because this happens to be off kilter a little bit and you tighten these down, now you can't get the last bolt in. So we'll just leave it nice and loose and line it up wherever we need. We can go ahead and tighten these down. We don't need to go very tight, it's just plastic. You can use whatever you have for a tool, but it's a 5mm head. Nice and snug. Snug. Last one, there's only three. There we are, nice and secured.
Thanks for watching. Visit 1aauto.com, your place for DIY auto repairs for great parts, great service, and more content.
Shop Products
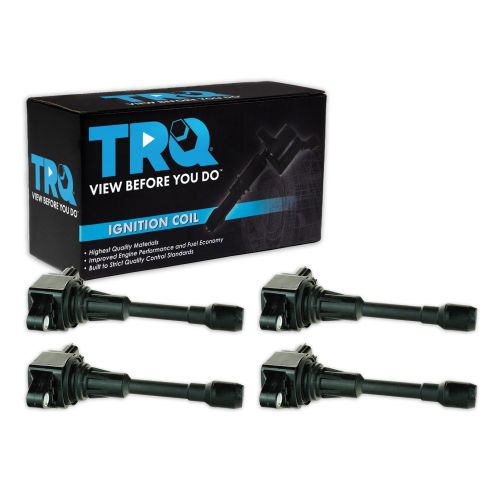
Nissan Infiniti 4 Piece Ignition Coil Set TRQ ICA61586
Part Details:
- 4 Piece
- (4) Ignition Coils
- Direct Replacement
- Black

How to Replace Ignition Coils 2007-09 Honda CR-V
How to repair, install, fix, change or replace a bad or broken ignition coil / coil pack on 07, 08, 09 Honda CR-V
