
How to Replace Control Arm 2005-14 Ford Mustang
Created on: 2020-04-03
Watch this video to learn how to install a new front control arm on your 2005-14 Ford Mustang.
Tools needed
-
Air Chisel
Torque Wrench
Hammer
Rust Penetrant
18mm Wrench
Pry Bar
Jack Stands
18mm Socket
21mm Socket
Pickle Fork
Copper Anti-Seize
Wheel Chocks
Ratchet
Floor Jack
Once you have your vehicle safely raised and supported, you're gonna remove all five lug nuts using a 21-millimeter. Carefully remove the wheel, set it aside. Next, we're gonna take off the outer tie rod end nut. At this point, I'm just gonna put this nut on there just a couple threads, and then I'm gonna hit right here on the knuckle until this drops down. You wanna be careful not to damage your boot. If you follow your subframe along, and you see this nut right here, you're gonna remove that nut and this one right here. And those have bolts that come through from the top, so you just use your 18-millimeter wrench. Grab that bolt head. Should be up there. Take this out of there. Do the same to the other side. Grab both bolts out, grab your power steering rack, give it a wiggle.
Okay. So, now that it came out of its spot, you can see this bolt right here. We're gonna remove that bolt completely. We're gonna use our 18-millimeter swivel. Okay. Get this off there. Next, we're gonna move along to the rear side of the subframe here where the control arm connects in. You've got a 21-millimeter nut there and one right here. On top, it's a captured bolt so you don't have to worry too much about it spinning too much. It's got a little tab on there. Okay. I'm gonna leave that on just a little bit. That looks good. Here we go. Let's leave that right like that. Let's move along to over here. Use a 15-millimeter to hold this side of the bolt, then use an 18-millimeter on the other side to remove the nut. Let's get that nut on there just a little bit. Got a little punch and hammer. Okay. Use that. Let's continue driving it out.
The next thing we wanna do is drive this ball joint stud down. So, you can use an air chisel and go right on the stud like that. You could try to use a pickle fork and come in between the control arm and the knuckle. Whatever you need to do, definitely make sure you have some penetration on there though. Awesome. Let's go ahead and pop these bolts out of here. Be careful not to damage that power steering rack of course. It's pretty close. Let's get these bolts out of here. There's one, there's a second one.
All right. So, I'm just gonna pull this down, pull our knuckle out of the way, and pull out that control arm. Let's take some of this copper never-seize, go right inside that ball joint hole. Perfect. Let's start putting this lower control arm in, put the rear up and over there, and then we're gonna get this ball joint stud started. Let me see if I can get it somewhere to go in a little bit. There we go. Now, we're gonna try to get the rest of it lined up. Let's get this bolt in there.
Now, I'm gonna take my bolts for the rear, start those through. This one might not go as far down. Okay. Grab those nuts, start them on there. All right. I've got both of those started. If for some reason you're having a hard time, you can use a long pry bar, use a little bit of leverage to try to pry down on this. Let's snug these up. Start in this bolt. So, now we're gonna get the lower ball joint bolt in here. What you wanna do is pay attention to this hole. Try to look through and see if you can see the slot on the lower ball joint stud. Make sure that it lines up with the hole. If it doesn't, just use your small pry bar, a little bit of leverage, and then you should be able to move it around to get it lined up. Here we are. Give it a bonk. We've got our nut, start that on there. Awesome. Let's snug this. All right. So, all the mounting points for this are snugged up, let's go ahead and torque them to manufacturer's specifications. Now it's time to torque up these bolts. I'm gonna start with the ball joint to the knuckle bolt using my 15-millimeter to hold it so I can't spin. I'm gonna torque this to 76 foot-pounds. There we are. Now, we're gonna torque these nuts to 129 foot-pounds. Torqued. Now, we're gonna torque this forward bolt to129 foot-pounds as well. Torqued.
So, now it's time to get the rack back inside here. Just gonna push it. If it doesn't work, you can use something as simple as a rubber mallet. Give it a couple of light bonks. Obviously, you don't wanna damage it by using a metal hammer. Now, we're gonna put our bolts down and through and then we'll put the nuts on here. That's our bolt. Same to the other side. Get them started on there. Awesome. Now, it's time to bottom those out. Let's finish by torquing this down. We're gonna torque it to 85 foot-pounds. Torqued. Bring your knuckle around, pull this up. Start on that neoprene locking nut. Spot on this out with our 18-millimeter. Let's torque this to 59 foot-pounds. Make sure you snug up your jam nut. Perfect. Let's get the wheel back up on here. Start on all your lug nuts and then bottom them out. Now, we're gonna bring this down and torque it to manufacturer's best... Now with the vehicle's wheel touching the ground but most of the weight of the vehicle off of it, we're gonna torque these in the star pattern to 100 foot-pounds. Torqued.
Shop Products


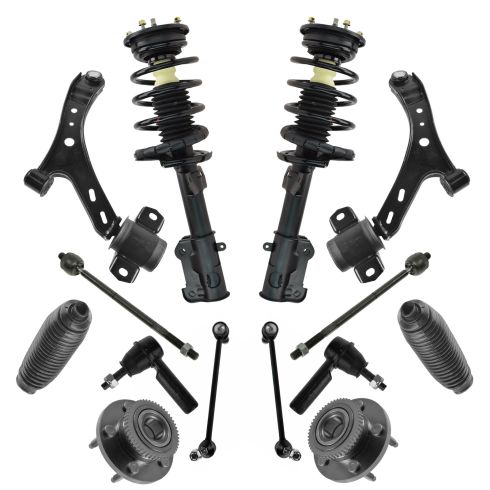
Ford Mustang Front 14 Piece Steering, Suspension, & Drivetrain Kit TRQ PSA32065
Part Details:
- (2) Front Sway Bar Links
- (2) Front Lower Control Arms with Ball Joints
- (2) Front Strut & Spring Assemblies
- 14 Piece
- (2) Front Steering Rack & Pinion Bellows
- (2) Front Wheel Bearing & Hub Assemblies
- (2) Front Outer Tie Rods
- (2) Front Inner Tie Rods

How to Replace Front Upper Control Arm 2007-14 Toyota FJ Cruiser
Check out this video to learn how to replace the upper control arm with ball joint on your 07-14 Toyota FJ cruiser. 1A Auto shows you how to DIY it!
