
How to Replace Corner Light 1993-98 Jeep Grand Cherokee
Created on: 2010-02-03
How to repair, install, fix, change or replace a broken, damaged, cracked, faded, cloudy, or chipped signal light on Grand Cherokee, years 93, 94, 95, 96, 97, and 98.
-
step 1 :Removing the Side Marker Light
- Loosen the lower T2 Torx screw from the side marker light
- Remove the lower T2 screw from the marker light
- Pull out the marker light
-
step 2 :Servicing the Side Marker Light Bulb
- Twist the bulb out of the side marker light
- Disconnect the bulb from the socket
- Connect the new bulb
- Twist the bulb into place
-
step 3 :Installing the New Side Marker Light
- Push the marker light into place
- Insert the lower T2 screw into the marker light
- Insert the top T2 screw into the marker light
This video is brought to you by www.1AAuto.com, your source for quality replacement parts and the best service on the internet.
Hi. My name is Mike Green. I want to help you save time and money repairing your vehicle. I have 20-plus years experience restoring and repairing cars and trucks. My company, 1A Auto, sells high quality replacement parts over the internet. In this video I'll be showing you how to install these parts. By the end of this video, you'll know how to install them and where to get them. That's going to save you time and money. Thank you and enjoy the video.
In this video, we'll be replacing these side marker lights on this 1998 Jeep Grand Cherokee. It's a very easy replacement. It only requires a number 2 Torx screwdriver. The side marker light is held in by two Torx screws and here is a close up of the first one. It's a little hard to find. It's between the side marker and the lower parking light. Here now you can see, I'm inserting my Torx driver into there and loosening up that screw. I'll loosen it in up some and then I'll actually take the top one off. The top one is just located right inside the fender right there. You'll notice I have the headlight out. You do not have to have the headlight out. Again, you don't have to have the headlight out. I was just doing another project and filming this at the same time. You can remove this marker easily without taking the headlight out. I remove that top screw, and now I am going to finish removing. The reason I did it that way is because when I pull the light out, I want to pull the screw out, too. I don't want to try and reach in there and remove that screw.
You can service the bulb at this point or replace it. Note that you do have to have the orange bulbs. To put it back in, put the screwdriver in there. Keep the screw in its location and then find that area and then start it in. I'll just start it in place and then I'll put the top one in. You always want to do it this way so you can kind of move it around loose. Get that top one started in and then I'll tighten up the bottom one and I'll tighten up the top one. That's pretty much it. Side marker lights on these are pretty easy fix.
We hope this helped you out. I wish you good luck on your Jeep Grand Cherokee project. Your source for quality replacement parts and the best service on the Internet. You call us toll-free, 888-844-3393. We're the company that's here for you on the Internet and in person.
Shop Products


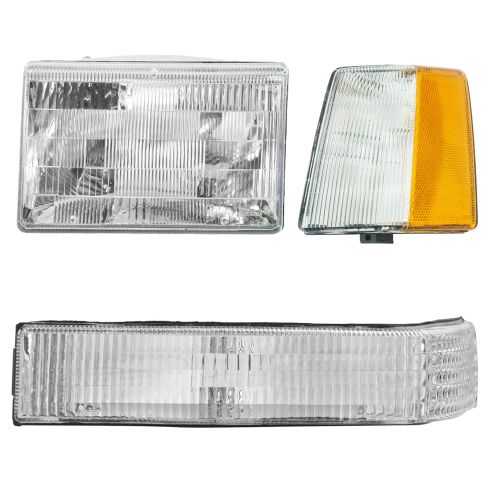
Jeep Grand Cherokee Left 3 Piece Lighting Kit DIY Solutions LHT04071
Part Details:
- (1) Corner Light
- (1) Parking Light
- Features and Benefits
- 3 Piece
- (1) Headlight Assembly

How to Replace Turn Signal 1998-2000 Toyota Sienna
Watch this video to learn how to replace the turn signal lights on your 98-03 Toyota Sienna.
