How to Replace Door Latch 2009-19 Ford Fiesta
Created on: 2019-03-07
How to replace the front door latch on 09, 10, 11, 12, 13, 14, 15, 16, 17, 18, 19 Ford Fiesta
Tools needed
-
Flat Blade Screwdriver
T20 Driver
T30 Driver
10mm Socket
Ratchet
Hi, I'm Mike from 1A Auto. We've been selling auto parts for over 30 years.
Hi everyone. Sue here from 1A Auto. Today we have a 2011 Ford Fiesta in the shop and I'm going to show you how to remove the driver's door latch. So if you need any parts for your car, click on the link below and head on over to 1aauto.com.
A little pocket screwdriver, a flat edge screwdriver, and you're going to pop this cover off. Just reach in there and give it a pry. And then we can set that aside. You can see there's a little screw in there. It's got a Torx bit head to it. It's a T20. Take that out.
Now just pry on this casing and it'll pop right out. Now you can reveal the actual, this is the mirror adjuster button, so we're going to take that connector off. Down below here there's a little clip. Pushing on that pin. Let's see if I can see it. Maybe I'll get this side first.
So here is your little mini speaker. Take that clip. Push in on the pin. Pull that clip, the connector out. Now we have the actual door handle itself cable. This handle for the exterior, this is the interior door handle cable, and it releases the latch. It's basically, it just slides right in. There's no clips. There's no screws. Pull up on the cable end and it comes right out. You can see how it goes in, it slides right in like that, and clicks down. To release, pull up and there you go. Now we can see the actual connector on this side. Take a small screwdriver.
Now we're going to remove the crank, window crank handle. It's a manual window. We're going to use a body tool with this little fork right here, and it's basically just pops off. There's no clip or nothing. So with pressure on this and pressure on the handle, just snap it right off. You can see how it just has like these little fingers that wrap around the window regulator, and that's it.
There's three mounting screws, one down here, middle, and then the top. These little covers, just pop them off, and now you can see the mounting screws. These are a Torx T20 tip. You can just take all three of them out. Now we're going to get to the main bolt that holds the panel on, and underneath the handle right here is this cover comes right off. Just pry it off. Here we have two more Torx head bolts. We got a T20. Take that handle right out of the way.
With a body tool I'm going to reach in the back here and just pop this door out. There we go. You're going to lift it straight up and out of the way. Before removing the hard plastic panel where the regulator is mounted, I'm going to disconnect the harness because it clips on all the way and that way we can set it aside and not damage the wires. I'm going to start right here and work my way over. Disconnect the mirror. I've got a trim tool. I'm going to push that clip right out, that body style clip, and then work my way around.
Remove the speaker wire. Push in on this tab. Easier said than done. Now on this sensor it's got a safety clip, that red thing. Push it down and then you can push it on that tab, pull that connector off. Now we're going to take this rubber boot out of the way. This goes to the electric door locks which is back there, which I'm going to leave it just like this, and now I can take the panel off, access the connector and disconnect it and slide it out. 10 millimeter socket and I'm going to go around the whole panel here and disconnect each bolt and set them aside, reminding myself that these three with the brackets go on the outer door edge, and they do have a guide slot so you can tell which one goes where. Might even stay on the actual panel.
Get the last one. Put the window crank on. You're going to guide right with these two holes you're going to guide the actual window, the glass bolts right up with that seam right here. Those are two 10 millimeter bolts, and they hold the glass on the regulator. Break those off. Now you shouldn't have to take the bolts completely out. You just want to loosen them up, and now that glass should be able to pull right out of that regulator. There we go. Now that's up there, but we want to tape it to guarantee it doesn't fall down.
Now you have to manipulate because the window regulator is mounted to this plastic and there's a steel part of the door that hangs down a loop and it goes on the lip down below. So with that being said, I'm going to slide it towards the interior part, lift the top up, and now I can expose the whole door panel. Take the inner cable off and now I can get to that latch, pull in the tab and disconnect it.
There are three bolts holding the actual door latch on the door frame, and it's a T30 Torx. We're going to loosen those up. They might give you a little trouble coming out because they have a thread locker on them so they're kind of tight. Now that the latch bolts are out of the way, the latch is right here but it's attached to the external handle mechanism. So you actually have to take the external handle off to get the whole assembly out.
I'm going to start with right here. There's a little black boot. Take this boot off. And if you looks like inside there, there's a little Torx bit screw, and it's T20, and it doesn't come out but it stays in place, but you're going to loosen it up to take the outer handle out. Once you line that up, just going to back off on it. Like I said, the screw itself is not coming out. It just, it floats in there and like it's like a vice for this piece right here. Just keep loosening it up until this piece just comes right out. That screw goes in here and holds that piece tight in there. Like I said, it stays in there. Now you've got the external lock out. Grab this handle and you're going to slide it towards the opening like that. Pull that handle off.
Now there's a steel plate back here and there's a T30 head bolt right here. Loosen it up. I can take the steel plate off. Now you got a T20 Torx right here. Now you can see the ear tab right here. It's supposed to be two more right here, but cars get some miles on it so looks like it already broke once which is pretty ... could happen. It's plastic. But we're going to slide the mechanism that way from the inside. Grab it. Slide it this way and the whole assembly comes out.
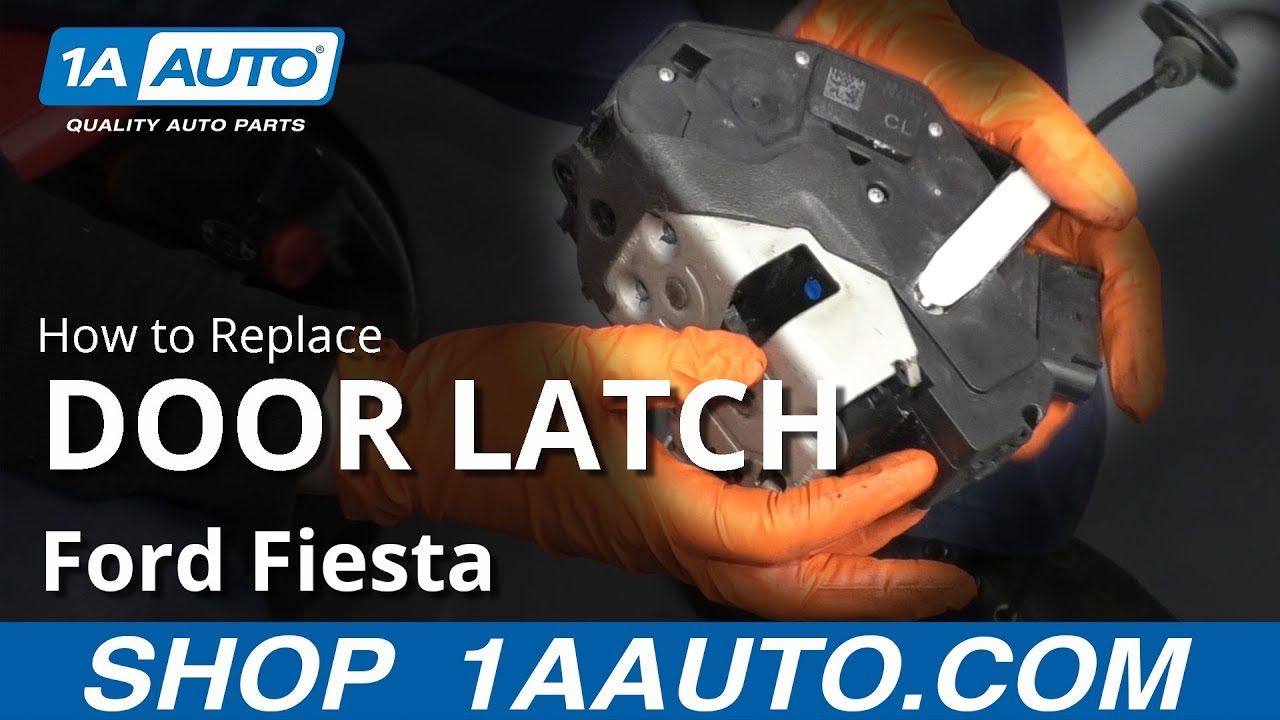
Now take the latch off of the housing T20 Torx bit. There's two mounting screws. One there and then one here. There is a rod that it's connected to for the electric lock. Once you take these little bolts out, detach it. You can see where the rod goes right in there, up inside. That's the electric motor and all you got to do is tilt it so you can pop that rod right out. Now you have the door latch.
Now to reassemble it to the assembly, you got to reconnect that lock rod. That's going to go right into that spot right there. This cable goes through the long slotted area. Line that up. That falls right into place. There's your two mounting spots. Put those two mounting screws. Looks a smiley face. He's smiling at you.
On the backside here you've got this metal pin and it's going to go right into that spot to mount properly and to sit in this housing. Here we go. If it's not in there, you'll feel it. You'll be like, "What's holding this thing up?" That's what it is. Line one screw up, line the other one up. Take your T20, tighten this down. Perfect. Now we can put the assembly back in the car.
Now we're going to attach the other end of the outside handle cable. Bring it around, line it up on this and snap it in. We're going to bring it back in. This is the key on the outside here. You'll see that tab and it goes forward. These pieces are missing remember. And that was a little, little Torx screw. It's a T20.
Now with this piece slid in forward that way, put you a little screw in in the back here, T20. Snug it down. Put this bracket in so it lines up pretty much self-explanatory. There's a hook in the front here and the bracket in the back. It slides right the back of it. You can't even let go. The one bolt in the middle, that's our T30.
We're going to put the latch back on the door and line that right up there. I hand start all three of these mounting bolts. You want to make sure the thread is not cross threaded. Now you take a T30, tighten that right down.
We're going to put our external handle back together. We got this notch and this notch so you're going to slide them right back into place. They fall right in. That's your handle. You can feel the tension. Then you put the lock mechanism on. Flat piece is going to go up against the handle. Slide that right in until it's flush. And take your T20, go right through there. You can see the head of a screw that is suspended in there. Once you feel it, tighten it down. When it stops, it's done. Don't forget to put your little boot on to keep the weather out.
So now we're going to put the door panel back on. We got to remember that we have to slide the electrical connector through and connect it to the door latch and the inner cable. There's two slots on the door panel, top and a lower. The lower one's for the harness, top one's for the cable that goes up here. I'm going to run this right through here, and I'm going to take my harness, run it over, put this through the bottom one. Before I put that full panel on and everything, I'm going to connect my connector. It's right here on the bottom. You'll hear it click in. There we go.
Now the key to this panel is you want that bottom regulator down in the middle and this top part of the regulator on the other, the right side of that ear. I'm going to put this rubber boot through because you have to get from the backside. It's like put my hand on the back and pop it up, work it around. Here we go. Seat it all around. Perfect. Now we get that top one in, bottom one, slide it over. Perfect.
Put this bottom boot in. Panel back in, slide it in. We also have this assembly bracket that the key ways, you can see there's one, two, and then three little key ways down here, they're going to sit in these spots. On top of everything else you got to do, you got to sing and dance, and also make sure that you get that in the bracket and slide it forward back that way.
We have about 10 mounting bolts. I'm going to line up a couple of the holes and start them by hand. Now I'm going to tighten up my inner door panel and I'm going to start from the center and work my way out. I'm going to bottom it out. Make sure it lines up. There's little plastic dimples that ... there as guides.
I'm going to connect the harness all the way around. It naturally will fall right into place. This is my mirror. Make sure I connect that. That's the wire for the door assembly. This one this way. Make sure that goes there. Speaker.
Now it's time to take the glass off the tape. I'm going to guide that back down into the regulator. I like to use painters tape because it holds the glass up, but it leaves no glue behind. Back in the day with using duct tape, then the job was a half-hour cleaning. Now I'm going to grab the glass with pressure and slide it down, keeping it on the back track here. Get the window crank, slide that on. Bring that glass right up to that.
With a 10 millimeter socket and an extension I'm going to reach right in there and tighten the regulator on the glass. Once again, this is two plastic pieces with a bolt going through it that are squeezing it together like a pair of vise. We don't need to rank on it. You don't want to crack the glass. But at the same time if it's too loose, your window will flop back and forth on the track. Let's try it out before you assemble the rest of the panel. Bring it up. Bring it all the way down.
Now we're ready to put the panel back on, making sure all my electrical stuff is out of the way. I'm just going to make sure we put the cable through the spot. The lip, put it in the window seal. Make sure it's all the way forward. Make sure that cable is on the top side. Now with all three connectors coming out of the slot, I just have the door panel resting on the windowsill, just in case it have to come back because I can't get this incorrectly. But I have faith. That slides down right in there like that and then clicks in.
Connect our little tweeter speaker. Connect our window control ... mirror control, sorry. There we go. Slide that all back in there. I know on the pedal's pretty much lined up. I'm going to just push the snaps back in. That's nice and tight. I'm going to put my mounting bolt on for this and there's out of all the bolts there's also these two long ones which are for the handle handle, but then we have three identical ones and then the one that's not. So these three go for this door panel, and the one that's not goes in the handle. T20, line it up, tighten it down.
Now I want to make sure my handle works, so I'm going to act like a door latch. Lock it. Put a little pressure on it. I know my handle works. Now I don't have it all bolted down yet because I want ... I made sure that my handle works. Now I'm going to make sure that my mirror adjuster works. Other side. Yep. So it's all good. Trying the key off and I could tighten it all down.
T20, line it right up. Put the tab back, one on the top and install the handle. This is a T25 if I remember correctly. Yep, T25. Top one. This has got that little fancy plastic cover. Okay, it's got three line ups, one at 3:00, 12:00, and 6:00. Snap it in, and the window crank. The spacer goes like that with the inverted going that way. Now you know when the window's up, the crank should be right about 2:00. Snap it on.
Thanks for watching. Visit us at 1aauto.com for quality auto parts, fast and free shipping, and the best customer service in the industry.

How to Replace Door Lock Actuator Integrated Latch 2006-11 Chevy Impala
Follow along to see how you can replace the rear power door lock actuator as well as the integrated latch on your 06-11 Chevy Impala.
