How to Replace Drivers Side Seat Cushion 2006-08 Dodge Ram
Created on: 2016-06-06
This video will show you how to replace the driver side seat cushion for heated and non-heated seats on the 06-08 Dodge Ram
-
step 1 :Disconnecting the Battery
- Disconnect the negative terminal with a 10mm wrench
- Let the vehicle sit for 30 minutes to let the airbag modules power down
-
step 2 :Removing the Seats
- Undo the two 15mm bolts at the front of the seat brackets
- Remove the two 15mm bolts at the back of the rail
- Spray the underside of the vehicle where the bolts are with rust penetrant if needed
- Remove the seat belt cover
- Remove the T45 Torx bolt from the seatbelt
- Pull the seat back and buckle in the seat with the rear seat belt
- Disconnect the electrical connector under the driver's seat
- Disconnect the red safety tab from the wiring harness
- Remove the four 13mm nuts holding the seat together
- Remove the center seat
- Remove the driver and passenger seats
-
step 3 :Removing the Seat Cushion
- Remove the four #2 Phillips screws from the seat
- Remove the manual handle
- Remove the three #2 Phillips screws from the other side
- Pull out on the back cover and pry it off
- Disconnect the switch wiring harness
- Remove the three Phillips head screws
- Remove the side cover
- Unhook the plastic covers from the seat
- Release the clips from the sides
- Remove the seat cover and cushion
- Disconnect the electrical connector and Velcro
- Pull the seat up and out
- Work the cover off of the cushion
-
step 4 :Installing the Seat Cushion
- Insert the seat cushion into the seat cover
- Place the Velcro strap across the seat
- Insert the seat cushion into place
- Pull the heating pad harness through
- Clip in the seat cushion
- Connect the wiring harnesses
- Insert the side cover wiring harness
- Insert the side cover into place
- Tighten the four #2 Phillips screws to the seat
- Place the other panel into its position
- Tighten the three #2 Phillips screws on the other side
-
step 5 :Installing the Seats
- Insert the seats into place
- Leave them laid back
- Tighten the 13mm bolts the center console onto the passenger seat
- Clip the wiring harness into place
- Connect the wiring harness
- Lay the seats back down and align the bolt holes up
- Tighten the 15mm bolts to the front of the seat
- Tighten the 15mm bolts to the back of the seat
- Torque the seat bolts to 30 foot-pounds
- Insert the seatbelt tab into place
- Tighten the T45 bolt into the seat belt
- Torque the bolt to 29 foot-pounds
- Press in the seatbelt cover
-
step 6 :Connecting the Battery
- Tighten the 10mm negative battery terminal
Tools needed
-
No. 3 Phillips Screwdriver
13mm Socket
Socket Extensions
Flat Blade Screwdriver
Torque Wrench
15mm Socket
Rust Penetrant
No. 2 Phillips Screwdriver
T45 Socket
Bent Nose Pliers
10mm Socket
Ratchet
Brought to you by 1AAuto.com, your source for quality replacement parts and the best service on the Internet.
Hi, I'm Mike from 1A Auto. I hope this how-to video helps you out, and next time you need parts for your vehicle, think of 1AAuto.com. Thanks.
In this video, we're going to show you how to replace the driver's seat cushion in this 2008 Dodge Ram. This seat happens to have the heated option, but the procedure is the same for non-heated seats. You'll need a new seat cushion from 1AAuto.com, 10-18 millimeter sockets with ratchet and extensions, T45 Torx bit, pliers, penetrating oil, number 2 and number 3 Phillips screwdrivers, flat blade screwdriver, and a torque wrench.
Before working on any part of the electrical system, you'll want to use a 10 millimeter wrench to remove the negative terminal of your battery and set it off to the side. After the battery has been disconnected and the vehicle sat for 30 minutes, to allow the airbag modules power down.
You'll need a 15 millimeter socket to undo two 15 millimeter bolts at the front of the seat brackets. Remove the two 18 millimeter bolts at the back of the rail. You may want to spray the underside of the vehicle where the bolts go through with some penetrating oil. Remove the cover at the bottom of the seat belt by snapping it out.
Undo the T45 Torx bolt holding the bottom of the seat belt in. Repeat these steps on the opposite side. Leave the seats back. Secure the rear seat belt around the headrest and buckle it in so you can work on the bottom side of the seats.
Disconnect the electrical connector under the driver's seat. Disconnect the two electrical connectors on the passenger side of the center seat. Pull back on the red safety tab on the rear most connector so you can push down and release it.
Remove the wire loom retainer from the front driver's corner of the harness. Remove the connectors from the base of the seats by prying them out carefully with a trim plier or a pair of needle nose. Remove the four 13 millimeter nuts holding the seats together.
Remove the seat belt that was securing the seats. Lay them down. Make sure that your seat belts aren't tangled together. Remove the center seat from the vehicle. Carefully remove the driver and passenger seats from the vehicle. You may need a friend to help you if you can't maneuver them out on your own without damaging the truck.
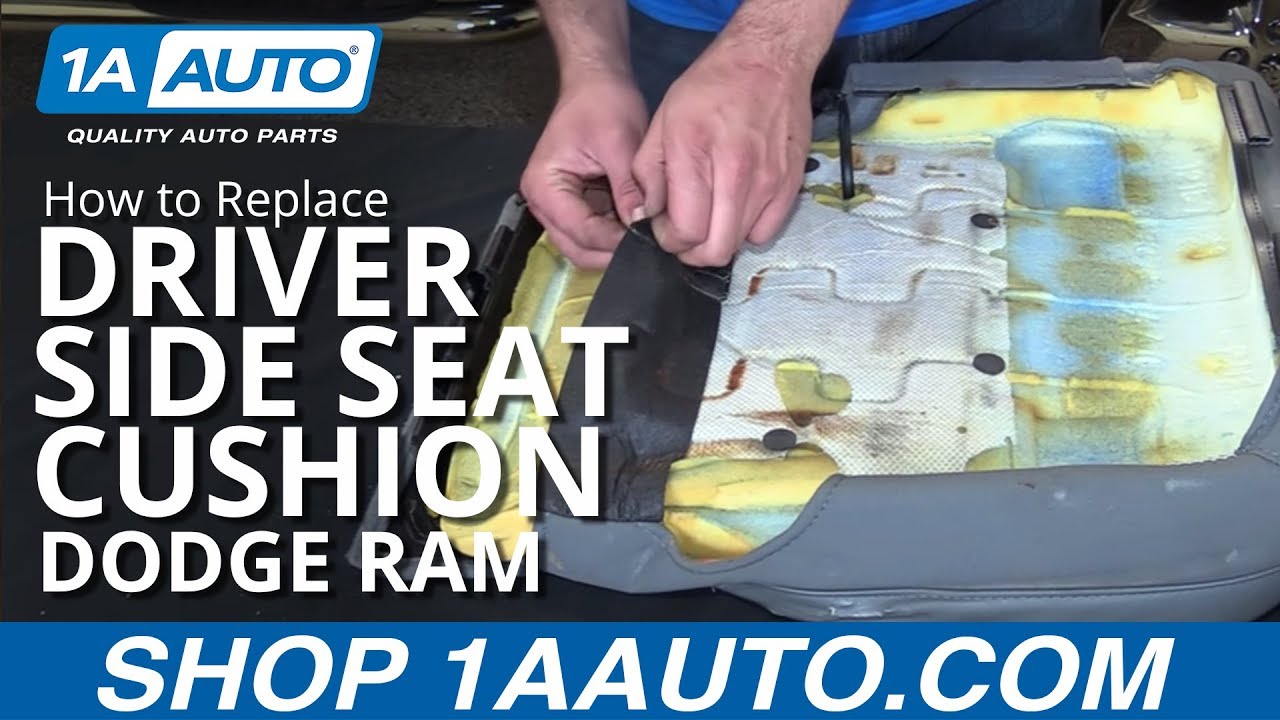
Set up your seat somewhere you can work on it, like a work bench. You're going to need to remove one, two, three,, and a fourth number 2 Phillips screw around the back—as well as a number 3 Phillips for this latch if you have a manual seat. Once your screws are removed, you'll have to pull out on the back cover that's hooked around the metal seat frame. Once that's free, lift up to release these tabs in this line here.
Disconnect your electrical connector, push down on the tab on the inner edge of this connector to release. Remove the three Phillips head screws on the opposite side: one on the back, two on the side. Release the back of the cover the same way you did on the other side and remove the side cover.
Lay your seat on its back to remove the plastic hooks. You can use a small flat blade screwdriver if they're really stuck on there. Be careful not to snap these. Just unhook. Do the bottom two next. These upper clips hold the cover from the seat back. The next set are for the bottom of your cushion cover. Release the clips on the sides. Remove your seat cover and cushion. Careful for any wiring.
Looks like we have an occupancy sensor or a heated seat, so you want to disconnect this electrical connector underneath and the black one on the inner edge. Undo the velcro on your seat cover and work the cover off of your cushion carefully—it's velcroed on.
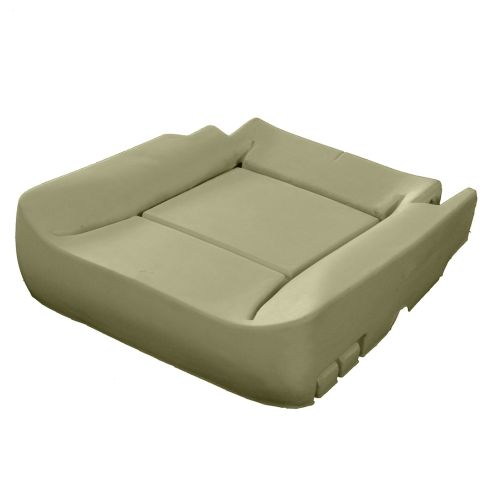
Here we have our new seat cushion from 1A Auto. We're going to reinstall it into the seat cover. We're going to use our old one. Now is a great time to replace it if yours has become damaged from the seat cushion being worn out. These steps will be exactly the same, you'll just be using a new part.
Tuck the cushion in nice and tight. This little velcro strap goes across the bottom there. We're going to reinstall it onto the seat frame. Pull our cover through the seat back. We're going to lay our seat down so we can hook our cover back into place here.
Before we get everything locked down, make sure that our heating pad harness is pulled through. Roll over the sides of the cushion. Move on to the front, the top the way it's laying now. Lay your seat back up. Make sure that your cover looks nice and tight and square. Give it a few pulls to make sure that everything is going to stay seated.
Reconnect your connectors for the heated seat. Reconnect black connector which goes to the heated seat in the back rest. Reinstall your side cover. Reconnect the connector to your seat position switch. Remember that these tabs hook over this metal rail here and that the back of this cover snaps over the back of the metal seat rail.
Now reinstall the four Phillips head screws. Reinstall the lever onto the splines with your #3 Phillips screw. Make sure that you have it tight enough and the lever works properly. Hook the back of the cover on the opposite side into place and reinstall the three Philips head screws on this side.
Reinstall the driver's seat. Lay it back and reconnect to the center console. Be sure to line up the nuts with the marks from where they came off. Reconnect the electrical connectors. Reconnect the big connector, the base of the seat. Lay your seats back down.
Line them up with their bolt holes and the alignment mark, on the front inside mount on both sides. Start the bolts in the front of your seat, on both sides. Start the bolts in the rear. Using an 18 millimeter socket and ratchet, tighten down the rear bolts on the seat brackets. Torque the seat bolts to 34 pounds.
Using the 15 millimeter socket and ratchet, tighten the front seat track bolts. Torque the front seat bolts to 30 foot-pounds.
Reinstall the tab on the bottom of your seat belt into its hole. Over the stud, reinstall your bolt with a T45 Torx socket. Torque the seat belt bolt to 29 foot-pounds. Repeat this step on the opposite side. Snap the plastic seat belt cover back into place.
Reinstall your negative battery terminal. Tighten it back with a 10 millimeter socket.
Thanks for tuning in. We hope this video helped you out. Next time you need parts for your car, please visit 1AAuto.com. Also check out our other helpful how-to and diagnosis videos.
Shop Products


How to Replace Seat Adjuster Button 2009-14 Ford F150
Watch this video to learn how to remove or replace a damaged or missing seat switch button on your 09-14 Ford F150. Its super simple! 1A Auto will show you
