
How to Replace Fog Light 2001-04 Ford Escape
Created on: 2012-06-08
Need to replace the fog lights on your 01-04 Ford Escape? We'll show you how to get the job done in this video!
-
step 1 :Servicing the Fog Light Bulbs
- Remove the three 10mm bolts from the splash shield
- Pull back the splash shield
- Twist the bulbs counterclockwise out of the fog light
- Disconnect the bulb from the wiring harness
- Connect the new bulb to the wiring harness
- Twist the bulbs clockwise into the fog light
- Push the splash shield into place
- Insert the three 10mm bolts into the splash shield
-
step 2 :Removing the Bumper
- Remove the two 10mm bolts from the top of the bumper
- Remove the three plastic clips from each inner fender with a Phillips head screwdriver
- Remove the two plastic clips from underneath the grille with a Phillips head screwdriver
- Remove the two plastic clips behind each inner fender with a Phillips head screwdriver
- Remove the series of 10mm bolts underneath the bumper
- Apply penetrating oil to the bolts as necessary
- Disconnect the wiring harnesses from the fog lights
- Pull off the bumper
-
step 3 :Replacing the Fog Lights
- Remove the three 8mm or 10mm bolts from each fog light
- Pull off the old fog lights
- Push the ne fog lights into place
- Insert the three 8mm or 10mm bolts into each fog light
-
step 4 :Reinstalling the Bumper
- Lift the bumper into place
- Start the two 10mm bolts into the top of the bumper by hand
- Make sure the splash shield overlaps the bumper
- Insert one 10mm bolt into the bottom of the bumper
- Insert the two plastic clips behind each inner fender
- Insert the two plastic clips underneath the grille
- Insert the series of 10mm bolts into the bottom of the bumper
- Insert the three plastic clips into each inner fender
- Tighten the two 10mm bolts into the top of the bumper
Tools needed
-
Phillips Head Screwdriver
Rust Penetrant
8mm Socket
10mm Socket
Ratchet
Brought to you by 1AAuto.com, your source for quality replacement parts and the best service on the Internet.
Hi, I'm Mike from 1A Auto. I hope this how-to video helps you out, and next time you need parts for your vehicle, think of 1AAuto.com. Thanks.
In this video, we're going to virtually show you how to service the fog lights. This 2002 Ford Escape that we have, doesn't actually have fog lights but we show you how to get to the back side of them and change the bulb, if that's what you need to do. We also show you how to remove the bumper cover and once you have the bumper cover off, swapping fog light assemblies, if your fog light have been broken and you're putting a new one on from 1A Auto, is pretty self-explanatory. A few bolts hold the fog light to the bumper cover. The tools you'll need are a Phillips screwdriver and a 10 millimeter socket with a ratchet.
Come up underneath and there's three bolts to remove. A lot of time what happens with these bolts, is they get, because they're in a bad place, they get rusty. You can see right here, this one has been broken off. But you are to remove these three bolts. Then you reach up in here. You'll be able to feel the back of your fog light. You would want to twist the bulb counter clockwise and then you can bring it down. There's a lead that will come down as well. You pull this little tab up, disconnect the bulb, reconnect it. Put it back up in here. Get it into the fog light. Twist it clockwise to lock it.
I'm going to put this back together. Again, here, as I speed through this. This vehicle didn't have fog lights on but I am going to show you how to remove the bumper cover and then, once you remove the bumper cover, replacing the assembly itself is pretty self-explanatory.
You're going to remove a 10 millimeter bolt here, then here to start. Fast forward here as I use a 10 millimeter socket and ratchet to remove those 2 bolts. Pretty much, this is what I'll do throughout the video. I'll show you the step and then I'll kind of fast forward through me doing it. Now, you can see, I have the car raised up off the ground. You don't need to raise the car off the ground. It just certainly makes it easier to film. There's going to be a series of Phillips clips. Here's one of the clips. Use a Phillips screwdriver. Lightly try and turn this. The center should come out. Okay and then when the center comes out the whole clip will pop out. There's three on the side here. There's three on the other side, as well as a couple right up under here, underneath your grille. Here, again, we'll fast forward as I remove the rest of those clips. Once you get those out, then there are two more. You pull this back and it's probably a little difficult to see, but up in there, there is another one of those little Phillips clips. If you feel up in here with your hand, you'll feel the head of it. The best strategy for these is actually just pull firmly down on them and the clips will break free. Now there are, a series of 10 millimeter bolts under here: one there, one there, one up here. There's a few up under here, and one to this side. I'm going to fast forward through removing these. Because these bolts are up underneath, a lot of times they're rusted from salt and sand and whatnot. They'll be difficult to get apart and you could see, as I went through in the previous shot, one of them was broken off. You may break one or two off but do your best to get them out. For one of them, I actually go back, spray on some penetrant, wait, and see if the penetrating oil will help. If you break one or two of them off, it's not the biggest thing. You can put it back together with just one or two of them missing. You can see, as I get the last bolt broken free, the bumper cover's about to, basically, come right off.
At this point, before you pull the bumper cover too far off, you would want to reach behind and disconnect the leads to your fog lights and then take the bumper cover, put it on the ground. You'll see that each fog light is held in by three either 8 or 10 millimeter bolts. Remove those bolts, put on your new fog light from 1A Auto and then we'll show you how to reinstall the bumper cover.
I'm going to speed through this a little bit. At this point, the first thing you want to do is make sure that all your clips are out. Especially those clips you had to kind of reach up underneath. Make sure those are out of the bumper cover and then, if you have fog lights, reconnect them. Then have your two bolts ready for the top. Put the bumper cover back in place and just kind of finger tighten those two top bolts to hold it. Now, go up underneath, and just make sure that the black lower fascia overlaps the gray part of the fascia. On my vehicle, the center bolt was still there so I just put that in and preliminarily tightened it up to hold things in place. Next, you're going to put all the clips back in and you want to set them up like this. Have the screw just inserted a little bit so that you can push them in place. Then, obviously, do the ones up underneath first. Push them into the fascia first and then up into the fender and lock them in place. Obviously, repeat that for the other side as well. Keeping the work pace going, I'm going to put the clips up in underneath the grille and then I'm going to start all the 10 millimeter bolts for the bottom. Again, if one of these, or one or two of them break, it's not a big deal. You can put it back together with what you have. It's pretty much inevitable that if you have a car with quite a few miles on it, that one or two of them will break. Once you're done starting them in, then tighten them up.
Now, here, I'm just putting the rest of those Phillips-style pins back in that hold the sides of the wheel wells. Then, finish off by tightening up the two top bolts on each side of the grille.
We hope this video helps you out. Brought to you by www.1AAuto.com, your source for quality replacement parts and the best service on the Internet. Please feel free to call us toll-free, 888-844-3393. We're the company that's here for you on the Internet and in person.
Shop Products


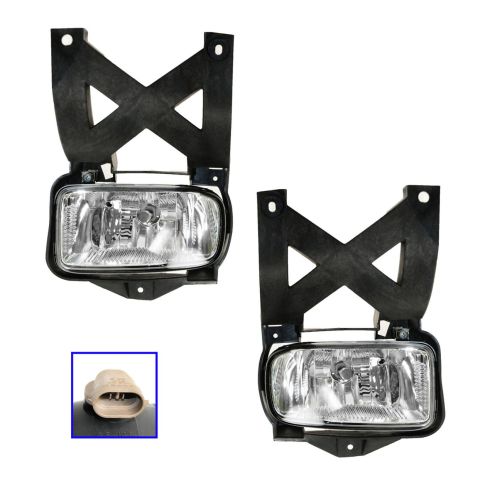
2001-04 Ford Escape Driver & Passenger Side 2 Piece Fog Light Set DIY Solutions LHT00758
Part Details:
- 2 Piece
- Features and Benefits
- (1) Passenger Side Fog Light
- (1) Driver Side Fog Light

How to Replace Fog Lights 1993-99 Volkswagen Jetta
Check out this helpful video on how to replace the fog lights on your 93-99 Volkswagen Jetta.
