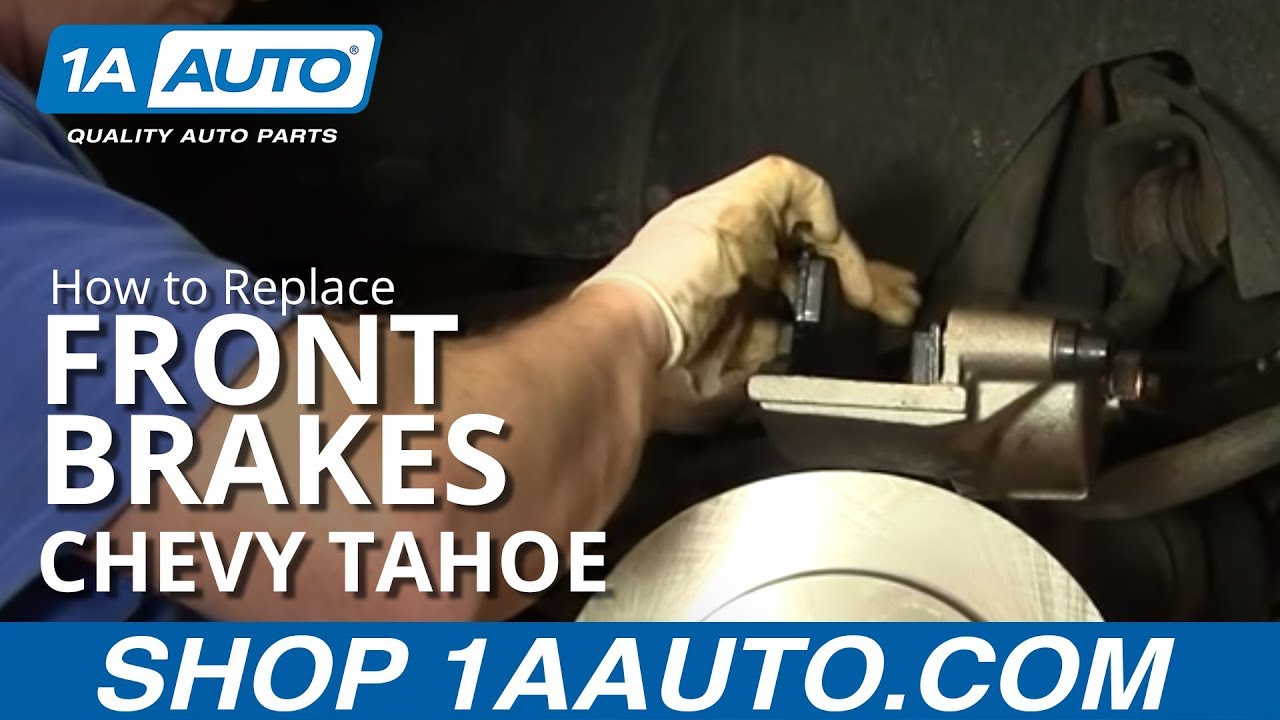
How to Replace Front Brakes 1995-2000 Chevy Tahoe
Created on: 2011-12-02
Check out this video to learn how to replace the front brakes on your 95-00 Chevy Tahoe.
-
step 1 :Removing the Wheel
- Remove the center cap and lug nut covers
- Loosen the lug nuts with the vehicle on the ground
- Raise the vehicle with a floor jack
- Secure the vehicle on jack stands
- Remove the lug nuts
- Pull of the wheel
-
step 2 :Removing the Brake Caliper
- Have a drain pan ready
- Loosen the 11mm bolt that holds the brake line to the caliper
- Force the piston in with a pry bar or flat blade screwdriver
- Remove the two 3/8 inch Allen bolts with an Allen wrench and a wrench for leverage
- Pull off the caliper
- Disconnect the brake line from the caliper
- Pull the copper crush washers off the brake line
- Remove the brake pads from the caliper
-
step 3 :Installing the New Caliper
- Thread the bolt for the brake line, putting a crush washer on either side
- Attach the brake line to the caliper
- Clean off any brake fluid with paper towels or a cloth rag
- If reusing old rotors, clean them with brake parts cleaner or mineral spirits
- If you are replacing the pads and rotors, see the 1996 Tahoe front brakes video for more detailed instructions
- Put the inner pad into the caliper
- Put the outer pad into the caliper
- Push the brake pistons to their starting point with a flat blade screwdriver
- Put the caliper into place
- Start the 3/8 inch bolts
- Tighten the bolts with the Allen Wrench
- Tighten the bolts to between 25-30 foot-pounds
-
step 4 :Bleeding the Brakes
- Pump the brake pedal repeatedly
- Check your brake fluid level
- Enlist the help of an assistant
- Remove the cap from the bleeder valve
- Connect a tube to the bleeder valve
- Run the tube into a plastic bottle with some brake fluid in it
- Instruct the assistant to step on the brake pedal
- Loosen the bleeder valve with a 10mm wrench
- Tighten the bleeder valve
- Instruct the assistant to release the brakes
- Repeat this process until fluid rather than air comes out of the bleeder valve
- Replace the bleeder valve cap
- Instruct your assistant to step on and hold the brakes
- Check for leaks
- Add brake fluid to the reservoir as necessary
-
step 5 :Reattaching the Wheel
- Slide the wheel into place
- Start the lug nuts by hand
- Tighten the lug nuts preliminarily
- Lower the vehicle to the ground
- Tighten the lug nuts to between 100 - 110 foot-pounds in a crossing or star pattern
- Reattach the center cap and lug nut covers
-
step 6 :Testing the Brakes
- Pump your brakes repeatedly until they feel firm
- Test your brakes at 5 miles per hour and then 10 miles per hour
- Road test the vehicle
Tools needed
-
Torque Wrench
Pry Bar
Jack Stands
10mm Wrench
Brake Parts Cleaner
3/8 Inch Allen Wrench
Flat Blade Screwdriver
Paper Towels
Brake Fluid
Mineral Spirits
Drain Pan
Lug Wrench
Ratchet
Floor Jack
Cloth Rags
Assistant
22mm Socket
Brought to you by 1AAuto.com, your source for quality replacement parts and the best service on the Internet.
In this video, we're going to show you how to replace the front brake calipers on this 1996 Chevy Tahoe, same as most Chevy and GMC trucks and SUVs from this time period, basically '88 to '98.
Calipers can need to be replaced because they start leaking or because they get sticky and you can't service the sleeves that the calipers slide on. The tools you'll need are jack and jack stands, 22mm socket and ratchet or your tire iron, 3/8 Allen wrench, an additional combination wrench, an 11mm wrench and then a tube, a small bottle and some extra brake fluid.
Start by removing your wheel, if you have a center cap or the lug covers take them off carefully and then if you don't have the benefit of air tools or impact tools as I do, you'll want to start with your vehicle on the ground, loosen the lug nuts, then raise it up, secure it and remove the lug nuts and the wheel. You're going to want to loosen this 11mm bolt that holds the line into the caliper. You want to take a large screwdriver or a pry bar, and it helps if you kind of force that piston back in, so I'm taking a screwdriver and prying out on the caliper.
Now we want to remove the calipers and back here there are two 3/8 inch Allen bolts, one here and then one right down here. I've got my 3/8 inch Allen wrench, I'm going to put it in, and make sure it goes into the bolt as far as possible. Then, I'm going to use a regular crescent wrench and put that on there for some extra leverage and then pull. Same thing for the top. I'm going to fast forward here as I just finish removing those two bolts .Once you've got those bolts backed out, then your caliper comes off. Take our 11mm socket, and you want to have a catch pan or something underneath because you are going to get brake fluid coming out of here.
Remove your bolts, make sure both of these copper washers come off. Now take your new caliper, put it right up here. You want to take your bolt, put one of the new crush washers on it, the bolt goes through from the same side as where your line bends to then you want to put the line, oops, you want to .obviously you put the other crush washer on the other side. A little clarification here: the new caliper should come with new copper crush washers so you put one onto the bolt then put the bolt through the line and then put a crush washer on the bolt on the other side so that you have a washer in between the bolt head and the line and then a washer between the line and the caliper. Put the line on and you want the line pointing to where that bleeder valve is. The bolt should go in nice and easy. Tighten it up just a little bit so that it stops leaking.
Now use a paper towel or a rag to wipe away the excess fluid. If you're going to be putting the same rotors back on, make sure you use some brakes part cleaner or mineral spirits and clean off the rotors. Your caliper can start leaking at any time so you don't always need to replace the brakes but as you can see here we're doing everything at once so that's why you're noticing new rotors and pads and everything. If you want to see the whole procedure of replacing your rotors and pads, just check out our other videos for doing the front brake job on this truck.
Take your inside pad, put it down in. Press it in. Your outer pad, take it and you just slide it and put it down and in. I'm just going to make sure these two shafts are back in at their starting points. It looks like they're set up out a little bit. Put this right on. I'm just going to hit fast forward here, put the bolts through, you might have to move the calipers just a little bit back and forth, get them started and then, use your Allen wrench to start them most of the way until you get them seeded. Generally, what I do is with an Allen wrench of this size, I basically pull it as tight as I can with that; it should be about 25 to 30 foot pounds.
Once you replace your caliper or calipers, pump your brakes and try to get as much pressure into the lines as possible. Be sure to check your brake fluid before you bleed as well periodically while you are bleeding. We've got plenty in there right now. Here's your bleeder valve, take this little cap off, put a wrench on, 10mm, counterclockwise is open, clockwise is closed. I'm going to put this, got a little bit of brake fluid in the bottom of a small bottle, put the hose on there. I've got an assistant in the car, I'm going to tell him to step on the brakes and then I'll loosen this up and then they'll let go of the brakes and I'll tighten it back up. Okay, hit the brakes. You watch the air come out. Let off. Hit the brakes. I can see some fluid coming out. Let off. Hit the brakes. Let off. Now repeat that for the other side. Now after you bleed them, stand on the brakes. Have your assistant put pressure on the brakes, check the backside, make sure you're not leaking at all. Make sure you top off your brake fluid now.
Now we're going to speed through putting the wheel and tire back on. Make sure you do torque them, torque the lug nuts to 100 to 110 foot pounds and always after you do work on your brakes just make sure that you pump them and make sure that they're working before you go out and road test. Just do a stop from 5 miles an hour and 10 miles an hour to make sure everything is in good order.
We hope this helps you out. Brought to you by www.1AAuto.com, your source for quality replacement parts and the best service on the Internet. Please feel free to call us toll-free, 888-844-3393. We're the company that's here for you on the Internet and in person.
Shop Products


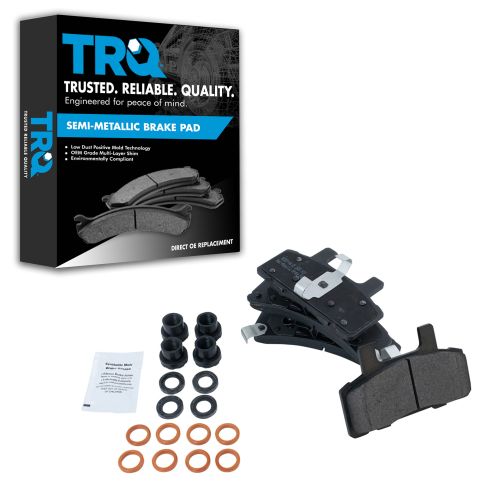
Chevrolet Dodge GMC Cadillac Front Semi-Metallic Brake Pads TRQ BFA73561
Part Details:
- Semi-Metallic
- Premium Posi
- Contact Point Grease
- Hardware
- Semi-metallic
- No
- 16 mm
- 10 mm
- 125 mm
- 5.79 in
- 77 mm
- Black
- 0.39 in
- 58 mm
- 4.92 in
- Yes
- N
- Fiber
- Mechanical
- Yes
- 0.63 in
- Yes
- 2.28 in
- Yes
- Yes
- Yes
- Integrally Molded
- No
- Yes
- 4
- Yes
- 3.03 in
- 15 mm
- 147 mm
- 11 mm
- Black
- 0.43 in
- Yes
- Steel
- 0.59 in

How To Replace Front Brakes 2000-04 Ford Focus
Check out this video and learn how to do your own brakes! This one is for your 00-04 Ford Focus. You can do it, 1A Auto will help!
