How to Replace Front Brakes 1998-2006 Hyundai Elantra
Created on: 2013-05-17
Check out this video to learn how you can replace the worn or squeaky front brakes on your 98-06 Hyundai Elantra.
-
step 1 :Removing the Wheel
- Loosen the lug nuts with the vehicle on the ground
- Raise the vehicle with a floor jack
- Secure the vehicle on jack stands
- Remove the lug nuts
- Pull off the hub cap
- Pull off the wheel
-
step 2 :Inspecting the Brakes
- Turn the rotor by hand or turn the steering wheel to turn the rotor
- Check for gouges on both sides of the rotor
- Check the thickness of the brake pads
-
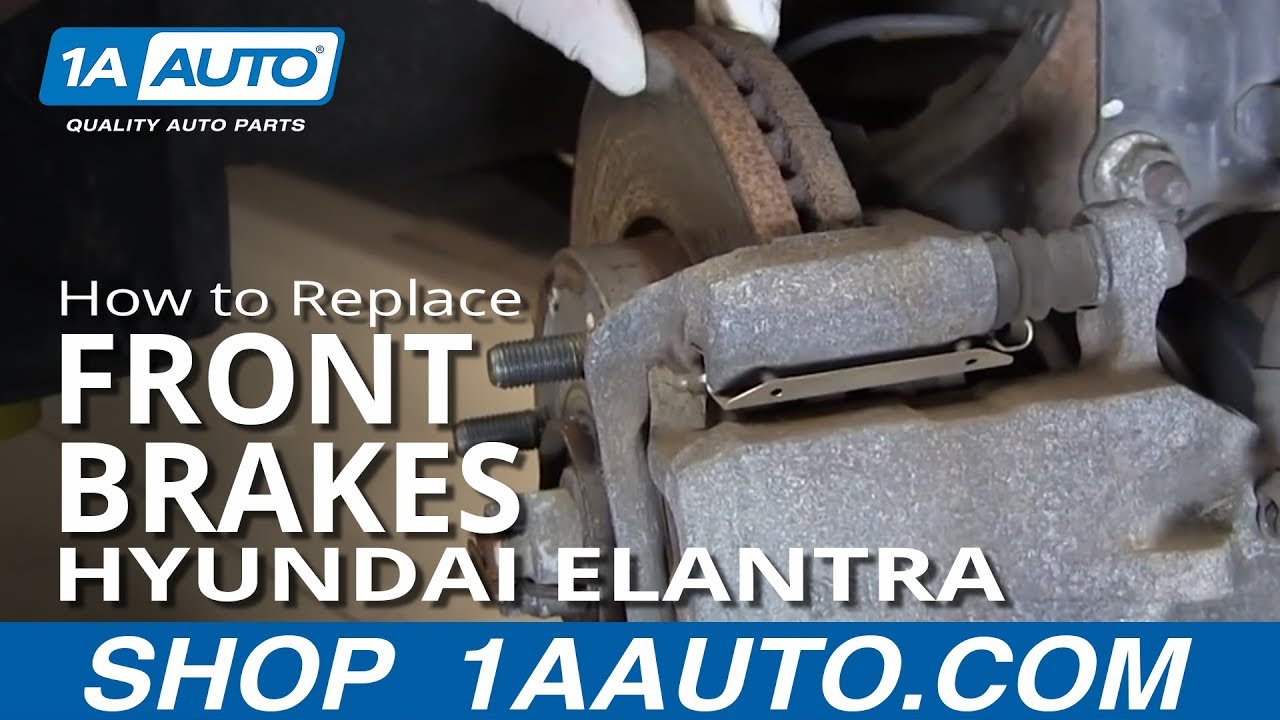
step 3 :Removing the Brake Pads
- Remove the two 14mm bolts from the brake caliper
- Pry off the caliper with a flat blade screwdriver
- Pull the caliper aside
- Pull off the brake pads
-
step 4 :Removing the Brake Rotor
- Remove the two 17mm bolts from the brake caliper bracket
- Pull off the brake caliper bracket
- Remove the two Phillips head screws from the brake rotor with an impact screwdriver and a hammer
- Pull the rotor off
-
step 5 :Installing the New Brake Rotor
- Slide the rotor on
- Insert the two Phillips screws into the rotor
- Put an old pad in the caliper
- Use a large C-clamp and the old pad or Channellock pliers to push the pistons back
- Check that the caliper bracket slides move smoothly
- Add grease to the bracket slides as necessary
- Clean the brake pad slides with a wire brush
- Put the caliper bracket back into place
- Start the two 17mm bolts by hand
- Tighten the 17mm bolts to 90 foot-pounds of torque
-
step 6 :Installing the New Brake Pads
- Install the brake pad with the metal shield on the inside
- Install the other pad on the outside
- Put the caliper on
- Thread the 14mm bolts by hand
- Tighten the 14mm bolts to between 22 - 25 foot-pounds
-
step 7 :Reattaching the Wheel
- Straighten the rotor by hand or turn the steering wheel to turn the rotor
- Make sure the rotor moves smoothly on the backing plate
- Slide the wheel into place
- Put the hub cap into place
- Start the lug nuts by hand
- Tighten the lug nuts preliminarily
- Lower the vehicle to the ground
- Tighten the lug nuts to 100 foot-pounds in a crossing or star pattern
-
step 8 :Testing the Brakes
- Pump your brakes repeatedly until they feel firm
- Test your brakes at 5 miles per hour and then 10 miles per hour
- Road test the vehicle
Tools needed
-
A Piece of Pipe (for leverage)
Large C-Clamp
Torque Wrench
14mm Socket
Channel-Lock Pliers
17mm Socket
Jack Stands
Impact Screwdriver
Flat Blade Screwdriver
Phillips Head Screwdriver
Anti-Seize Grease
Ratchet
Wire Brush
Floor Jack
1/2 Inch Breaker Bar
22mm Socket
Brought to you by 1AAuto.com, your source for quality replacement parts and the best service on the Internet.
Hi, I'm Don from 1A Auto. I hope this how-to video helps you out, and next time you need parts for your vehicle, think of 1AAuto.com. Thanks.
In this video, we're going to show you how to replace the front brakes on this 2005 Hyundai Elantra. The process is pretty much the same for any 2001 to 2006 Elantra. We do the right-hand or passenger side. The left-hand driver side is the same and the brakes on this car are actually fine so we just take them off and put them back on to show you. You'll need jack and jack stands; and 14mm, 17mm, and 22mm sockets. You'll need a ratchet with a breaker bar or a pipe for some extra leverage, a flat blade screwdriver, wire brush, a large C-clamp and a torque wrench.
We'll start by removing one of the front wheels. If you don't have the benefits of air tools, you'll want to start with the vehicle on the ground. Loosen the lug nuts, then jack up and secure the vehicle on jack stands and remove the lug nuts, the wheel cover and wheel and tire.
Pull your wheels or use a steering wheel and turn them to get easy access to the rear of the caliper. Now, we're just going to check over the overall condition of the brakes. We're going to look at the rotor for any deep grooves and you can run your finger along the front side and the back side just to make sure there are no big gouges. You can look through the inspection port here. Check your brake thickness on the inner pad and the outer pad, and these are in good shape, so what we'll do is just take them apart and then put them back together for you.
I'm removing two 14mm caliper bolts, and these should come off pretty easily with a 14mm socket and ratchet. You could also use wrenches if you wanted to. Pull the caliper towards me and give myself a little more space. Just keep a little bit of force on the caliper. You can do it on the top and on the bottom. We'll take the pads out: first the inboard pad, and note this one has a bit of a metal shield on it, and then the outboard pad.
Locate your two 17mm caliper bracket bolts. I'll use my socket wrench and a pipe. Fast forward here as we just finish removing those bolts the rest of the way. I want to remove the two Phillips head screws that hold the disc to the hub, and the right tool for this job is an impact driver with the appropriate size Phillips head. You can turn it counterclockwise, and give it a whack. Just speed up as he finishes removing those. That impact driver, when you hit it with the hammer, it drives the bit into the screw as well as turns it counterclockwise. That's how it works so well.
This brake rotor was still good so we're just going to go ahead and put it right back on and those two Phillips head screws and use the impact driver to get out. I put a little anti-seize on these so this should come apart a little easier the next time.
When you go to put the new pads on, you're going to need to recess the pistons back into the caliper. You can do it a couple different ways. You can do it with a C-clamp like this or a pair of big Channellock water pump pliers. I'm using the old pad here to help provide a surface to push against. The caliper bracket has two slides on it and they should be able to go in and out or not be seized at all. If you find that one is, pry it off and make sure it is lubed like this one is. Put it back in, re-secure the boot, and just make sure that they move okay. You are going to want to just go ahead take a wire brush and clean up where the pads sit in the caliper. Fast forward here as we just put that caliper back into position and start the bolts in. Torque the caliper bracket bolts to 90 foot-pounds.
I'm going to take my inboard pad, again with that metal plate on it, snap it into the guide, there, the bracket. Then, with the outboard, fit my caliper over it and you're going to want to make sure that these notched slides fit into the groove like so. Then you're ready to put your caliper bolts back on. Tighten up those caliper bolts to between 22 and 25 foot-pounds.
Straighten out the spindle here. Make sure that my shield isn't rubbing against the rotor at all. Reinstall the wheel. Put the wheel back in place. Put the hub cap on and start your lug nuts. You just want to kind of hand start them first, to make sure you don't cross the threads and then once they're hand started, then just kind of preliminarily tighten them up. With the car back on the ground with a little bit of pressure on it, or weight on it, I will use 22mm and my torque wrench that I've set to 100 foot-pounds and torque them in a star pattern.
After we do any brake work, it's a good practice to pump the brake pedal several times before you go taking off.
We hope this video helps you out. Brought to you by www.1AAuto.com, your source for quality replacement parts and the best service on the Internet. Please feel free to call us toll-free, 888-844-3393. We're the company that's here for you on the Internet and in person.
Shop Products


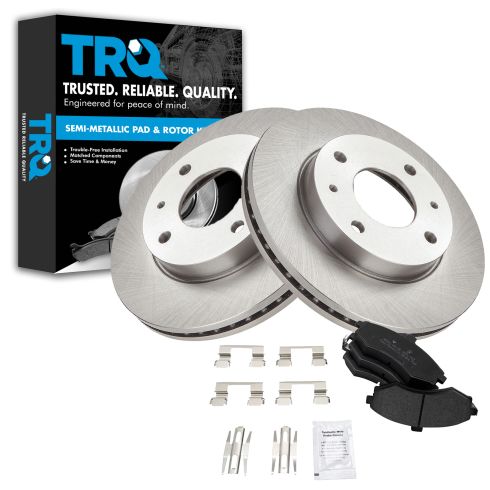
2002-05 Hyundai Elantra Front Semi-Metallic Brake Pad & Rotor Kit TRQ BKA11416
Part Details:
- Semi-Metallic
- Premium Posi
- Vented
- 4 Lug
- 10.12 in. (257mm)
- (2) Front Brake Rotors
- (1) Front Semi-Metallic Brake Pad Set

How to Replace Rear Brakes 2001-03 Nissan Maxima
Check out this video to learn how you can replace the worn or squeaky rear brakes on your 01-03 Nissan Maxima.
