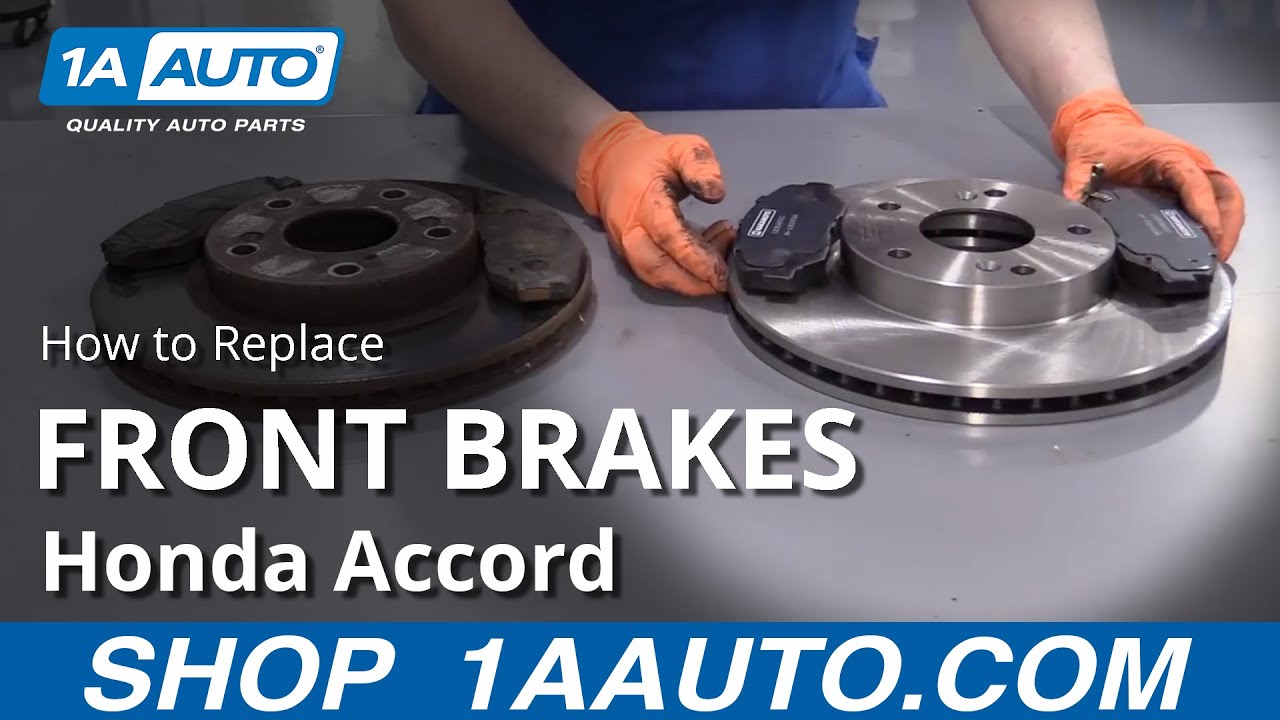
How to Replace Front Brakes 2003-07 Honda Accord
Created on: 2019-06-19
Watch this video to learn how to replace the brakes on your 03-07 Honda Accord. 1A Auto shows you how, step by step.
-
step 1 :Removing the Wheel
- Partially raise the vehicle with the wheel still contacting the ground
- Loosen the 19 mm lug nuts
- Raise and support the vehicle on jack stands
- Remove the lug nuts
- Replace one lug nut loosely
- Hammer the tire from the back side if the wheel is stuck
- Remove the last lug nut and the wheel
-
step 2 :Removing the Brakes
- Remove the bleeder screw cap
- Slightly open the 10 mm bleeder screw to ensure it's not stuck
- Remove the 12 mm brake slider bolts
- Remove the caliper bracket
- Open the 10 mm bleeder screw
- Compress the brake caliper piston, draining the fluid into a drain pan
- Tighten the 10 mm bleeder screw
- Remove the 17 mm brake caliper bracket bolts
- Remove the brake caliper bracket and pads
- Remove the rotor from the wheel hub
- Remove the brake pads from the caliper bracket
-
step 3 :Cleaning the Brake Components
- Clean the wheel hub surface
- Clean the brake tins in the caliper bracket with a wire brush
- Remove the brake tins from the caliper bracket
- Clean the brake caliper bracket grooves
- Remove the sliders from the brake caliper bracket and clean them
- Remove the slider boots to clean and inspect for damage
- Clean the slider holes in the caliper bracket
- Replace the slider boots
- Apply brake grease to the caliper bracket grooves
- Reinstall the brake tins into the caliper bracket grooves
- Apply brake grease to the caliper sliders
- Reinstall the caliper sliders
- Set the rotor on the wheel hub backwards to clean the braking surface, then turn it around to clean the other side
- Apply anti seize grease to the wheel hub
-
step 4 :Installing the brakes
- Place the brake rotor on the wheel hub
- Reinstall the brake caliper bracket
- Reinstall the brake caliper bracket 17 mm bolts
- Torque the 17 mm bracket bolts to 80 ft-lb
- Seat the brake pads into the brake caliper bracket, making sure the pad with the wear indicator is placed on the inside
- Reinstall the brake caliper
- Reinstall the 12 mm caliper slider bolts
- Torque the 12 mm slider bolts to 26 ft-lb
- Open the 10 mm bleeder screw and allow the fluid to gravity bleed until there is a steady stream of fluid
-
step 5 :Installing the Wheel
- Slide the wheel onto the lug nuts
- Replace the lug nuts and tighten them in a star pattern
- Lower the vehicle with the wheel lightly touching the ground
- Torque the lug nuts in a star pattern to 80 ft-lbs
- Lower the vehicle completely
Tools needed
-
12mm Socket
Socket Extensions
Torque Wrench
Jack Stands
19mm Socket
10mm Wrench
Brake Grease
Drain Pan
Ratchet
Wire Brush
Floor Jack
Hi. I'm Mike from 1A Auto. We've been selling auto parts for over 30 years.
Hi everyone. Sue here from 1A Auto. Today, we have an '07 Honda Accord in the shop, and we're going to be showing you how to do a front-brake service. If you need those parts or any other parts of your car, click on the link below and head on over to 1aauto.com. 19-millimeter socket to loosen up the lug nuts. Now, I am going to raise and support my vehicle with my two-post lift, and you can use jack stands with a jack. Now, we're clear to remove the tire.
First thing to do is remove the boot for the caliper bleeder, and we're going to break that open and make sure it moves. 10-millimeter wrench. Nice and smooth. I'm just going to lightly snug it, so that I can break it free once it's hanging. 12-millimeter socket. We can break free the caliper mounting/slider bolts. It's two. One on the top, one in the bottom. So now we're going to look at the caliper slider bolts.
They both look good shape. Nothing's wrong with them. I can take a pry bar now and just pry my caliper off in the caliper bracket. While that's out, I can look at it, make sure the dust boot's not torn. There's no fluid leak. I'm going to take my tool that pushes the caliper piston back, snug it up before I start to push that piston back. I can open that bleeder screw again.
Aim it at the bucket I have down below to catch the brake fluid. At this time, I'm going to feel out the caliper piston. It's going back really smooth. No glitches. It's not frozen. No fluid's coming out of the dust boot. So, we have a good seal. Once that's snug, I can re-tighten my bleeder screw. 17-millimeter socket, and now we're going to break free the caliper bracket to knuckle bolts.
It's just two of them. One top, one bottom. Now we have the bracket with pads in it. There's the front rotor. So, now all's we have to do is take the pads out of the bracket, and that's basically if they're frozen, and then you can take a hammer, or I just squeeze them sometimes as the outer pad and the inner. I'm noting where the indicator is on the inner pad.
Here, we have our front rotor for our '07 Honda Accord from 1A Auto, and here we have our set of pads. They come pre-shimmed. They have the beveled edges to allow the brake dust to disperse evenly. Both inner and outer pad have that marking, and they both come with the shims. The rotors are a nice crosscut. They have the manufacturer's amount of vintage specs, and it has the actual specs stamped on it.
Here, we have a rotor that we took off. It's probably not original equipment, so if you need these parts or any of the parts for your car, click on the link below and head on over to 1aauto.com. Now, I'm going to clean the surface of the hub. Use a little brake clean. You can see all that dirt and grease come right off, and just use a nice wire brush. We don't want any raised grease. I mean, raised rust lines.
I just want to point something out here. So if someone has done a brake job on this car probably in the past eight months or so, then you can see the groove lines. They took what we call a grinder wheel or a whizzer cookie, and they just went to town on this hub. There's a couple of problems with that. That is shaving the metal off. You can see the actual marks. The car is probably... It's an '07, so it's 12 years old. It's up there in age.
The customer's never going to feel a pulsation, but you need to keep this down to a minimal of how much metal you take away from a hub on a mounting surface. So, now, we're going to clean up our front caliper bracket. First thing I'm going to do is clean the tins while they're in the bracket. It's easier to hold onto them. Do that to both sides. Now, we can take the tins off.
Let's clean out the surface that they mount to. See that right there? It's layers of rust. That's what I want to avoid, so I can chip away that. That'd be great. What happens there is that rust ends up swelling and pushing that tin up. It makes that pad not slide in and out of the bracket, so we call that... It'll end up with uneven wear and premature wear. That's the whole point of doing what we're doing.
That's much better. I'm going to clean the backside of the brackets here, the tins. These tins are in good shape. You can always order a set of tins with the brake job. So, if you don't want to clean, you want to avoid this part of the job. It will go quicker. Plus you don't know if it's damaged until you take it apart. So, might be best for the few dollars it costs to be prepared and just change them out new every time.
Now, I'm going to take the sliders out, and these are stiff, so I don't know what I'm going to find when I take this out whether it's damaged. I might actually take a pair of pliers to this. I got it. Wow. Okay, so either they put too much grease in there, or they didn't clean it when they redid it. Look at the condition of this. Looks like it's going to be able to be reusable. Let's take the boot off, really examine the boot. Make sure there's no pin holes.
That looks good. I'm going to take the wire brush and clean inside there. I'm going to repeat that process on this side. I'm going to reinstall the boot. Both sides, reinstall. Let's put some silicone paste right in there. This is water resistant, so hopefully, it stops that rust buildup that we saw that we took out. That only goes underneath, nothing on the top part of the tins.
We want a smooth sliding surface. Okay, the rubber bushing always goes on the top caliber bracket. I don't know about always. That seems like it's always that way, especially with Hondas. I got to put some on the boot inside. Much smoother. I couldn't even turn it before. Perfect. Let's do the same on the other side. I've put the rotor on backwards so that I can clean the surface before I install it.
I'm just getting the package oil off, the anti-rusts they put on for it when it sits on the shelf. I got to spray a little anti-seize lubricant on the hub. Now, I can mount my rotor. This did not have any of the mounting screws. They must have fallen off in previous... or maybe broke off in previous installations. I'm going to use a lug nut to hold that rotor flush to the hub. Now, you clean this surface of the verdict.
Now, we're ready to install our caliper bracket. We have a upper bolt key. Slide it. Then the lower bolt. We're just going to snug these. Then I'm going to torque them to the manufacturer's specs. 80-foot pounds is the specs for these caliper to knuckle bracket bolts. Now, we can put our pads in the caliper bracket. Put the inner one in first, and that's the one with the indicator, and it's on the top and the outer pad.
Let's grab the caliper, ready to mount that. You'll see a flat spot on the sliders. Those line up with the angle of the caliper. I'm going to torque down the caliper slider bolt, and it's 26-foot pounds. Last thing I'm going to do is reopen the bleeder screw, and let it gravity bleed till I see a steady stream of fluid. Looks good. No air bubbles. Well, we can snug that up. Let's clean it and re-install our caliper with the screw cover.
Now, we're ready to put our wheel back on. I'm just going to snug them up by hand. Then I'll lower it down on the ground with the weight of the vehicle on it, and I'll torque the wheel to 80-foot pounds. 19-millimeter socket, and we're going to torque the wheel to 80-foot pounds in a star pattern. Double check. Now, we're going to repeat the process on the other side.
Thanks for watching. Visit us at 1aauto.com for quality auto parts, fast and free shipping, and the best customer service in the industry.
Shop Products


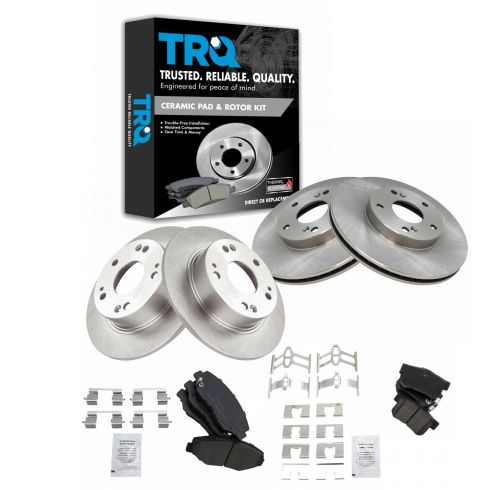
2003-07 Honda Accord L4 2.4L Front & Rear Ceramic Brake Pad & Rotor Kit TRQ BKA11290
Part Details:
- Premium Posi
- Solid
- 10.23 in. (260mm)
- Ceramic
- 5 Lug
- (2) Front Brake Rotors
- (2) Rear Brake Rotors
- (1) Front Ceramic Brake Pad Set
- (1) Rear Ceramic Brake Pad Set

How to Replace Rear Brakes 2001-05 BMW 325Xi
Learn what steps are needed to remove the old rear brakes and prepare and install new ones with this how-to video
