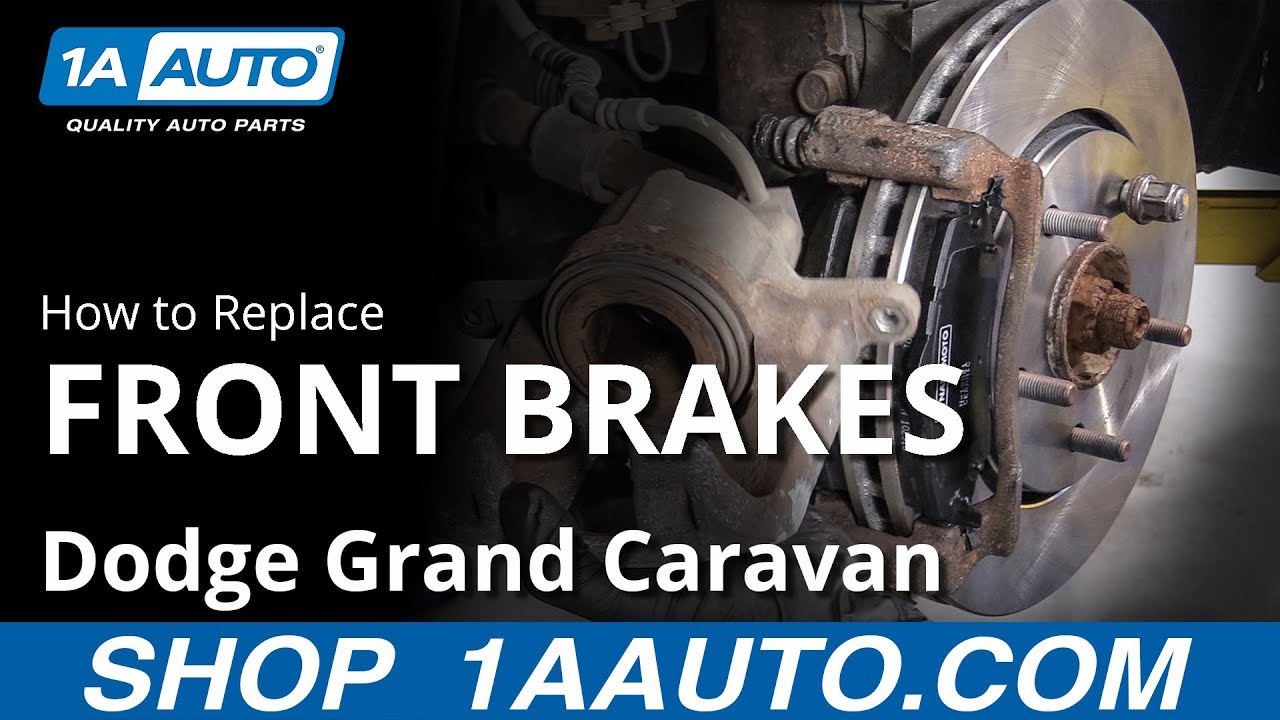
How to Replace Front Brakes 2008-20 Dodge Grand Caravan
Created on: 2019-09-09
Learn how to replace and properly prepare the front brakes yourself with these detailed tips and steps
-
step 1 :Removing the Wheel
- Loosen the lug nuts with the vehicle on the ground
- Raise the vehicle with a floor jack
- Secure the vehicle on jack stands
- Remove the 19mm lug nuts
- Pull off the wheel
-
step 2 :Removing the Brakes
- Pry the brake pads into the caliper with a flat blade screwdriver to push in the pistons
- Remove 13mm bolts from the brake caliper
- Pull the caliper aside
- Pry the brake pads off with a flat blade screwdriver
- Push the slides on with a flat blade screwdriver
- Remove bolts from the brake caliper bracket
- Pull off the brake caliper bracket
- Pull the rotor off
-
step 3 :Preparing the New Brake Pads and Rotors
- Clean the hub with a wire brush
- Apply copper anti-seize to the hub
- Clean the rotor with brake parts cleaner
- Secure the rotor with a lug nut
- Apply grease to the caliper slides
- Clean the brake pad slides with a wire brush
- Apply grease to the brake pad slide mating surface with grease
- Press the brake pad tabs into place
-
step 4 :Installing the New Brakes
- Put the caliper bracket back into place
- Start the bolts by hand
- Tighten the bolts to 126 foot-pounds of torque
- Install the new brake pads into the bracket
- Put the caliper on
- Thread 13mm bolts by hand
- Tighten bolts to 26 foot-pounds
- Clean the rotor with brake parts cleaner or mineral spirits
-
step 5 :Reattaching the Wheel
- Slide the wheel into place
- Start the lug nuts by hand
- Tighten the lug nuts preliminarily
- Lower the vehicle partially to the ground
- Tighten the lug nuts to 100 foot-pounds in a crossing or star pattern
Tools needed
-
21mm Socket
13mm Socket
Flat Blade Screwdriver
Torque Wrench
Copper Anti-Seize
19mm Socket
Mineral Spirits
Brake Grease
Ratchet
Wire Brush
1/2 Inch Breaker Bar
Hey friends, it's Len here at 1A Auto. Today we're working on our 2012 Dodge Caravan and I want to show you something very basic, front brake job. We're going to be doing some pads and rotors. It's going to be super easy. I can do it. You can do it too. As always, if you need these or any other part, you can always check us out at 1aauto.com. Thanks.
Okay, so one of the first things that we need to do after we get the vehicle raised off the ground, we're going to remove the lug nuts. For this vehicle it's 19 millimeter. I'm going to wear safety glasses because I'm going to be using my impact gun. That fourth lug nut, I'm going to leave on there a little bit, and that's just so if the wheel comes loose, it won't come falling off and hurt me. Break the wheel free here. Sometimes they don't want to break free. Can use a little bit of leverage. We're right up against the caliper and the wheel. Bonk, bonk. Take the wheel off and we'll wheel it out of the way safely.
Now that we have the wheel off, what we want to do is push back the caliper piston, which is located right in here. You also want to check to make sure you don't see any liquid coming out. If you see any liquid coming out of the caliper piston boot area, you know you've got a leak, in which case you would replace the caliper. To push back the caliper what a lot of people like to do is they'll take off this bleeder screw cover right here. It should just come right off. There's the boot. Under that is the bleeder screw. We'll say it's your prerogative if you want to open that up. If you open it up, brake fluid will come out, so you need to have a collection bucket, hand protection, eye protection while it's open.
That would be where you would go ahead and take your small pry bar and try to push back the caliper simply by going like this. I'm going to go right between the caliper and the pad, and I'm going to pry. And as I do that, it's going to push this piston in, just like this. It's a good idea to do it nice and slow. Oops.
All right, so the caliper can move around. You can see that the pistons moved quite a bit away from the pad. If you're not sure if it's all the way back, just come from this side now. Give it a nice little push. That piston's definitely in now. We can move on to the next step.
This right here is the caliper slider. It's kind of like a smooth bolt that just kind of rides inside here. And that makes it so your caliper can move around. What you need to do is take this bolt out and that just screws into this area right here. Okay?
So we're just going to use our 13 millimeter on this bolt on the backside. And then I'm going to hold this with some pliers and take out this bolt. I'll leave it in a few threads. And then I'm going to go ahead and remove this one completely and then we'll remove the other one completely. Break this free.
The other one. There's the pair. They both look the same. They have some threadlocker on them. So it'd be a good idea to clean that off. And then I would leave it up to you if you wanted to reuse more threadlocker.
Now we can take the caliper. We have a much better idea of what's going on with it at this point. You can see all the way around the boot. There's no fluid coming out, in which case you do not need to replace this caliper as long as the piston did push back. We'll set this aside and we can move along.
Okay, so we have our bracket with our pads right here. Let's get our old pads out of there. This right here is the wear indicator. It's letting us know that our pads are pretty much worn to the very minimal. So we'll set this aside, use it actually for getting this pad out of here first. So there we are. Here's our front pads. As you can tell, these are garbage. We've got our bracket with our sliders. We're going to take off these bracket bolts right here. If you're using an Aragon at all, make sure you're wearing safety glasses.
We've got our caliper bolts, caliper bracket. Let's move along. All right, so now we need to make sure that we secure this portion of the caliper so it can't fall down and go just like that. We need to take our rotor off of here. All this white stuff that comes around the hub in between the rotor and the hub right there, this is corrosion. And what it's doing is it's actually cementing the rotor in so it can't move around at all. So you can either try to chisel this out of here or you can just go ahead and give your rotor a few bonks and it should all break free and you'll be able to get your rotor off. At that point, we'll clean this up the best we can before we re-install our brand new quality 1A Auto part.
I'm going to use one of these lug nuts. I'm going to go right like that. And that's just going to protect the rotor from flying off and potentially hurting me. Here we are. Here's our brake rotor. That is absolutely garbage. Let's put it aside.
So here we are friends. A quick product comparison for you. Over here we have our front brake rotor and pads out of our 2012 Dodge Caravan and over here we have our brand new quality 1A Auto parts. The original rotor as you can tell is in what I would consider very poor condition. You definitely have brake noise and of course a brake pulsation. I'm almost sure of it on this thing. This is the rotor braking surface here. This is horrible. That's what the brakes were supposed ... the brake pads are supposed to be grabbing onto as they're stopping. Just doing that sounds horrible, and I don't even have as much pressure as a caliper would have.
Set those pads over here. I'm just going to show you the rotor to rotor, the same level here. Okay? I'm going to put the new one right up on top. You've got your same rotor diameter. That's very important. If you have one that's bigger than the other or smaller than the other, obviously there's an issue there. We'll take it. We'll turn it over. This part is also a very important. We'll gauge it this way and that just lets us know that the rotor hat, which is the part that goes up against the bearing, has the same depth from original to ours. If it's different and one sits higher than the other than the rotor hat, which is this area right here, is either deeper or shallower. Okay?
We have five lug studs, same as the original, and of course we have our pads. We don't want to leave that out. Let's bring them over, give you a little comparison to what we're looking at. We'll hold them up next to each other, just like this. Make sure we have the same size. We have the same mounting ears. They're the exact same. The only difference would be the amount of meat on there. Okay?
Set that aside. With all that said, I don't see any reason why these wouldn't be quality parts to install into the vehicle, so I'm going to go ahead and do it. As always, if you need this or any other part, you can always check us at 1aauto.com. Thanks.
Okay, so now that we've got the rotor off, we've got a clear view of our wheel bearing here. This is the hub. The areas that you can see that are kind of dark and discolored, that's the area that reaches up against your rotor and it's the mounting spot that your rotor goes up against. We need to make sure that that's nice and clean. If there's anything that's coming up off of it, like a buildup of any sort, that's going to make rotor off kilter and you're going to have a brake pulsation and probably a wheel shake as well. All right?
So there's a couple options you can use to clean this up. You can use something as basic as this brush, or you can use something like this, which is just basically a rotating sanding tool, has a little sanding disc on it, and you use it and you can scuff right along the edges here and clean it up nice. So it's your prerogative. You do you boo-boo. But I would definitely clean it up to make sure it's as clean as possible and there's no raised edges. I'll show you what the brush can do real quick.
And this is great if you've got all day. And some of you may, and that's fine. But what you still have a lot of times is a little bit of buildup that may or may not come off. So you can keep working at it, or can go with something like this. And I'll show you what this looks like in comparison to what we just did.
So in the same or less amount of time, I already did all this coming around here. And as you can tell, this is much cleaner than this area up here. So you decide. You make your choice. Okay? You do you boo-boo. I will say that you are going to need a wire brush either way to get in between here, okay, between the lug stud and the bearing because this just doesn't get in there. All right? So I'm going to continue with this for now and then we'll use the wire brush for only what we need it for.
Okay, so this looks really good. I don't feel any raised areas. Go all the way around. I'd say we're clear to move ahead to the next step. I'm going to use a little bit of copper Never-Seez along the mounting area where the rotor is going to go onto the bearing or the hub. There we are. Just put some on there. It doesn't need to be perfect. If you miss a couple of spots, it's okay. This is going to kind of smoosh in there and it'll do what it needs to do. This is just going to help keep moisture off of there, keep it from building up rust and everything.
All right, so we have our brand new quality 1A Auto rotor here. I'm just going to put it right on there like that. Now's a great time to grab a lug nut. We're just going to put it on and we don't need to tighten it up with an Aragon or torque it down or anything like that because it's going to be coming back off shortly. But the reason for doing this is just so the rotor doesn't move around and we don't risk anything falling in between the rotor and the hub that's behind it. If we get something behind there, then that's going to cause an issue. Like I said before about having raised areas, the rotor is going to be off kilter, have a brake pulsation, probably have a wheel shake as well. Something as simple as a lug nut, just throw it on there. Let's continue.
Okay, so now it's time to go ahead and clean up this bracket. We have a couple of things we need to pay attention to here. You have your sliders. These need to be able to move in and out without any resistance. So what we're going to do, take them right out, can take the boot right off, just like that. We'll set it to its corresponding side.
The reason for setting it to one side or the other is just so we can remember which side they go on. A lot of times on these sliders, what you'll notice, and this doesn't appear to be one of them, but just to state, you'll notice there'll be like a rubber on one of the slider pins, so that needs to go into the right hole. Okay. If you try to put it into the wrong side, it's going to cause an issue.
What we'll do with these sliders is we'll clean them off the best we can. If you want to use a little bit of parts cleaner, you can do that. I'm not going to worry about it for this application. I'm just going to get it nice and clean. Any gunk that may have been on there is going to be off. Both these pins look pretty good. I would say they're reusable. If for some reason your pins had a lot of rust or pits on them, you could try to clean them up with a wire wheel and you might be all right, but for the price of a slider pin kit you might as well just go with that. But these are nice and smooth. They won't cause any issue going in and out of here so I'm really not too worried about it.
Since we're still working on the slider pins here, we'll continue onto the boots. These boots, you need to make sure they're not torn, not dry rotted. They're still nice and flexible and pliable because they need to be able to do this very frequently. Every time you step on the brake, this is going to be moving around.
To clean it out and make sure there's no gunk or debris in there still, I'm just going to take our rag, just help it along through there, give a little twist as it goes. Grab it on the other end. Now I just take the boot and I just roll it with the rag inside the center there. What this is doing is just getting the grease all onto the rag and off of the boot. Just drag it right out of there. You can see it in comparison. This is going to be much cleaner and we know what kind of grease is going to be in there by the time we're done, where if we left it like this, we don't really know what's in there. There could be moisture, debris, anything. Who knows? Take a little bit of time and do the job right. You don't have to spend all day doing this. It's not super integral, but it is a good idea to at least give it an honest effort.
So now we have our caliper bracket. What I'm going to do before I continue to clean inside here, which we do still need to do, I'm going to take off these clips. You just use a small pocket screwdriver. It doesn't have to be bent like this. This is just, well bent. It's a specialty tool, we'll call it. So you just take off these clips and you pay attention to which way they come off. You've got a little hooky do here, okay. And you've got a nice flat area. The hooky do goes on the outside, away from where the rotor would be. If you put it the wrong way, and it's coming this way, this is going to hit up against your rotor and you'll know right as soon as you start driving, it's going to make a lot of noise for you and you're going to know what's going on.
Also, something to pay attention to is along this lip right here there's a flat area and that's going to ride right along the flat area of the caliper bracket just like this. So for some reason you ended up having it upside down or on the wrong side, that flat area will be on the wrong side and you'll know. If you can't remember which way it goes for some reason, you can just set them up so you can. For me personally, I'm really not too worried about it and I'll re-explain to you all that as we go to install our new tins.
So we have our tins off of there. We have our metal for the bracket. We need to make sure we clean this up. To do that can use something as simple as a small wire brush. Obviously the bigger one for the hub braking surface is too big, so we'll just go with the smaller one. And you just kind of go like this. Maybe this is working for you. Maybe it's not. If it's not, you can go ahead and use this tool. We used it before, billable at 1aauto.com. Just hook it up to some air. Give it a little bit ... Sand it down. It's going to look nice and pretty by the time you're done. For this application, I'm just going to continue with the brush.
You'll notice I got it all clean nice in here along this edge, this edge, and of course this edge up here. Okay? I did the same to all of these. And you could do that, like I said, what's something like this or this tool right here. You do you boo-boo.
Now that we have all those clean, we're going to clean the holes were the sliders are supposed to go. To do that, we're going to use something as simple as a catch bucket and a little bit of parts cleaner, nothing special. Okay? Bring it over the bucket. We've got our eye protection, our hand protection. Both are super important. I want to keep my eyes for a long, long time, hopefully for my whole life really, I mean.
I'm going to go ahead and spray in a little bit of this. As we spray stuff in, there's going to be fluid that's going to want to come out because we're forcing fluid and air in so it's going to all want to try to come out as well.
Use our board brush. Same to the other one. Here we are. Set that aside. Dump that crud out of there. I'm going to hit it again. Dump that out. Okay. Grab our rag. Something else that's very important about this that I'm going to show you in just one second. Okay. Get this bucket out of here so I'm not breathing it anymore. Come back over to a nice pad.
Along the caliper bracket where the slider goes in, there's a little edge right here. All right? A lot of times what will happen is moisture will get in between the boot and right here and it'll get all rusted and flaking. If that's the case, you need to go ahead and clean it off, just like that. Okay?
If it doesn't clean off nice and you put your boot on there, moisture can get in between the boot and this, work its way up, and in between where your slider and the inside of the bracket is and seize this slider up. In that case you won't be able to move it. Your caliper won't be able to function properly. That's going to become a major issue for you. You'll have overheating brakes, probably a brake pull, and I'm sure a pulsation at some point. So make sure that that's clean. Make sure the inside portion of this is clean and the sliders are clean. This is all super important. With all that said, we can continue on.
Okay, so now it's time to get our sliders in here. We're going to use a little bit of caliber grease. You don't need to use anything special, but you do need to use some sort of lubricant, something that won't break down, liquefy. We're going to coat our slider. All right, this part's super important. You're going to come all the way up so it gets onto that lip area that's on the slider. The slider has a lip just like the bracket, and that's where the boot sits into. So you need to make sure you get grease up inside there. I'll show you why.
You take your boot. Slide it right up on there. As it goes over this little ridge, goes into the groove, we're going to spin the boot on there. That's going to keep moisture from working its way inside and seizing up our slider pin. I'm just going to apply a little bit more, just along here. Nice little glob of it. We're going to bring it, slide it right in. I twist as I go. I can see I've got grease coming up there. That's great. That's exactly what I want to see.
Slide it up on there. Give it a couple more twists. We know that there's grease sitting along this ridge in the boot and the caliper bracket and there's grease in between the ridge between the slider and the boot. We'll do the same to the other side.
All right, so now that we've got our sliders done, these are looking great. They're flowing like they're supposed to. We're going to continue on. We have our tins that we removed. These are very important. You need to make sure that you either clean these up and put them back on, or replace them and put the new ones on.
I'm going to go with replacing these only because I found one that has a broken ear. If you have one that has a broken ear, you absolutely need to replace it. The reason for that is because there's nothing that holds this in, so this is just going to go ... right? It could come this way, could make a noise, cause issues down the line. So if you have any broken ears or you just don't feel like cleaning these up, I would replace it. If you were going to just clean these up and you did not want to replace them, use your brush. Get in here, give it a nice little scrub, could use some parts cleaner if that's nice for you. Get it as clean as you can and then install it.
I'm going to set these aside, recycle those, and we have some brand new tins. So what I was saying earlier about the tins is you want to make sure you have your ear and your little prong and you've got your little raised edge. Pay attention to where all that stuff is. That's going to be very important in the coming step. But before we get into that, we're going to take a little bit of caliper grease. The type of grease you use here isn't very important. An exception of just the fact that you want to make sure you use something that's heat resistant.
So once your brakes heat up, which they will do because brakes are all about friction. That's how you stop is with friction. Friction creates heat. So if you use something, I don't know, like I don't know why you'd even use it, but like Vaseline, that's just going to liquefy or melt down and it's going to make its way in between your pad and your rotor and you're not going to have very good friction and you're not going to have very good braking.
So now that I have all four of those nice and coated, they look great, we're going to grab our tins. We've got our ear and our little flippy do. I'm going to start with the part closest to the rotor. I'm going to squeeze it in, just like that. Okay? This one, I've got my flippy do and my ear. Ear phases out. Start with the part closest to the rotor, squeeze it in, and so on.
Okay, so we've got our bracket. We've got our bracket bolts. If you would like to use a little bit of threadlocker, you can go ahead and do that. It's your prerogative. I'm going to take my bracket, line up the bolt holes on the bracket with the ears in the knuckle. Start one in. I'm not going to tighten it down until I get the other one started as well.
Now that we have both these started, we're going to go ahead and snug them up and then we'll torque them down to the manufacturer's specifications. All right, so we're just going to bottom these out. Now we'll torque these down. We're going to go 126 foot-pounds with our half inch torque wrench and our 21 millimeter socket. This torque wrench is available at 1aauto.com by the way. It's a very good torque wrench. Both of those are tight. If you felt like you needed to go back and do them again, you can. I would say that they're good to go.
All right, so now what some people like to do is put a little bit of lubricant along the ears of the pads where they mount into the brackets along the tins. So I'm just going to go with a little teeny dab. You don't need very much on these. Okay? Last thing we want is any grease getting on the friction material, whether it's the pad or the rotor.
Now that we've got a thin amount of lubricant on all ears, we can install these into the bracket. One of the pads will have a brake wear indicator, or you can call it a squealer. That goes on the inner pad, the pad closest to the piston of the caliber. On this application it faces up. I'm just going to go right in here. Should want to slide right in, theoretically. There it is. If you had to use a hammer or a screwdriver or anything else really to try to bonk this in, odds are you didn't clean up your bracket enough, in which case stop what you're doing, take the caliper bracket off and go ahead and clean down the bracket a little bit better and then restart all these steps up to this point.
That slid in nice so we can continue. Do the outer pad. Slides right in. That moves around freely. This moves around freely. I like it. Let's continue.
Okay. So we've got our caliper. We've got a little bit of caliper grease. We're just going to go along the piston and along the backside of these ears, only where the caliper touches up against the pads. Some people like to put a little bit of lubricant all over the whole pad, which doesn't make any sense because then you're going to get dirt and debris all accumulated on there and it's just going to be looking like garbage. So I'm going to take this. You don't have to go too crazy on it. What this does is it's going to make a nice barrier for moisture, so you won't have moisture accumulating in between there. It's going to help with vibration dampening and noise reduction.
Put the caliper up on here. If it doesn't want to go past the slider, no problem. Give a push, slide it over. We're going to grab our caliper bolts right here. If you want to use a little bit of threadlocker, it's up to you. It's your prerogative. Got to get that one on there. There it is. That's much better.
We'll bottom these out and then we'll torque them down. I'm going to use my 13 millimeter. Bottom this out. If you notice while you're trying to turn this in, the slider is spinning at the same time, you could just try to hold it. If you can't hold it by finger, just grab your pliers. Let's go ahead and torque these down to manufacturer specifications, which would be 26 foot-pounds. All right, I'm just going to hit it one more time. Both those are torqued.
So now we're just going to go ahead and put on this bleeder screw cover. That goes right on the bleeder screw and it prevents moisture and debris from getting in there. Okay friends, here we go. We're going to get the wheel up on here. To do that, I've got a lug nut in hand just so I have it ready. I'm going to bring it over to my leg and then I'm going to lift it up using mostly my legs/ab muscles and put it on here. I'm not going to try to lift it up with my back and potentially hurt my back. Like this, lift it up on my leg. Easy peasy.
Get that one lug nut started on there pretty well. Now we're just going to bottom these out. We're going to go in star pattern. It's important to go on a star pattern, so that way there, if you were to go in a circular pattern, you could make the wheel tighten up kind of off-kilter like this and think you have it tight. Then when you drive down the road, bonk, hit a bump, and this is what your wheel's doing. Okay?
So just do a star or criss-cross. Call it what you want.
There we are. Now we'll torque those down to manufacturer specifications. We're going to use our 19 millimeter with our torque wrench, 100 foot-pounds. If you want to, you can go around again. There we are. Easy peasy.
Thanks for watching. Visit 1aauto.com for quality auto parts shipped to your door, the place for DIY auto repair. And if you enjoyed this video, please click the Subscribe button.

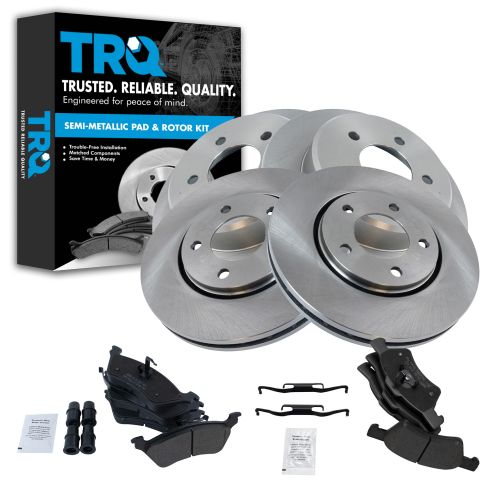
2001-07 Dodge Chrysler Front & Rear Semi-Metallic Brake Pad & Rotor Kit TRQ BKA11373
Part Details:
- Semi-Metallic
- Premium Posi
- Solid
- 11.42 in. (290mm)
- 5 Lug
- (2) Front Brake Rotors
- (2) Rear Brake Rotors
- (1) Rear Semi-Metallic Brake Pad Set
- (1) Front Semi-Metallic Brake Pad Set

How to Replace Brake Kit 2006-10 Chevy Impala
Here's a video on how to service or replace the rear brakes on your 06-10 Chevy Impala.
