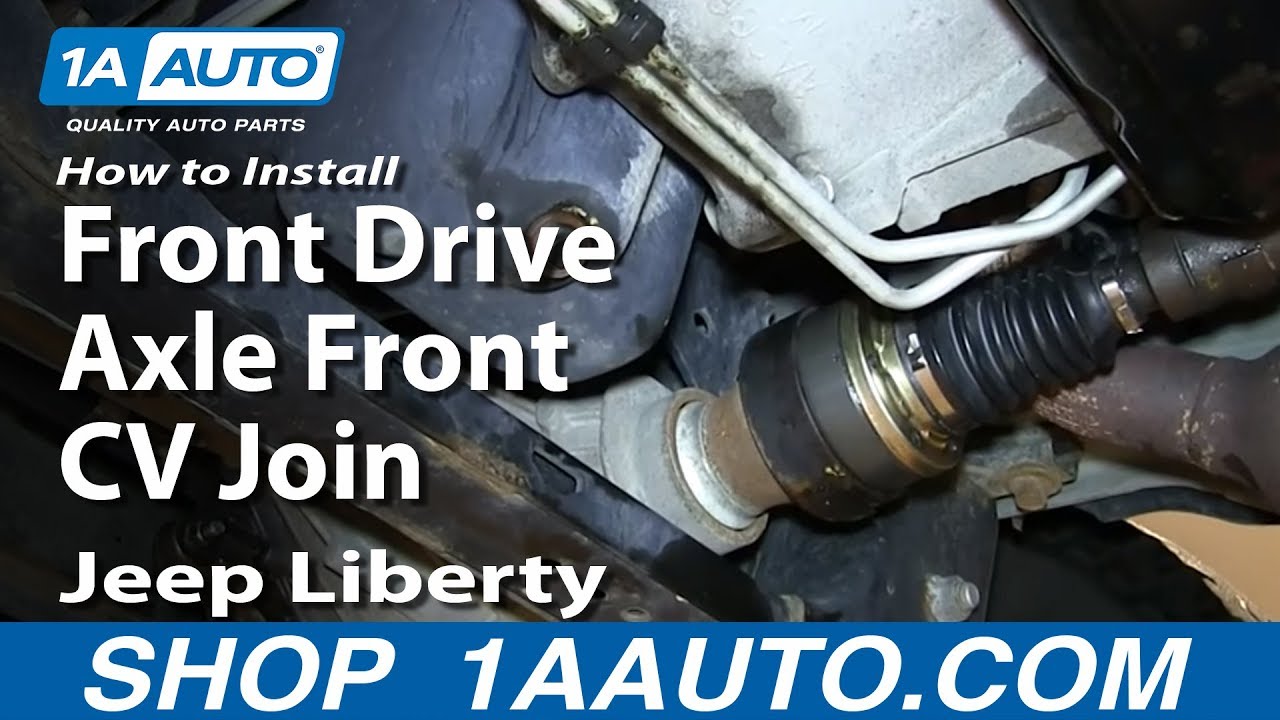
How to Replace Front CV Joint 2002-07 Jeep Liberty
Created on: 2014-01-25
Learn how to replace the front CV joint in your 02-07 Jeep Liberty with this video from 1A Auto.
-
step 1 :Removing the Driveshaft
- Remove the 8mm bolts from the front of the driveshaft
- Break the front of the driveshaft free with a hammer and a flat blade screwdriver
- Have an assistant hold the driveshaft, or brace it in place
- Remove the 8mm bolts from the rear of the driveshaft
- Break the rear of the driveshaft free with a hammer and a flat blade screwdriver
- Pull out the driveshaft
-
step 2 :Removing the CV Joint
- Pry off the larger CV joint boot clamp clip with a hammer and screwdriver
- Pry off the smaller CV joint boot clamp clip with a hammer and screwdriver
- Cut off the boot with a razor blade
- Pry the top off the CV joint with a flat blade screwdriver and a hammer
- Pull off the CV joint housing
- Clean the driveshaft with a cloth rag
- Pull off the CV joint clip with snap ring pliers
- Use a hammer to remove the CV joint from the driveshaft
-
step 3 :Constructing the New CV Joint
- Slide the new boot onto the driveshaft
- Slide on the smaller boot clamp
- Slide on the larger boot clamp
- Slide on the bottom of the CV joint housing
- Slide on the CV joint
- Carefully hammer the CV joint into place
- Insert the clip into the CV joint with the snap ring pliers
- Apply grease to the CV joint
- Thread the bolts through the top of the CV joint housing
- Push the top into place, using the bolts to line it up
- Hammer the CV joint housing together
- Thread the bolts out of the CV joint
- Tighten the boot clamps with a pair of pliers
- Bend the clamps into their clips
- Cut off the extra material with wire cutters
-
step 4 :Reinstalling the Driveshaft
- Feed the driveshaft into place
- Push the front of the driveshaft into place
- Push the rear of the driveshaft into place
- Have an assistant hold the wheel, or brace the wheel, to keep the driveshaft from turning
- Insert the 6mm Allen bolts at the front of the driveshaft
- Tighten the 6mm Allen bolts to between 12 - 14 foot-pounds of torque
- Insert the 8mm bolts at the rear of the driveshaft
Tools needed
-
Razor Blade / Gasket Scraper
Torque Wrench
Hammer
Channel-Lock Pliers
Jack Stands
6mm Allen Wrench
Flat Blade Screwdriver
8mm Socket
Slip-Joint Pliers
Ratchet
Floor Jack
Cloth Rags
Assistant
Wire Cutters
Brought to you by 1AAuto.com, your source for quality replacement parts and the best service on the Internet.
Hi, I'm Don from 1A Auto. I hope this how-to video helps you out, and next time you need parts for your vehicle, think of 1AAuto.com. Thanks.
In this video, we're going to show you how to rebuild your front CV Joint on your front drive shaft on this 2006 Jeep Liberty. The items you'll need for this are a new Front CV joint rebuild kit from 1AAuto.com, an 8 millimeter socket and ratchet, 6 millimeter Allen bit, flat blade screwdriver, a hammer, jack and jack stands, and snap ring pliers. It's not required, but having a second person will make this procedure a lot easier.
The front drive shaft is located right here. It's held in on either end with a series of 8 millimeter bolts. We'll start off by removing the front 8 millimeter bolts. Using a hammer and a flat blade screwdriver, break that front part free. We'll just fast forward as Don removes the 8 millimeter bolts on the other side. It helps to have another person holding the drive shaft while someone else removes the bolts, but you can brace it yourself. Again, using a flat blade screwdriver and a hammer, you just want to hit this end out. Once it's broken free, you just want to tilt it up and pull it down the mount.
Using a flat blade screwdriver and a hammer, you just want to get the screwdriver underneath the clip. Once you've got it under the clip, you can just pry at it with the screwdriver until you break that clip free. It pulls right off. We'll fast forward as Don does this to the smaller one at the bottom of that boot. Now, using a razor blade, you want to just cut this boot off. Using a flat blade screwdriver and a hammer, you want to pry off the top part of your CV joint. We're just going to fast forward here as he pries at it all the way around. Eventually, that cap will break off. You want to just pull everything off. Using a rag, clean up the area. Using snap ring pliers, you want to just pull this clip off. Use a hammer and just hit this top part of off the drive shaft.
On the left is the old CV joint. On the right is the new one from 1A Auto. You can see they're identical. This kit comes with everything you need to rebuild the CV joint. Slide the boot and the smaller clamp down into place. Slide the larger clamp down, and then, the bottom part of the CV joint, and then, the actual joint itself. Then, hammer it down into place carefully, you don't want to damage anything. Now, replace that C-clip up at the top, using your snap ring pliers. Now, take the supplied grease and fill up the top and bottoms of the joint. Replace the bolts into the cap and make sure that gasket's lined up. You want to push this into place. You're just using this to line everything up. Once you pushed that into place, push the bottom part into place and then hammer it on, carefully, not bending anything. You can pull those bolts back out and slide the boot on and then replace those two clips. To tighten this up, take a pair of pliers and just pull it tight. Bend it back into that clip and push the tabs down. We'll fast forward as Don does the smaller one. Clip off the extra.
Feed the rear-end of the drive shaft up first, and you want to feed it up past where it's supposed to go. Push the front part of your drive shaft into place and then lower the rear-end down into place. Now, replace the bolts. You can see that this comes with new bolts that are 6 millimeter Allen bolts. We'll just fast forward as Don tightens those up. Having a second person can come in handy right now. You want him to hold the wheel so that you can tighten these bolts up without the drive shaft turning. You can also just brace the wheel with something. You don't necessarily need another person to hold it. Tighten these bolts to 12 to 14 foot pounds. You want to repeat the process on the other end. Again, we'll just fast forward here as Don tightens up those 8 millimeter bolts. Once you've tightened up all the bolts, you're all set.
We hope this video helps you out. Brought to you by www.1AAuto.com, your source for quality replacement parts and the best service on the Internet. Please feel free to call us toll-free, 888-844-3393. We're the company that's here for you on the Internet and in person.

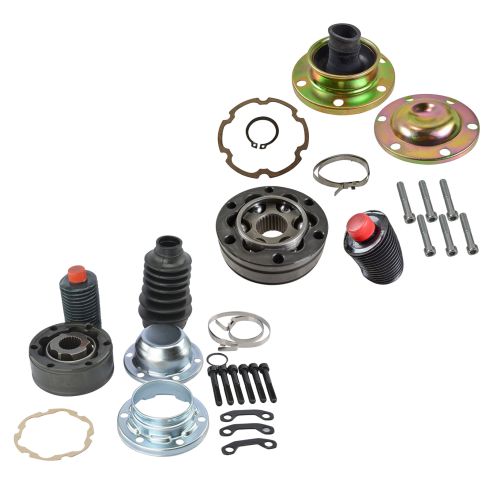
Jeep Grand Cherokee Liberty Front Drive Shaft 2 Piece CV Joint Rebuild Kit TRQ CRA80100
Part Details:
- 2 Piece
- (1) CV Joint Rebuild Kit
- (1) Forward Front Drive Shaft CV Joint Rebuild Kit

How To Replace Front Axle Drive Shaft 2002-07 Jeep Liberty
Watch this video to learn how to replace the front axle drive shaft in your 02-07 Jeep Liberty. 1A Auto mechanics will guide you through the job.
