How to Replace Front Inner Tie Rod 2004-08 Ford F-150
Created on: 2020-08-05
This video shows you how to install a new inner tie rod on your 2004-08 Ford F-150.
Tools needed
-
Torque Wrench
Hammer
Pry Bar
19mm Socket
Liquid Thread Locker
Safety Glasses
Pliers
21mm Socket
Gloves
Inner Tie Rod Removal Tool
Copper Anti-Seize
Straight Cutters
Brake Grease
Wire Ties
Needle nose pliers
1/2 Inch Impact Gun
Okay, friends, to get started on this job, the first thing that we need to talk about is safety. You want hand protection and eye protection at all times. With that said, safely raise and support your vehicle so you have your front wheel off the ground. We're gonna remove this center cover and then we're gonna remove the lug nuts as well. Get your wheel off of here. Okay. Now that the wheel's off, we have a nice, clear view of our inner tie rod end. We need to loosen this jam nut right here. I like to use a nice big pair of pliers. Give that a little turn, grab it. There we are. Make sure it's broken free.
Now we're gonna remove our outer tie rod end nut. To remove your outer tie rod end, it's best to hit right along the knuckle. If for some reason that isn't working and you don't have a threaded area along the top of your tire rod, you could carefully try to bonk along the top as well. Now we're gonna unscrew our outer tie rod end from the inner. As you do this turning counterclockwise, you wanna count the amount of turns. One, two, and so on. Next, we're gonna fully remove our jam nut here. Sometimes there'll be stuck on there. If that's the case, hold your inner tie rod end with some pliers and then remove the nut.
Now we need to remove our bellows boot right here. To do that, you need to remove your outer clamp right here, and then closer to the rack, you're gonna find another clamp. Remove them both and get the boot off. To do this inner clamp, I like to use a nice pry bar like this and a hammer. And if you come right along this area, you're gonna see a metal piece that comes up. That's actually the clamp. We wanna break that right off. It's a single-time use. Grab our bellows boot, give it a twist, and pull it off the inner tie rod end in the rack. Check your bellows boot. Make sure it is not torn in any way. This one looks great. We'll reuse it. Now it's time to take the inner tie rod end off of the rack. To do that, you can use several things. They have an inner tie rod end tool that'll slide over this and it'll have a little hooky-do that'll grab onto that. Not everybody has access to that. So, I like to use some nice long pliers. You can pretty much find these anywhere. Grab right onto it. And then I'm gonna turn it counterclockwise to break it free. Now, we'll just unscrew it completely.
There we are, friends. Now it's gonna be time to install our brand new tire rod end. I always like to use a tiny bit of thread locker. With that said, at this point, I'm just gonna go ahead and put it in here. I'll screw it until it bottoms out and then we'll snug it up. Now that we have this bottomed out, it's gonna be time to snug it up. I'm gonna go back to using these nice long pliers. When I grab onto this, I'm just gonna give it a nice little tweak to make sure it's locked down. I don't wanna continue twisting so I don't damage the rack though. So, pay special attention to that.
That's nice and tight. Let's go ahead and get this jam nut off of here. Now it's gonna be time to get our bellows boot back on here. When we remove the inside clamp, you probably broke it. If that's the case, go ahead and get yourself a wire tie. I like to just start it and then I'll slide it right over like this. I'm not gonna tighten it down yet. Next, we're gonna put the bellows boot on the power steering rack and we're gonna push as far as it can go so it's completely bottomed out and then we'll go ahead and snug it up. Get that on there. Give it a nice twist. Make sure it's completely situated. That looks great.
At this point, I usually like to use some long nose pliers. It's something that's easy to grip onto and you can give it a twist. And then, of course, we'll trim off whatever's left. There we are. Trim this. Next, I always like to take the bellows boot and I'll just try to push it in a little bit. If you were to look at the inner tie rod end, you're gonna see there's these grooves. Just put a tiny bit of grease or whatever type of lubricant you might have just along that area. That's right where this boot has to ride. The reason for that is because when you go to get an alignment, you don't want the boot being stuck on the inner tie rod end and then twisting as the alignment professional's trying to do his job. Get that up there. That feels great.
Now we're gonna put our clamp back on there. Let's take our clamp, put it right on our pliers here, get it ready. I'm gonna go over the inner tie rod end and then, of course, over the boot. Next, we're just gonna put a little bit of copper never-seize on our threads. That's gonna help prevent things from seizing up. Take your nice new jam nut, we'll put it right on here. Something to mention, anytime you're doing your inner tie rod end, it's always a good idea to replace your outer tie rod end, especially if it looks as though they're in the same condition. Ours looks really great. So, I'm just gonna go ahead and reinstall it. I'm gonna count as I go in. There's one, two, three, and so on. Okay. So, now I just finished up with the exact same amount of turns as when I took it off. Let's go ahead and bring this jam nut down close to the outer tie rod end. Now it's time to get our outer tie rod end into the knuckle. Let's see if I can just turn it a little bit. Slide it in here.
There we are. Take our nut. If it has a lock, make sure the lock is facing up, of course. Now we're gonna snug it down and then we're gonna torque it to 111 foot-pounds. Now we're just gonna make sure our jam nut's nice and snug. Awesome. Now it's time to get our wheel back up on here. We'll start on all of our lug nuts, bottom them out, and then we're gonna torque them to 150 foot-pounds. Next, you need to get your vehicle so the tire's just barely on the ground so it can't spin. We're gonna torque the lug nuts, like I said, to 150 foot-pounds in a star pattern. Once you've torqued it, make sure you put back on your center cover, of course. Okay, friends, anytime you do any type of front-end work on your vehicle, it's always super important to make sure you get your vehicle down to a reputable alignment shop. They're gonna take care of you and make sure you're going straight on down the road. Be safe out there.
Shop Products


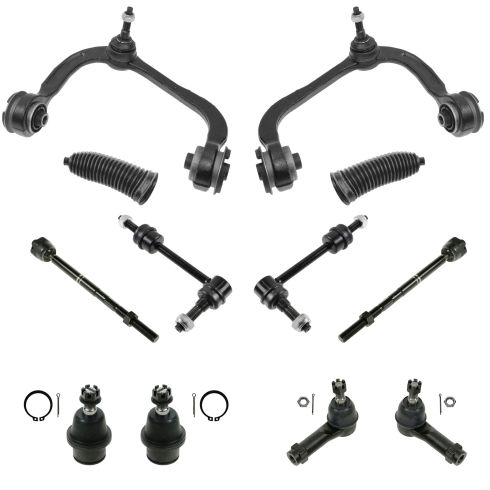
Ford F150 Front 12 Piece Steering & Suspension Kit TRQ PSA59961
Part Details:
- (2) Front Lower Ball Joints
- (2) Front Upper Control Arms with Ball Joints
- (2) Front Sway Bar Links
- (2) Front Steering Rack & Pinion Bellows
- 12 Piece
- (2) Front Outer Tie Rods
- (2) Front Inner Tie Rods

How to Replace Outer Tie Rods 2007-17 Ford Expedition
This video shows you how to install new TRQ outer tie rods on your 2007-2017 Ford Expedition.
