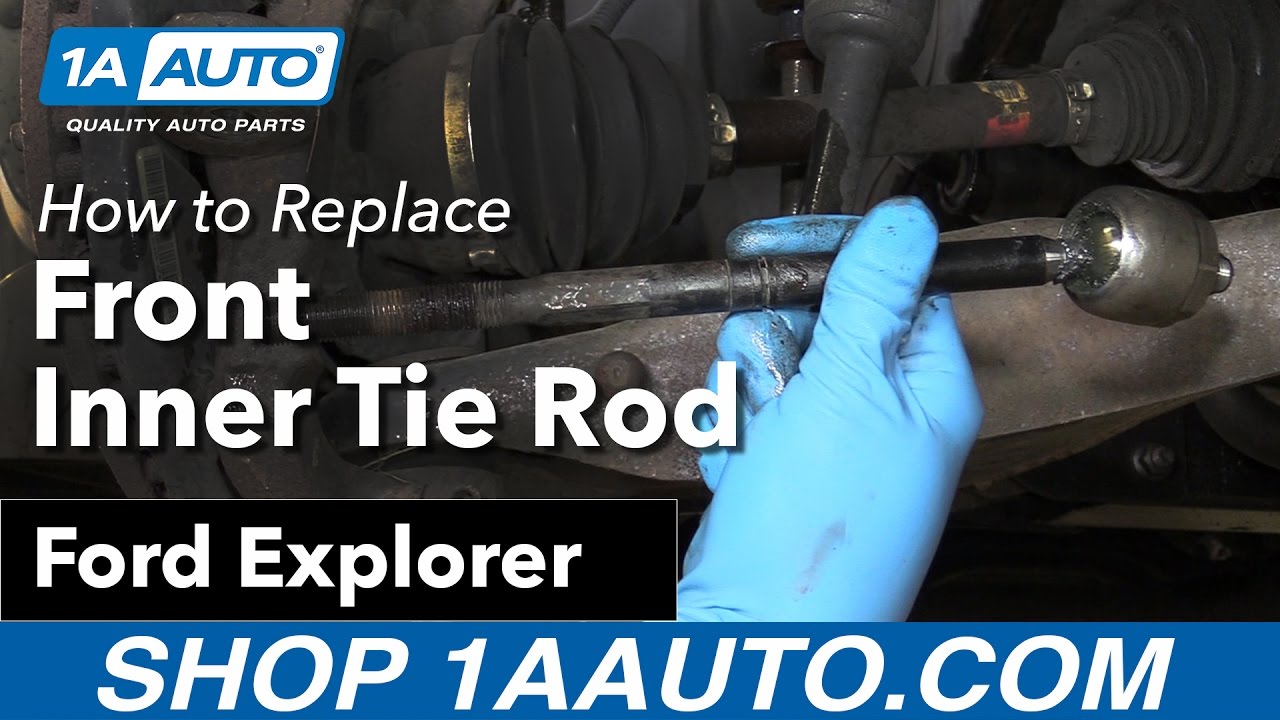
How to Replace Front Inner Tie Rod 2006-10 Ford Explorer
Created on: 2017-05-16
This video will show how to remove and install an outer and inner tie rod and the tie rod boot if it is rusted, broken, or damaged
-
step 1 :Removing the Wheel
- Loosen the five 19mm lug nuts
- Raise and support the vehicle
- Remove the lug nuts
- Slide off the wheel
-
step 2 :Removing the Outer Tie Rod
- Apply rust penetrant to the tie rod
- Loosen the 21mm jam nut on the outer tie rod
- Remove the 19mm nut from the tie rod ball joint
- Tap the wheel knuckle with a hammer to loosen the tie rod ball joint stud
- Remove the tie rod from the wheel knuckle twist the outer tie rod off
- Count the number of turns it takes to remove the tie rod
- Hold the inner tie rod with locking pliers
- Mark one side of the jam nut
- Twist off the jam nut
- Count how many turns it takes to remove the jam nut
-
step 3 :Removing the Tie Rod Boot
- Remove the outside tie rod boot clamp with needle nose pliers
- Split the inside tie rod boot clamp with a hammer and punch or side cutters
- Remove the inside tie rod boot clamp
- Pull the tie rod boot off the tie rod
-
step 4 :Removing the Inner Tie Rod
- Loosen the inner tie rod with a pipe wrench
- Twist off the inner tie rod by hand
-
step 5 :Installing the Inner Tie Rod
- Apply thread-lubricant to the inner tie rod
- Thread the inner tie rod onto the steering rack
- Tighten the inner tie rod with a pipe wrench
- Remove the jam nut from the inner tie rod
-
step 6 :Installing the Tie Rod Boot
- Slide the tie rod boot onto the tie rod
- Fit the boot onto the steering rack
- Loop the inside tie rod boot clamp around the boot
- Tighten the clamp with pliers
- Tighten the outside clamp with pliers
- Slide the clamp onto the boot
-
step 7 :Installing the Outer Tie Rod
- Apply anti-seize grease to the outer tie rod and the jam nut
- Thread on the jam nut
- Apply anti-seize grease to the inner tie rod
- Thread the outer tie rod on the number of turns you counted in Step 2
- Turn the jam rod to the edge of the tie rod
- Push the tie rod stud into the wheel knuckle
- Thread the 22mm nut onto the stud
- Torque the 22mm nut to 52 foot-pounds
-
step 8 :Installing the Wheel
- Slide the wheel into place
- Start the five 19mm lug nuts
- Lower the vehicle to the ground
- Torque the lug nuts to 100 foot-pounds in a crossing pattern
Tools needed
-
Socket Extensions
Torque Wrench
Hammer
17mm Wrench
Rust Penetrant
Pry Bar
17mm Socket
Jack Stands
19mm Wrench
19mm Socket
Pipe Wrench
Pick
21mm Socket
21mm wrench
Side Cutters
Center Punch
22mm Wrench
Anti-Seize Grease
Ratchet
Floor Jack
Needle nose pliers
1/2 Inch Breaker Bar
Marker / Writing Utensil
22mm Socket
Hi, I'm Mike from 1A Auto. We've been selling auto parts for over 30 years. We're dedicated to delivering quality auto parts, expert customer service, fast and free shipping, all backed by our 100% satisfaction guarantee. Visit us at 1AAuto.com, your trusted source for quality auto parts.
In this video, we're going to be working with our 2006 Ford Explorer. We're going to show you how to remove and replace your vehicle's inner tie rod. We are doing this on the passenger side but the procedure is the same on the driver side. If you like this video, please click subscribe. We have a ton more information on this and many other vehicles. If you need this part for your truck, you can follow the link down into the description over to 1aauto.com. Here are the items you'll need for this repair.
Using a 19mm socket and a breaker bar, loosen the lug nuts on your tire. Raise and support your vehicle. We're doing this on a lift to make it easier to show you what's going on, but this job can be done at home on a jack and jack stands. Finish removing your lug nuts. You should be able to do this by hand at this point but you can use a ratchet if you need to. You can then remove your wheel and tire.
It may be a good idea to apply some penetrating oil to whatever parts you're going to be working with. Remove the 21mm jam nut with a 21mm wrench. You really only need to crack that loose.
Remove the 19mm nut from the bottom of the tie rod end at the knuckle. We'll do this with the 19mm socket and ratchet. In order to save our tie rod end and not damage it in the removal process, we're going to use a hammer and hit the side of the knuckle right here to oblong the hole for a second and pop the actual tie rod end out. Be sure to wear proper safety equipment when doing this. Remove the tie rod end. Count the number of revolutions it takes to remove it, so we can install our new one the same way. That looks like 20 for us.
Using a pair of locking jaw pliers, clamp on to the inner tie rod and just brace it against the lower control arm. Mark one side of the nut, so you can count the number of rotations to remove that as well: 28-1/2.
Compress the clamp on the end of the inner tie rod boot. Do this with a variety of different pliers. Locate the crimped portion of the clamp on the inside edge of your tie rod boot. These could be in different locations on any vehicle as far as the clock position around the boot. Then normally, you can just cut these off with a pair of side cutters, but because ours is in a tight spot, I'm going to spread it with a tapered punch and wait for it to break. Remove the inner tie rod boot.
Now you can rent or buy an inner tie rod tool to do these. However, they're usually not on really, really tight, so if you have a pipe wrench, a good quality adjustable, or a pair of groove jaw pliers, you should just be able to get on there and break it loose with those. Now these ones, unlike our outer tire rod, bottom out. Once you break them loose, you can just remove them because the new one just goes on all the way.
Here we have our old inner tie rod that we removed from our vehicle and our new part from 1AAuto.com. As you can see, they're the exact same piece. They're the same length. We have the same hex for the inner tie rod, same length and size threads on both the end and the piece that goes into the actual steering rack. That little ball socket in there is what actually goes bad on these. You develop play in there and it will pop in and out and create some slop in your steering and improper alignment angles, where our new one is nice and tight. The old one just flops around. It comes with a nice new jam nut too. If your inner tie rod is worn and clunking or creating steering play or poor alignment angles, this new part from 1A Auto will go in direct fit just like your original equipment and fix you up right.
There's some thread lubricant included with your part. Make sure you get that on there. Then we'll reinstall it into the steering rack. Install the pipe wrench on there and tighten down your new inner tie rod. Remove the jam nut from your new inner tie rod.
Install the boot. Make sure the inner portion of the steering rack boot is on. You may want something like a hooked pick or if you have a hose pick that's a little bit bigger, those are pretty good too. Now, this is the original style clamp that we're using here. All you do for this is loop it around. Then, you have all these little square holes here and three hooks on this end. You just wrap it around as tight as you can get it. Set those hooks in. You want to make sure you get all three of them in there. Then, using a pair of side cutters, if you have a pair like these, these work really well too. Just get on both sides of that clamp, pinch it down to compress it. You'll want to compress your clamp, slide it back on.
I'm just going to put some anti-seize lubricant on the inside of this to make sure that it's always easy to adjust, and we'll do the same thing to the jam nut. Now, our new outer tie rod is just a little bit shorter on the actual female thread piece than our original one was, so I'm just going to spin the jam nut on, and then we'll apply some more anti-seize to the threads. Now, although the actual length on the female threads here is smaller, we're going to go ahead and install it 20 turns just like we did with the part that came off: 1, 2, 3, and your numbers may be different than this. You do just want to go the same amount of rotations. All right. Put back the jam nut until it just touches the end of our outer tie rod.
Then, we reinstall it into the knuckle. Install the new nut included with your new outer tie rod. We'll tighten that down with a 22mm socket and ratchet. Torque the nut to 52 foot-pounds.
Now, when we were knocking the outer tie rod end out of the knuckle, kind of folded the backing plate here. While it's not quite touching our rotor, it's a pretty common issue. You can just take a little pair of pliers and just tweak it until it's just about the same shape as it was. You can see there's some wrinkles and stuff that have happened over the years on it anyway, but just taking that extra second to pull it away is going to keep you from getting annoying noises that can cause you frustration after you've already made your repair.
Reinstall the wheel and tire onto your hub. It's easiest to put a lug nut inside of the 19mm socket to start it onto the studs. Get all five of these down as tight as you can by hand, and then we'll torque the wheel once there's some weight on it. Lower the vehicle back down and put partial weight onto the wheel and tire. This means that you may have your jack or lift under the vehicle. Get the tire to touch and let the vehicle come down some without allowing it completely off of the lift or jack. Torque your lug nuts to 100 foot-pounds in a cross pattern.
Thanks for watching. Visit us at 1AAuto.com for quality auto parts, fast and free shipping, and the best customer service in the industry.
Shop Products


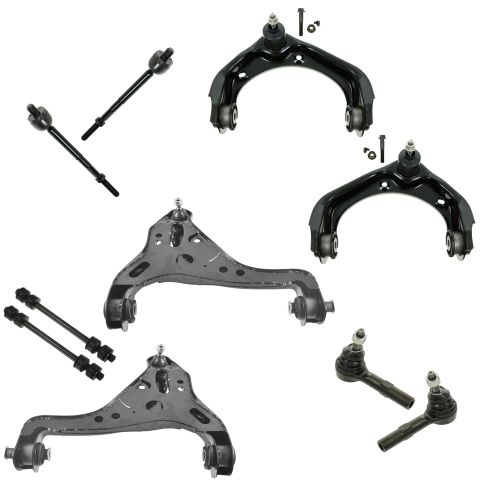
Ford Mercury Front 10 Piece Steering & Suspension Kit TRQ PSA59128
Part Details:
- (2) Front Sway Bar Links
- 10 Piece
- (2) Front Lower Control Arms with Ball Joints
- (2) Front Outer Tie Rods
- (2) Front Upper Control Arms with Ball Joints
- (2) Front Inner Tie Rods

How to Replace Tie Rod Assembly 1998-2004 Nissan Frontier
If the tie rod needs to be replaced, this video will show how to remove it and prepare a new on one the 98-04 Nissan Frontier
