
How to Replace Front Lower Control Arm 2002-09 Dodge RAM 1500
Created on: 2020-09-28
This video shows you how to install a new quality TRQ lower control arm with ball joint in your 2002-2009 Dodge Ram 1500.
Tools needed
-
Torque Wrench
Gloves
Locking Pliers
Hammer
Brake Caliper Hanger
Pry Bar
Wheel Chocks
18mm Socket
Floor Jack
Liquid Thread Locker
Safety Glasses
Pocket Screwdriver
Okay, friends, to get started on this vehicle, the first thing we wanna talk about is safety. You want hand and eye protection. Secondly, you wanna make sure that you raise and support the vehicle by the frame so the suspension's hanging. Next, let's remove our lug nuts. Remove your wheel. Next, we're gonna move right down here and we're gonna remove this nut. I'm just gonna take a nice pair of locking pliers like this. Clamp it onto this stud. Make it as tight as possible. Let's remove that 18-millimeter nut. Okay. For us personally, where the top of ours is broken, this is gonna come out nice and easy. If you still have the top of the stud on your sway bar link, what you're gonna notice is it's gonna be very hard to get it out. You could try to pry up on the pry bar and see if you can squeeze it out. So now's the perfect time to go over and remove the right front as well. There we are. When you're just replacing the control arm the only thing you really need to take off of the sway bar link is the lower nut down here. You can leave the top on. Ours was broken, so I'm just gonna replace it anyway.
Let's go ahead and spray down our hardware right here that holds the control arm to the frame. The lower area where your shock connects to your control arm is gonna be the biggest hassle for you. This bolt right here tends to freeze up inside there and it's gonna be an issue. It couldn't hurt to spray it down, but it's gonna be kind of one of those things that you're gonna wanna replace the bolt with the nut anyway.
Now, the next thing we need to do is remove our caliper, but when you do that, you wanna make sure you don't leave it hanging on the hose here. So I like to use a nice bungee cord, we'll take it off, and then we're gonna hang it so it's secure without putting a tug on our flex hose. Make sure you hang this caliper from something other than your actual brake hose. So let's go ahead and remove the rotor as well. Let's follow our ABS wire up. We're gonna disconnect it from up here. There's gonna be a little red tab. Pull that down, squeeze on this button right here, and then separate the two pieces. Let's get that ABS wire down so it's nice and safe.
Next, let's remove our 36-millimeter axle nut. Next, we need to break the axle free from the bearing. You can either try to push on it, if it doesn't move, there's a little center hole right there, use a punch with a hammer and give it a couple loving bonks. Just be careful not to damage the threads of your axle. The next thing we need to do is remove our outer tie rod end from the knuckle itself. Ours has a little cotter pin, so of course we're gonna remove that and then we'll remove the nut as well. Now we need to separate the tie rod from the knuckle. I'm just gonna bonk lightly right here, cause a little bit of vibration so it breaks free.
The next thing we need to do is separate the upper ball joint from the knuckle itself right here. Remove this nut. Just be careful when it breaks free, this might wanna fall down. A couple loving bonks, or one. Remove that nut. Just go ahead and push on the axle a little bit, make sure it's broken free. Let's remove that nut. Just gonna put that back on a couple threads. Let's go ahead and bonk on the knuckle again, holding onto the knuckle. Let's get the axle out of here. I'm just gonna tie up this axle so there's no way it can flop around.
Now we need to separate the strut from the lower control arm. The next thing that we're gonna do is remove our bolts that hold the control arm to the frame itself. With that said, there really isn't much else holding the control arm in, so you wanna be very careful once they're both loose, it could swing down and potentially hurt you. Let's go ahead and start that nut on so it's flush. Now we'll give it a couple loving bonks with our hammer just to try to break it free. Okay. All right. Now that we have everything broken free here, let's leave it just like it is with the nuts still on there and the bolt in there. We're gonna do the same to the rear.
Move this around quite freely. I'm gonna go ahead and remove that forward bolt. There it is. Set that aside. You should be able to wiggle this and remove it from here. There it is, friends. Okay, friends, now it's gonna be time to get our brand new lower control arm in here. Something I like to mention is I like to replace the bolts if I have the access to them. And I also like to put a little bit of grease on them. With that said, let's go ahead and start the control arm in here like this. Go ahead and get it into the back just to get them started again. There we are. You have your little cam right here. That's the circle or the oblong. It's gonna kind of fit inside these grooves right there. You want it facing up. Prime in those. Put them facing up as well, and then of course your new nut. It's a good idea to use some thread locker if you're not replacing your hardware. Get the control arm here.
The next thing we wanna do is try to level up our lower control arm so it'll be pretty much at ride height if the vehicle is on the ground. All right, so now I'm gonna make sure that that forward cam is nice and straight. Make sure this is sitting into its groove where it needs to be. And this one as well. Then get the jack out from under there. Now let's torque these bolts to 150 foot-pounds. Let's torque this bolt to 155 foot-pounds. Let's get our axle down from here and grab our knuckle. Take your knuckle and of course your lower ball-joint nut. We're gonna start the axle inside the wheel bearing here and then start the lower ball joint at the same time. Go ahead and start on that lower ball-joint nut. Put a nice pry bar up top of your upper control arm. Go ahead and lower that down through and then take your nut, start it on there. Bottom out the lower ball-joint nut. Let's do the same to the upper ball joint. Torque your upper ball joint nut to 40 foot-pounds. Let's torque this lower ball joint to 38 foot-pounds. Let's get our ABS wire reattached here.
If you were to look underneath the control arm, you can see where there's a little slot and then of course there's a little dimple where this is gonna go into. Let's just line those up. Make sure that this is nice and secure, you don't want it falling back out. Make sure it clicks. Lock it and then put it right through the back so it comes through that hole. There we are. Make sure it's not caught anywhere. This looks great. Something you wanna make sure you do is clean down the hub surface where the rotor is gonna be, and you also wanna make sure you clean down the back of the rotor surface where the hub's gonna make. You can use a little brush like this if you got a while or use a nice sanding disc like this and clean it up nice and pretty. Okay. So this looks pretty good, let's go ahead and spray it with some Copper Never-Seez. Let's get our rotor back on here. I like to put a lug nut to hold it on. Now obviously, this brake rotor isn't in the best condition, we're gonna end up replacing it overall. But for this process, let's continue on. Let's get our caliper back on here now. Two caliper mounting bolts. If you wanna use some thread locker, we'll call it your prerogative. Go ahead and start them in and then we'll snug them up and torque them to manufacturer specifications. Let's torque these bolts to 130 foot-pounds. Torqued.
Now let's get our outer tie rod back into the knuckle. Let's torque this to 45 foot-pounds. Now you wanna look at where your slotted nut is in comparison to where the hole is in the tie rod stud. If it's not lined up, you need to continue tightening until the next slot. This needs to go a little further. Make sure you peen over your cotter pin. Perfect. Now let's get our axle nut back on here. It's a good idea to replace the nut, but if you can't for some reason, make sure you use a little thread locker. You can slide it into either direction you want, then of course we're gonna bring the bar down once we have the other side in as well. Start this nut on here. Looking at the lower aspect of the sway bar link where it's gonna connect to the actual control arm, you can see there's like a little nut there. We're gonna hold that and then turn this. Now we're gonna snug up this nut, and we're just gonna watch these bushings right here. You wanna see them touch up against the bar but you definitely don't wanna see them squished down so they look like a pancake and start bubbling out. That looks pretty great right there. You can see it's squished down here, squished down there. It's definitely making contact with both sides of the bar. Do the same thing to the other side and make sure you have the same amount of threads on both sides. Let's torque this to 20 foot-pounds.
The next thing we need to do is torque our axle nut. To do that, there's a couple different ways you can do it. You can either put the wheel back on with the center open and then of course you'd be able to do that. But for us personally, we're gonna use this bar coming across the studs to the ground to hold leverage and let's torque this to 185 foot-pounds. Torqued. Go ahead and put the wheel back up on here. We're gonna start all of our lug nuts and then we'll torque them to 130 foot-pounds.
Torqued. Now let's pump up the brake. That feels good.
Shop Products


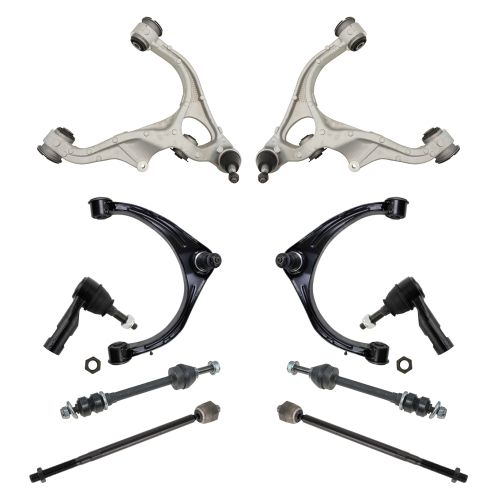
Ram 1500 1500 Classic Front 10 Piece Steering & Suspension Kit TRQ PSA65021
Part Details:
- (2) Front Sway Bar Links
- 10 Piece
- (2) Front Lower Control Arms with Ball Joints
- (2) Front Outer Tie Rods
- (2) Front Upper Control Arms with Ball Joints
- (2) Front Inner Tie Rods

How To Replace Front Lower Control Arm 2007-16 GMC Acadia
This video shows you how to install a new control arm with ball joint on your 2007-16 GMC Acadia.
