
How to Replace Front Outer Tie Rod 1999-2007 Chevy Silverado
Created on: 2020-06-22
Watch this video to learn how to install new outer tie rods on your 1999-2007 Chevy Silverado.
Tools needed
-
Torque Wrench
Gloves
Hammer
Rust Penetrant
Wheel Chocks
Floor Jack
Safety Glasses
Pliers
22mm Socket
Now one of the first things you're gonna wanna do before you start any job is to make sure you're safe as possible. You wanna have safety glasses and hand protection at all times. The next thing you're gonna wanna do is safely raise and support your vehicle so that your wheels are off the ground. Next, if there's a center cap, remove the plastic center cap and that will expose your lug nuts. Remove all 6 using a 22-millimeter socket. Remove your wheel. Now that we have a nice clear view of our tire rods, I'm gonna spray down this area right here. This is the adjustment area. Use a little bit of penetrant. That's gonna help you along. Using some nice long pliers, I'm gonna grab right onto this and I'm gonna turn it clockwise. That'll break free this jam nut. Okay, that broke free. Let's remove the nut that holds the outer tie rod end to the knuckle.
Now we're gonna hit right here on the knuckle to break our outer tie rod end free from the knuckle. Turn your outer tie rod end counterclockwise and count the amount of times it turns around as you remove it. One, two, three and so on. Okay. Write down that corresponding number so you can remember. We have our outer tie rod end. Let's go ahead and put that on. And we're gonna count it in the same amount of threads that we counted the original one off. That was one, two, three and so on. Okay. Just bring this so it's close. Get that nut off of there. I'm gonna put this on there. Let's bottom that out. Now we're gonna torque this nut to 48 foot-pounds. All right. So now that we have that torqued, we need to pay special attention to where the slot on the castle nut lines up with the hole in the stud. If it doesn't line up, you need to continue tightening until it does. Okay, so that looks pretty good. Let's try it.
That slides right through. Spin it over. The cotter pin's gonna ensure that there's no way that this nut can come loose. Now it's gonna be time to tighten up your jam nut. To tighten this we're gonna turn it counter clockwise. When you torque it, you would wanna torque it to 37 foot-pounds if you have the ability. Let's see here. Okay. Just make sure that it's nice and snug. By the time you're finished, make sure your outer tie rod end is nice and parallel to the ground or at least as parallel as it can be. Now let's get the wheel back up on here. Okay. Now with the wheel barely on the ground so it can't spin, we're gonna torque the lug nuts to 140 foot-pounds. Torqued. If you have a center cover, put it on there now. Now that you've finished your service, go ahead and take it for a road test and make sure you get it down to a local reputable alignment shop.
Shop Products


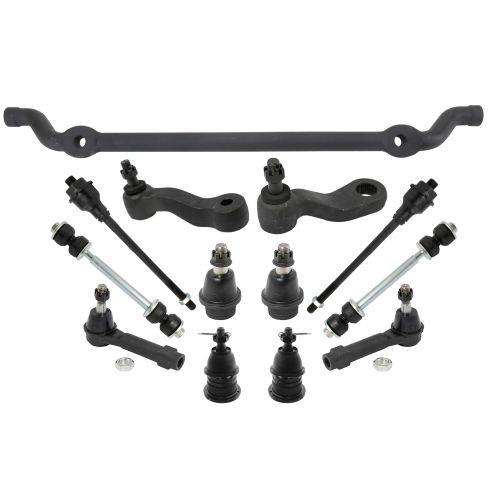
Chevrolet GMC Cadillac Front 13 Piece Steering & Suspension Kit TRQ PSA34599
Part Details:
- (2) Front Sway Bar Links
- (1) Front Center Link
- (1) Idler Arm
- (1) Pitman Arm
- 13 Piece
- (2) Front Lower Ball Joints
- (2) Front Outer Tie Rods
- (2) Front Upper Ball Joints
- (2) Front Inner Tie Rods

How to Replace Outer Tie Rod 2007-13 Nissan Altima
Watch this video to learn how to replace the outer tie rods on your 2007-13 Nissan Altima.
