How To Replace Front Power Window Regulator 2004-12 Chevy Colorado
Created on: 2012-11-01
How to repair, install, fix, change or replace a slow, stuck, cracked or damaged window regulatoron 2004-2012 Chevy Colorado models.
-
step 1 :Removing the Door Panel
- Remove the two Phillips screws in the pull cup
- Pry up the switch panel
- Disconnect the door lock wiring harness
- Disconnect the window switch wiring harness
- Remove the Phillips screw inside the door handle
- Pry off the door handle bezel
- Pull out the door panel from its clips
- Pry off the side rear view mirror trim piece
- Lift the door panel up and off
- Disconnect the speaker wiring harness
- Carefully peel off the water shield
-
step 2 :Removing the Regulator
- Disconnect the window motor lead
- Remove the four 10mm bolts from the regulator motor
- Remove the two 10mm bolts from the regulator
- Remove the two 10mm bolts from the window track
- Raise the window by hand
- Lift the window up and out
- Pull the window regulator out through the door
-
step 3 :Reinstalling the Regulator
- Insert one of the bolts into the window regulator
- Push the regulator into the door
- Hang the regulator by its bolt
- Insert the two 10mm bolts into the regulator
- Insert the four 10mm bolts into the regulator motor
- Lower the window onto the regulator, front end first
- Insert the two 10mm bolts into the window track
- Connect the motor wiring harness
- Connect the window switch harness to the switch panel
- Test the regulator
- Disconnect the window switch harness
-
step 4 :Inserting the Door Panel
- Put the water shield into place
- Connect the speaker wiring lead
- Lift the door panel into place
- Push in the door panel clips
- Push on the side rear view mirror trim piece
- Push on the door handle bezel
- Insert the Phillips screw to the door handle
- Connect the door lock wiring harness
- Connect the mirror switch wiring harness
- Push in the switch panel
- Tighten the two Phillips screws to the pull cup
Tools needed
-
Socket Extensions
Phillips Head Screwdriver
10mm Socket
Ratchet
Brought to you by 1AAuto.com, your source for quality replacement parts and the best service on the Internet.
Hi, I'm Mike from 1A Auto. I hope this how-to video helps you out, and next time you need parts for your vehicle, think of 1AAuto.com. Thanks.
In this video, I'm going to show you how to remove and replace a window regulator, the front window regulator. I'm going to show you the driver side on this Colorado. Passenger side is the same procedure. I'm going to show you it as if your window was stuck in the up position. It's fairly simple. The only tools you'll need are a Phillips screwdriver and a 10mm socket with a ratchet and extension.
There are two screws right down in here. Use a Phillips screwdriver to remove these. Pull this up and turn it over, take the screws out. These disconnect just by pressing on the little tabs and pulling out. Disconnect the gear switch as well. There's a screw you want to remove right in there. Remove that screw and this bezel comes off, and then you can just kind of pull around the door panel and give it a good, firm, quick pull. Remove this up here by pulling out and then up. Then the door panel comes right off there.
There is a little connector here for your speaker. Just press in on the tab. You want to carefully remove your water shield. Do your best not to rip it or tear it. The stuff, it's stuck on with some kind of stuff that it's really sticky, but you just work at it and it comes off.
Okay, if your window is stuck in the up position, what you want to do is remove these four bolts up here as well as these two nuts here. That will allow your window regulator to drop down and your window to drop down. You can reach right in here and you'll see a brown clip. There's a tab right on top of it. You just push down and pull that off. I'm going to fast-forward here as I remove the nuts and bolts that hold the regulator in place. Once you get to a point where the window starts slipping down, just be very careful not to get your hands or fingers pinched anywhere between the window or the regulator or any of the mechanism or metal.
Okay, now carefully, you're going to hold the window up and take your regulator out. Then the window comes down. You can see there's a bolt right here. As it slides down, remove this bolt here. Now tilting the window, regulator and everything, tilt the window up and remove this bolt. Grab it and pull the window right on out. Take the regulator out.
Here's a new regulator from 1A Auto. You have the bolts in here. It's got the stud there, stud there, and a bolt in there. This actually needs to go this way. What we'll do is go like that. Slide it in here. Got the bolt there. The stud comes in right there. We'll put a nut on there to hold it in place and then this will push. I've got the nut in place there, just slid in. A nut on here. Then put our two bolts in here and tighten everything up.
I'll just speed it up here as I tighten all those fasteners up nice and firm. You don't want to over-tighten them, but they need to be nice and snug to hold everything in place. Slide the window down and in carefully. What you want to do is keep it tilted and make sure you get the front in the window channel here. Okay, I've got the front in. Make sure the back drops into this channel. Okay and get the window in there so it slides up and down well. Bring it right down. I'm going to fast-forward here. Slide the window down and then you line up the holes where you attach the window to the regulator. The front hole can be accessed through an oblong hole in the door.
A little hint: if you're putting in a regulator that's not already in this position, then you can just hook up the connection, hook up your power window switch and move the regulator up or down to wherever you need it to line up. Reach back behind here for the lead in. Turn the key on. The battery's a little bit weak, but other than that it works nicely. Now I'll speed up here again as I put that water shield back on. Just a little tip, there are two holes in it where you have the two screws that go down into the door pull. Just make sure those are lined up, and then just kind of stick everything back in place and get it on there as best you can.
Okay, before you put your door panel back on, a couple of my clips didn't come with the panel so I just pull them off with needle nose pliers. They just slide right into the panel. Okay, put your panel back on, hook in your speaker. Okay, hang the panel up, up here. Pull the harnesses through. Take a peek back here and make sure your clips or your pins will go right into the holes.
Okay, this, you have to pull out on the panel a little bit, put it in place. Put this in place. Push it in. Phillips screw in nice and firm. Plug your mirror switch back in. There are two connections for the window switch. We'll just fast-forward here as we put those two Phillips screws back in. Tighten them up nice and firm and you're all set.
We hope this video helps you out. Brought to you by www.1AAuto.com, your source for quality replacement parts and the best service on the Internet. Please feel free to call us toll-free, 888-844-3393. We're the company that's here for you on the Internet and in person.
Shop Products


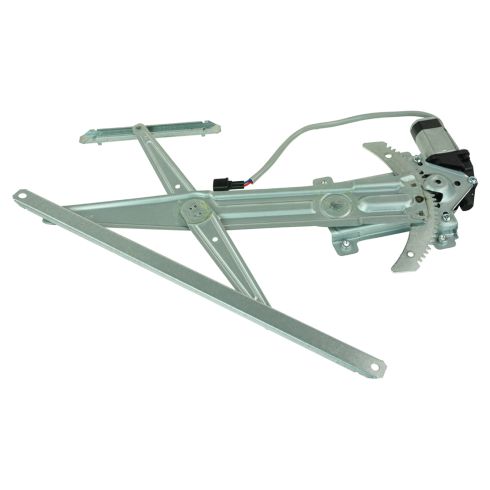
Chevrolet GMC Isuzu Front Driver Side Power Power Window Motor & Regulator Assembly TRQ WRA51948
Part Details:
- Power
- No
- 8
- 2
- No
- 7.87 in
- No
- Galvanized Steel
- Yes
- Steel

How To Replace Power Window Regulator 2005-09 Chevy Equinox
Learn how to remove the door panel and replace a damaged or bad window regulator motor with the help of the 1A mechanics in this video.
