
How to Replace Front Struts 2004-08 Ford F150
Created on: 2020-08-10
This video shows you how to install a new shock and spring assembly on your 2004-08 Ford F-150.
Tools needed
-
15mm Wrench
Torque Wrench
Hammer
Socket Extensions
15mm Socket
Pry Bar
Jack Stands
Liquid Thread Locker
21mm Socket
21mm wrench
Rubber Mallet
Flat Blade Screwdriver
Socket Driver
Large Locking Pliers
Copper Anti-Seize
Wheel Chocks
Straight Cutters
30mm Socket
Ratchet
Floor Jack
1/2 Inch Impact Gun
Okay, friends. To get started on this job, the first thing that we need to talk about is safety. You want hand protection and eye protection at all times. With that said, safely raise and support your vehicle so you have your front wheel off the ground. We're gonna remove this center cover and then we're gonna remove the lug nuts as well. Get your wheel off of here. We need to get this cotter pin off of the outer tie rod end now and we'll get the nut off of there. Use your 21-millimeter socket and remove your nut. I just put this back on there just a couple threads because now we're gonna use our hammer and we're gonna hit right along here on the knuckle, being careful not to damage the tie rod. Let's get this off of there. Pull this down. Next, we need to get the mounting nuts off of the top of the strut area here. There's gonna be three of them. There's gonna be two right here where you can see and the other one is gonna be located further in. You definitely don't wanna touch this center nut in any way. So I'm just gonna use my 15-millimeter wrench because it's the easiest thing to get into this space. Put it right up on here and then, of course, a nice rubber mallet because I don't wanna damage my tool. I'll get this nice and loose. Do the same to the other two and then we'll remove the nuts fully.
As you can see, the inward nut is much easier to get from inside the engine compartment. Let's get this one right off of here. We're gonna leave one of the nuts on here just a few good threads. That way there, there's no chance that this strut can fall out. Moving down the strut, if you were to look, you're gonna see a big old bolt with a nut. Using your 30-millimeter socket, you're to go right here and remove this nut and I'm gonna hold the bolt head with some pliers. Now I'm just gonna drive this bolt out of here. Next, we're gonna use a nice long pry bar and we're gonna come right under here. Go ahead and pry and you should see it wanna separate. We'll pull it away from the control arm. You can see our safety nut did its job. Remove that nut and remove your strut unit.
Now it's gonna be time to get the strut up in here. If you were to look, you can see the area that the strut holes are gonna be so just line that up. Put this right up in here. There we are. Now I'm just gonna start on all three of those nuts real quick. I like to use a little threadlocker on those. If it looks like this needs to be twisted a little bit, you can use a long screwdriver or pry bar. Just come right through the bolt hole and then you can twist it as needed. Once you think it looks pretty good, I'm just gonna take my pry bar, and then I'm gonna push and lift at the same time. Okay. This is working its way right in there nicely.
Now we need to grab our bolts because we wanna have it ready so once we have this lined up, we can go ahead and put it right through. Before we go too much further, we need to make sure we inspect our bolt, clean it and of course, make sure the threads are nice and clean and safe. Once we've done that, we'll add a little bit of threadlocker and we'll continue. So I got the bolt cleaned up. You'll notice I put on my threadlocker like I said I would and I also put a little bit of copper Never-Seez on the shanked area here. I wanted to make sure I didn't get any Never-Seez on the threaded area though. With that said, let's get this lined up and get the bolt in. There we are. Let's get the nut on there. Now we're gonna go ahead and bottom this out and then we'll torque it down.
So next we're gonna have to torque this nut to 351 foot-pounds which, just to let you know, is a lot. Most torque wrenches don't necessarily go up that high. A lot of them only go up to 250. Torque it as high as you can. Just keep in mind the torque should be 351. That's torqued. Let's get our tie rod end back in here. Now it's gonna be time to get the nut on here. Just make sure if you've got a locking end, that's facing up. Bottom it out. Torque this to 111 foot-pounds. Torqued. Now we're just gonna bottom out these strut nuts.
So now we're just gonna torque down these nuts. Something to think about though is before you torque them, you need to either have your wheel on and the wheel on the ground with the weight of the vehicle, or you can use a jack stand but you need to have the weight of the vehicle forcing down on the strut. Now it's time to get our wheel back up on here. Start on all of our lug nuts, bottom them out, and then we're gonna torque them to 150 foot-pounds. Next, you need to get your vehicle so the tire is just barely on the ground so it can't spin. We're gonna torque the lug nuts, like I said, to 150 foot-pounds in a star pattern. Once you've torqued it, make sure you put back on your center cover of course.
Shop Products


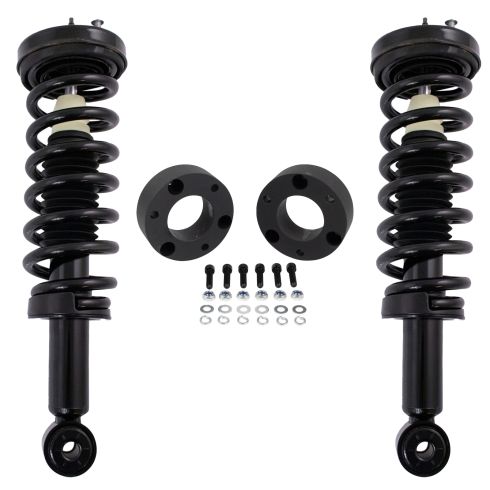
Ford F150 Lincoln Mark LT Front Driver & Passenger Side 2 Piece Shock & Spring Assembly Set with Leveling Kit TRQ Performance SCA28721
Part Details:
- 2 Piece
- 2-1/2 in. Lift
- (2) Front Shock & Spring Assemblies
- (1) Front Leveling Kit

How to Replace Front Strut Assembly 2007-13 Chevy Suburban
If the front strut assembly is worn or failing and needs to be replaced, check out this how-to video and follow the steps to DIY
