How To Replace Front Struts 2004-13 Mazda 3
Created on: 2013-08-02
Watch this video to learn how to replace the front struts on your 04-12 Mazda 3.
-
step 1 :Accessing the Strut
- Remove the lug nuts
- Pull the wheel free
- Apply penetrating oil to the bolt holding the lower strut and the upper bolt holding the stabilizer link
- Remove the clip holding the brake hose to the strut (Use a screwdriver to pry up from below)
- Pull the hose free
- Lock locking pliers on the backside of the stabilizer shaft
- Remove the 14mm bolt
- Spray the 17mm bolt holding the steering knuckle to the strut with penetrating oil
- Remove the 17mm bolt using the pipe for extra leverage
-
step 2 :Removing the Strut
- Spray penetrating oil around the bottom of the strut
- Hit the steering knuckle with a sledge hammer
- Once the knuckle moves, place a piece of wood over the knuckle and hammer the rest of the way
- Remove two of the bolts holding the strut from the back of the engine. Loosen the third bolt
- Push down on the steering knuckle and push the bottom free
- Remove the third screw up top to free the strut
-
step 3 :Replacing the Strut
- Line the strut up with the bolt holes up top. Replace the three bolts firm but not fully tightened
- Spray penetrating oil on the strut and steering knuckle
- Once its lined up but a jack underneath the knuckle and use it to force it into place
- Replace the bolt holding the knuckle to the strut. (Use a torque wrench to tighten it to 80 ft/lbs)
- Bring the hose down and feed it through into place. Replace the clip
- Reconnect the stabilizer link. Using locking pliers on the back, thread the nut on and tight to 50-60 ft/lbs
- Replace the wheel
- Replace lug nuts, and tighten to 100 ft/lbs. in a star pattern
- Tighten the upper strut bolts to 25ft/lbs
Tools needed
-
13mm Socket
A Piece of Pipe (for leverage)
Torque Wrench
14mm Socket
15mm Socket
Rust Penetrant
Channel-Lock Pliers
16mm Socket
17mm Socket
Jack Stands
18mm Socket
19mm Socket
Flat Blade Screwdriver
Sledge Hammer
Ratchet
Floor Jack
Brought to you by 1AAuto.com, your source for quality replacement parts and the best service on the internet. Hi, I'm Don from 1A Auto. I hope this helpful video helps you out. The next time you need a part for your vehicle, think of 1AAuto.com. Thanks.
In this video, we're going to be showing you how to replace the front struts on this 2007 Mazda 3 series. We'll show you the right hand side, left hand side is the same procedure and obviously we always recommend that you replace your struts in pairs. You'll need a new set of loaded struts from 1AAuto.com, jack and jack stands, 13 to 19mm sockets, ratchets and a breaker bar or pipe for some extra leverage, a couple of the bolts are pretty tough, flat blade screwdriver, locking pliers, a large hammer, 5 or 10 pound sledge, penetrating oil and a torque wrench.
Start off by removing your wheel and tire. There will be a hub cap so you'll remove the hub cap first. We have the benefit of air tools. If you're not using air tools, you'll want to loosen the lug nuts with the vehicle on the ground first then raise and support the vehicle and remove the lug nuts wheel and tire. We're going to apply some penetrating oil to the bolt that holds the lower strut and as well as the upper bolt for the stabilizer link. There is a clip that holds the break hose into the strut, now use a screw driver to pry that clip out. You can pry from the side first and then kind of pry up from below and pull the clip out.
Once you remove the clip, just pull the hose free. Now, take a pair of vise grip or locking pliers and lock it onto the back side of the stabilizer shaft and then there's a 14mm bolt and remove that with a 14mm socket and ratchet. Now, there's a 17mm bolt that holds the steering knuckle to the strut. You see I'm using a 17mm socket and ratchet and a pipe for some extra leverage to loosen up that bolt. You need to make sure that you spray that bolt with a lot of penetrating bolt beforehand to help this process along. Okay, we just shed that extra pipe and removed the bolt the rest of the way.
I'm going to coat with penetrating oil around the bottom of the strut where it goes with the steering knuckle and then use a nice, big sledge hammer and just hit the steering knuckle directly at first. Once you get it to move then put a piece of wood in just so you don't do too much damage to the steering knuckle and use the wood to hammer it the rest of the way off. There are three 14mm bolts that hold the strut in at the top, remove those. One note as we fast forward here, you want to remove two of the bolts and then just loosen up one of the bolts most of the way. You want to leave one bolt intact.
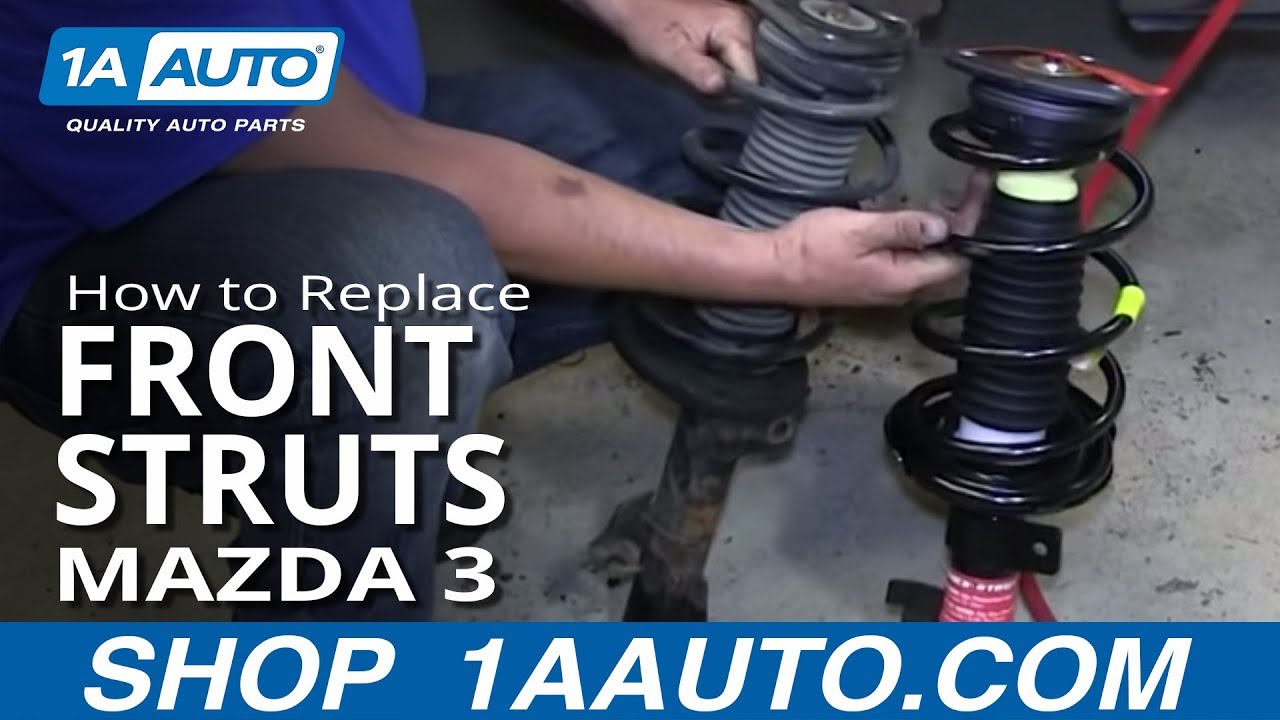
Okay, with one bolt still up top installed, push down on the steering knuckle and break the bottom free. Now, finish removing that top bolt and bring the strut down and out. Old strut on the left, new strut from 1A Auto on the right. You can see all the mounting points are the same. It's going to install just the same. Okay, ready to install the new strut. There's the stabilizer link mount that goes right to the back, easy way to line it up. Put the strut up in and then start one of the bolts on. It's just a matter of lining it up. Once you have one of the bolt holes lined up then start the bolt on. Once you get one, you can start the other two. Now, just fast forward. We're not tightening them up all the way, we're just kind of preliminarily tightening them up.
Now, we're ready to put the bottom back together, put some penetrating oil or grease in then in hope to get things together. Push the steering knuckle down. Line them up with a strut and push it in. Once you started, put a floor jack underneath the spindle and jack it up and that will force the spindle or the steering knuckle up onto the strut. Now, you can put the bolt through. It will only go through if the strut is together enough. We'll fast forward here as we just preliminarily turn or preliminarily tighten that bolt up. Now, we'll use a torque wrench and tighten that bolt up to 80 foot pounds.
Bring the hose down, feed it through and back and up into position and put the clip back in place. Then fast forward here as we put that stabilizer link back in place. Thread the nut on, put the locking pliers on the back side and tighten it up, get it nice and tight, you want it anywhere from 50 to 60 foot pounds. Then keep the speed going here as we put the wheel and tire back on. Thread the log nuts on and tighten them up preliminarily. Okay, and back on the ground we've tighten the log nuts to 100 foot pounds using a star pattern. Reinstall the wheel cover noting the position of the valve stem.
Now, we're going to tighten and torque the upper bolts to 25 foot pounds and repeat all that for opposite side and we should be all set with nice new struts.
We hope this helps you out. Brought to you by www.1AAuto.com, your source for quality replacement parts and the best service on the internet. Please feel free to call us toll-free, 888-844-3393. We're the company that here for you on the internet and in person.
Shop Products


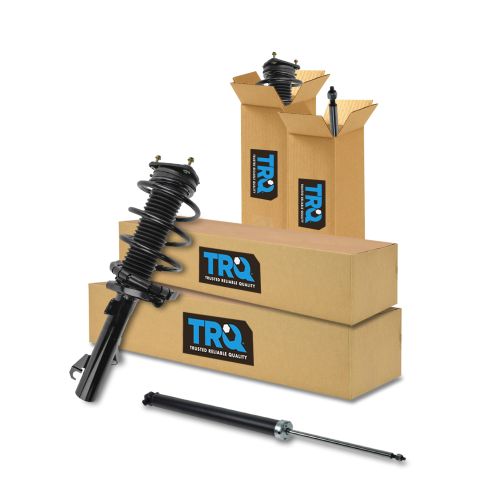
Mazda 3 5 Front & Rear 4 Piece Complete Strut Assembly & Shock Absorber Kit TRQ SKA60946
Part Details:
- 4 Piece
- (2) Front Strut & Spring Assemblies
- (2) Rear Shock Absorbers

How to Replace Strut Assembly 2000-05 Ford Focus
Watch this video to learn how to fix a sagging or loose suspension. The experts at 1A Auto show how to replace the front shocks in your 00-05 Ford Focus.
