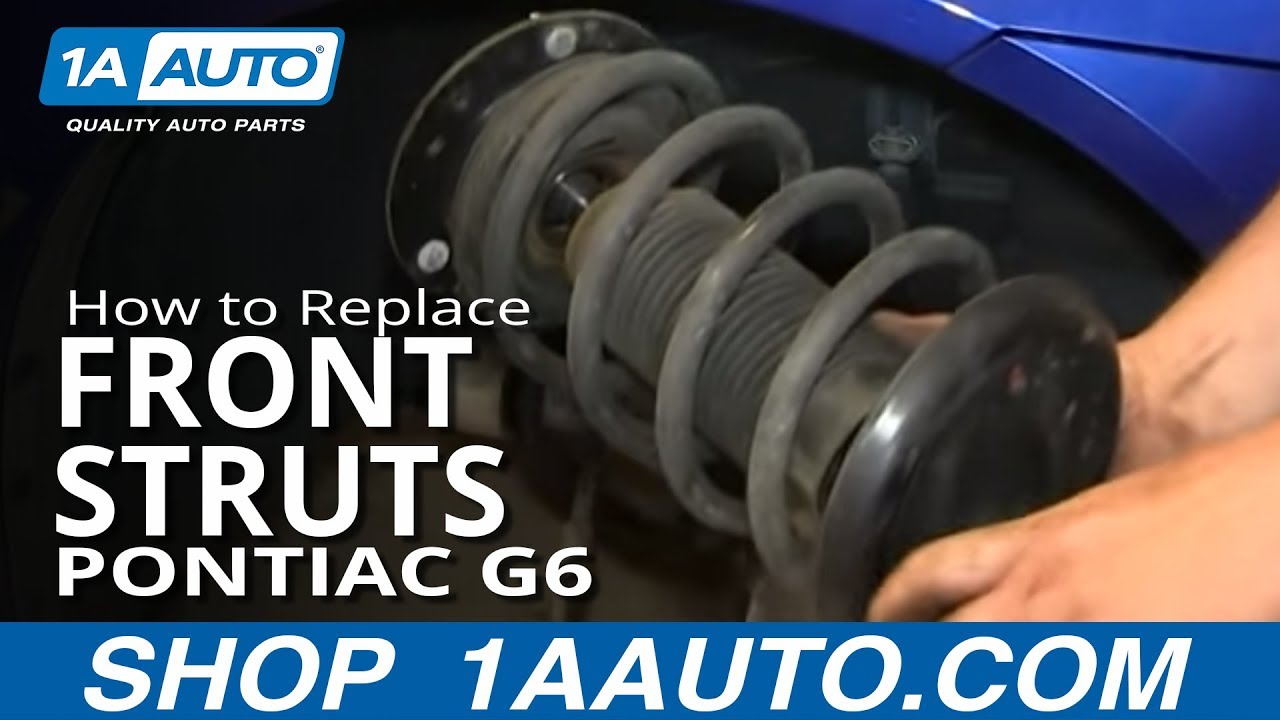
How to Replace Front Struts 2005-10 Pontiac G6
Created on: 2013-07-25
Watch this video to learn how to replace the front struts on your 05-10 Pontiac G6.
-
step 1 :Remove the wheel
- Loosen the lug nuts
- Raise and secure the vehicle
- Remove the lug nuts and wheel.
-
step 2 :Remove the bottom of the shock
- Unbolt the 10 mm securing the brake line to the strut.
- Unbolt the two bottom bolts securing the shock.
- Use a breaker bar and an 18 mm socket and some penetrating oil.
- Remove the 18 mm stabilizer link nut.
- You might need a hammer to work the bolts out once you have removed the nuts.
- Use a pry bar to pry the spindle free from the strut
-
step 3 :Remove the top of the strut
- Pop the hood and secure it.
- Use your 10 mm socket and ratchet and some penetrating oil to remove the three bolts securing the top of the strut.
- Pull the strut down and out.
-
step 4 :Install the new strut
- Work the strut into place and bolt in the top three 13 mm bolts
- Torque the three 10 mm nuts to 18 ft lbs
- Torque the 18 mm stabilizer link nut to 85 ft lbs
- Bolt in the bottom bolt and 18 mm nut and torque to 75 ft lbs.
- Fasten the brake line to the strut using your 10 mm socket and ratchet.
-
step 5 :Replace the wheel
- Put the wheel back on and hand tighten the lug nuts
- Lower the vehicle and torque the lug nuts to 100 ft lbs using a star pattern
Tools needed
-
Socket Extensions
Pry Bar
Jack Stands
18mm Socket
19mm Socket
10mm Socket
Ratchet
Floor Jack
Brought to you by 1AAuto.com, your source for quality replacement parts and the best service on the internet. Hi, I'm John from 1A Auto. I hope this how-to video helps you out and the next time you need a car for your vehicle, think of the 1AAuto.com. Thanks.
In this video we're going to show you how to replace front struts on this 2007 Pontiac G6. Very much the same for any 2005-2010 G6 as well as the Saturn Aura. We're going to show you the right hand side. The left hand side is the same procedure and we always recommend that you replace your struts in pairs. And speaking of struts you want to get a nice new set of loaded struts from 1AAuto.com. We sell both brand name as well as private label: Jack and Jack stands, 10, 18, and 19 mm sockets, ratchet and breaker bar or pipe for some extra leverage, and 18 mm wrench and a hammer.
Start out by using just the socket to loosen the lug nut covers or the wheel cover as in this case. We're going to use impact or air tools sometimes. If you don't have the benefit of air tools just start with the vehicle on the ground, loosen the lug nuts then raise and secure the vehicle and remove the lug nuts, wheel, and tire and grab the suspension and turn the wheels or turn them with the steering wheel and there's a 10 mm bolt that holds the brake line bracket to the strut, remove that.
There are 2, 18 mm nuts on the back side of the strut. You want to use a ratchet, using a breaker bar and a pipe or something here for some extra leverage might be in order but you can see on our vehicle they come off with just a good amount of force. Use an 18 mm wrench to grab onto the nuts part of the stud of the stabilizer link and then use an 18 mm socket. Loosen up the nut and then it comes off. Use a hammer, be careful not to damage the bolts too much. You might want to put a nut on the back of them and although ours came out pretty easy, and just drive those bolts right out. Heading up top underneath the hood, there are three 13 mm bolts that hold the top of the strut in place and we'll fast forward as we remove those. You can remove 2 of them and then just loosen one up most of the way.
And as you're taking that last nut off, you can just keep your hand on the strut and as you take the nut off you will be able to lower the strut out. And then put the strut back in place and yes, you probably will notice that we're just putting the old strut back in. The struts in this car were in fine shape and so we're not usually ones to waste putting a new strut into a car that doesn't need them. We're just kind of doing this to show you how to do it but you put it into place, start one of the nuts on top and then start the other two and you can tighten those up and the top nuts you should torque to 20 to 25 foot pounds.
Back down under now, lift your brake hub assembly and steering knuckle back in to the strut. You can force it in there and you put one of the bolts in, and just kind of put it in a little bit and then as you move the knuckle around on the strut you should be able to get the bolt through. Then make sure you put the bracket back into place and you can get the second bolt through and if you like use a hammer or something just to drive the bolts all the way through. And it should be noted that we do recommend an alignment after you do this because the movement of these struts is something that affects the caster and camber of your wheels.
And torque those nuts to 85 foot pounds. Bring the sway bar link back into place and should you possibly feel the need to replace those sway bar links, 1AAuto.com, we sell those as well but then use a 18 mm wrench and an 18 mm socket and ratchet to tighten up that bolt. That bolt should be tightened somewhere around 70 to 75 foot pounds. Put the bracket that holds your brake hose back into place and start the 10 mm bolt on and tighten it up. Please install the wheel and put the lug nuts on by hand first just to make sure you don't cross thread them then tighten them preliminarily.
the vehicle on the ground, torque the lug nuts to 100 foot pounds using a star pattern. Now reinstall your hubcap and I'm going to do that with that 19 mm socket and then I'm just going to screw them in by hand. Also want to make sure that you line up the valve stem with the notch in the hubcap for the valve stem and I'll go ahead and fast forward through that.
We hope this helps you out. Brought to you by www.1AAuto.com, your source for quality replacement parts and the best service on the internet. Please feel free to call us toll free: 888-844-3393. We're the company that's here for you on the internet and in person.
Shop Products


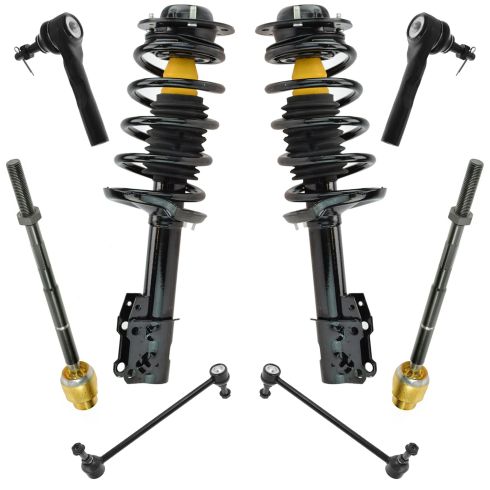
Chevrolet Pontiac Saturn Front 8 Piece Steering & Suspension Kit TRQ PSA59743
Part Details:
- (2) Front Sway Bar Links
- (2) Front Strut & Spring Assemblies
- 8 Piece
- (2) Front Outer Tie Rods
- (2) Front Inner Tie Rods

EricTheCarGuy Explains the Art of Finding Noises Your Vehicle is Making
Eric teaches you the art of locating noises. He points out common sources and demonstrates his tried-and-true diagnostic process that he uses to track down hidden noises!
