
How to Replace Front Sway Bar Links 1997-2000 Toyota Camry
Created on: 2016-09-21
If the sway bar links are bad and need to be replaced, this video will show the steps for this straightforward repair
-
step 1 :Removing the Wheel
- Loosen the lug nuts with the vehicle on the ground
- Raise the vehicle with a floor jack
- Secure the vehicle on jack stands
- Pull off the hub cap
- Remove the lug nuts
- Pull off the wheel
-
step 2 :Removing the Sway Bar Links
- Grab the backside of the joint with locking pliers
- Remove the 14mm nut from the sway bar link
- Repeat the process for the lower end
-
step 3 :Installing the New Sway Bar Links
- Insert the lower end of the sway bar link into place
- Start the 14mm nuts
- Torque the sway bar link nuts to 29 foot-pounds
-
step 4 :Reattaching the Wheel
- Slide the wheel into place
- Start the lug nuts by hand
- Tighten the lug nuts preliminarily
- Lower the vehicle to the ground
- Tighten the lug nuts 76 foot-pounds in a crossing or star pattern
- Reattach the center cap
Tools needed
-
21mm Socket
Socket Extensions
Torque Wrench
14mm Socket
Jack Stands
Ratchet
Floor Jack
1/2 Inch Breaker Bar
Brought to you by 1AAuto.com, your source for quality replacement parts and the best service on the Internet.
Hi, I'm Mike from 1A Auto. I hope this how-to video helps you out, and next time you need parts for your vehicle, think of 1AAuto.com. Thanks!
In this video, we are going to be working with our 98 Toyota Camry. We are going to show you how to remove and replace your front sway bar link. We happen to be doing this on the passenger side, but the process is the same as the drivers as well.
You want to replace this part as a pair. These are known to get a little bit of play in them and create a clicking or a popping sound as your vehicle transfers weight left and right and loads and unloads that sway bar. You can check them by placing a pry bar underneath and pushing up on the link and seeing if the joints move smoothly or if you can see a gap where the actually sway bar moves before the joint picks up and starts to pivot with it.
If you like this video, please click subscribe. We have a ton more info on this car, as well as many other makes and models. If you want this part for your vehicle, you can follow the link in the description over to 1A Auto.
Here are the items you'll need for this repair: 14-21mm sockets, ratchet, socket extension, torque wrench, locking pliers, breaker bar, jack, and jack stands.
Break all your lug nuts loose while the vehicle is still on the ground. Going to need a 21 millimeter socket and a breaker bar. Install your jack under the vehicle. Line it up with the pinch weld. Jack the vehicle up high enough that you can get a stand underneath. Making sure you have enough clearance to remove your tire or do whatever you have to do under the vehicle. Install your jack stand onto this uni body frame rail under the vehicle. With the vehicle raised and supported, remove your lug nuts the rest of the way. If you need a little more room to work, you can pull the hub cap off. Remove your wheel from the hub. We've put our vehicle on a lift to make it easier to film for you but this job can be easily done with a jack and jack stands.
To remove the sway bar link, we'll use a small pair of locking jaw plyers to grab on to the back side of the joint here and a 14 millimeter sock and ratchet to remove the nut. We'll push it out of the strut and use the same steps to remove the nut and stud on the bottom side at the sway bar. Remove the stud of the sway bar link from the strut and remove your locking jaw pliers. Remove the sway bar from the vehicle.
Here we have our old part that we removed from our vehicle and our new part from 1A Auto.com. As you can see, these parts are identical, same length, we have the same angle, on the heads of the sway bar here there is a right and left of these. This one happens to be the right. Comes with new nuts, with a nylon lock strip inside of them. What happens to these sway bar links is the inside of this joint is a ball and socket joint, much the same as your tie rod or your ball joint is in the front suspension.
It becomes warn out and allows up and down travel inside of that joint which creates a clicking sound and a little bit of play when that weight transfer gets moved from sway bar to sway bar. You can check these by placing a pry bar underneath them and just wiggling it up and down and they should move nice and fluid together. If you see one has the joint moving up before the stud starts to flex, that's a good indicator that you have a bad sway bar link.
This new part from 1A Auto goes in direct fit just like your original equipment does. It'll get your vehicle handling and transferring weight correctly as well as getting rid of those annoying sounds and fix you up right.
Install the bottom of the sway bar link into the sway bar first. We'll put the nut on a couple of threads. These new nuts are 17 millimeter, so we'll be installing them with a 17 millimeter socket and ratchet. Once you have the bottom threaded on by hand, push the top in and start that nut as well. Now these are at kind of an odd angle at first but as we tighten the nuts up, it's going to straighten out and sit where it's supposed to. Remember to clamp your vise grips onto the back side. Be careful not to tear the boots as these are the new parts, so we want to try not to damage them. Go ahead and tighten the nuts down. Torque the sway bar link nuts to 29 foot-pounds.
Reinstall the wheel and tire. Tighten down the nuts. Put the vehicle onto the ground. Check that they are all seated. If you've removed the tire, only lower the vehicle until the wheel touches the ground. With partial weight of the vehicle on the ground, torque your lug nuts to 76 foot-pounds in a cross pattern. Then, you can remove your jack the rest of the way.
Thanks for tuning in. We hope this video helped you out. Next time you need parts for your car, please visit 1AAuto.com. Also check out our other helpful how-to and diagnosis videos.
Shop Products


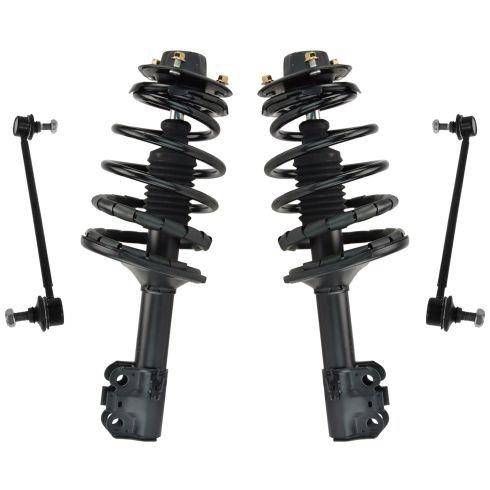
Toyota Lexus Front 4 Piece Suspension Kit TRQ PSA56304
Part Details:
- 4 Piece
- (2) Front Sway Bar Links
- (2) Front Strut & Spring Assemblies
How to Replace Front Sway Bar Links 2002-07 Mazda 6
How to remove, replace, and install a sway bar end link on 07 Mazda 6.
