
How to Replace Front Sway Bar Links 2006-11 Honda Civic
Created on: 2017-12-29
How to remove, replace, and install a sway bar end link on 06, 07, 08, 09, 10, 11 Honda Civic.
-
step 1 :Removing the Wheel
- Loosen the lug nuts with a 19mm socket with the vehicle on the ground
- Raise the vehicle with a floor jack
- Secure the vehicle on jack stands
- Remove the lug nuts
- Pull off the wheel
-
step 2 :Removing the Front Sway Bar Links
- Clean off any rust from the nut with a wire brush
- Spray the rusty parts with rust penetrant
- Break the nuts free with a 14mm wrench
- To reach the upper nut, raise a jack underneath the control arm
- Counter-hold with a 5mm Allen bit
- Remove the nut with a 14mm wrench
- Lower the jack
- Counter-hold with a 5mm Allen key
- Remove the lower nut with a 14mm wrench
-
step 3 :Installing the Front Sway Bar Links
- Insert the sway bar link into place
- Tighten the nuts with a 17mm wrench
- Counter-hold with a 5mm Allen bit
-
step 4 :Reattaching the Wheel
- Slide the wheel into place
- Start the lug nuts by hand
- Tighten the lug nuts preliminarily
- Lower the vehicle to the ground
- Tighten the lug nuts to 80 foot-pounds in a crossing or star pattern
Tools needed
-
5mm Hex Wrench
14mm Wrench
Torque Wrench
17mm Wrench
Rust Penetrant
Jack Stands
19mm Socket
Ratchet
Wire Brush
Floor Jack
1/2 Inch Breaker Bar
Hi, I’m Mike from 1A Auto. We’ve been selling auto parts for over 30 years!
With the vehicle on the ground, I'm going to use a 19mm socket and a breaker bar to loosen the lug nuts. With those bolts loosened, I'm going to raise and support the vehicle. With the lug nuts loosened, I should be able to use just the socket to finish removing them. With that last lug nut removed, I can take the wheel off.
With our wheel off, we can get to the sway bar link. It's bolted to the bottom of the control arm here, and the sway bar on the top. I'm going to use a wire brush to knock off some of the rust and dirt. Help this nut spin off of here. I'm also going to spray these with some rust penetrant. Use a 14mm box wrench, break these free first. That's just turning, but I know it'll spin. Do the same to this one. So those are spinning, because this is basically a little ball joint, so I need to take a 5mm Allen key and hold it. Both are going to be the same way. So they go in here like this. And we use our wrench to loosen it and hold it with this.
To get the 5mm Allen key into the top part of the sway bar link, doesn't quite line up evenly, it's at an angle. We're going to use this floor jack to lift up on the suspension arm. It's going to level it out. Before I do that, I have to put the box wrench on here. Put this on the breaker bar, wrench is in. Hold it and loosen it. If it starts to get harder, stop, spray some more rust penetrant, try to take your wire brush, and clean up some of the threads.
Now we're going to turn the nut back on like we're tightening it. You don't have to tighten it all the way back down. Spray some more rust penetrant, and clean the threads up a little more with the wire brush. Just slowly, but surely, working the nut off of there. Now I have that sway bar link loose, and nut off, I'm going to take the tension off this, just lowering the jack. So that'll come right out. So, both sides will be identical to this, so now I'm going to go after this lower one. I'm going to get this box wrench on here first, put the Allen key in here so I can counter hold it. There it is. That's the sway bar link.
Here's our original sway bar link out of the vehicle. This is our brand new one from 1AAuto.com. It's the same style design. These are left and right, when you go to install them. It comes with new locking nuts. This should fit in here and work great for us.
Take our new one, and slide it up in here. Capture the top nut, and you might have to push this up and in, just like that. These are 17mm, so use the 17mm box wrench to tighten them up. Once it starts to spin with the lock part, so it's turning the stud on the ball joint here, grab our 5mm Allen key again to counter-hold it and tighten this up. Just bring it down nice and snug. Going to do the same for the top. This ones actually tightening without turning the sway bar link on the stud. Let's get it nice and tightened down. Sway bar link is installed.
Reinstall the wheel. Thread the lug nuts on by hand. I'm just going to snug them down. And when I put the car on the ground, I will torque them. I'm going to torque the lug nuts to 80 foot pounds. And then you want to cross pattern.
Thanks for watching. Visit us at 1AAuto.com for quality auto parts, fast and free shipping, and the best customer service in the industry.
Shop Products


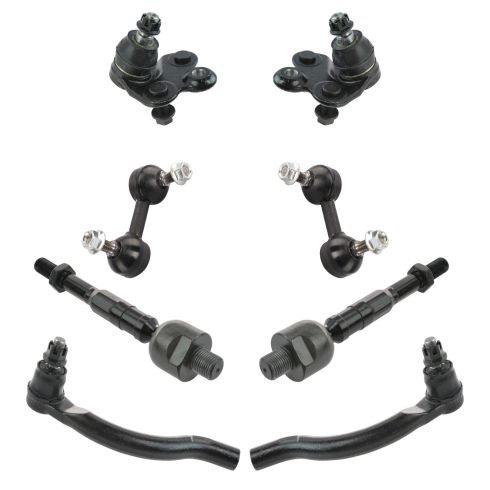
Honda Civic Front 8 Piece Steering & Suspension Kit TRQ PSA64903
Part Details:
- (2) Front Sway Bar Links
- (2) Front Lower Ball Joints
- 8 Piece
- (2) Front Outer Tie Rods
- (2) Front Inner Tie Rods

How to Replace Front Sway Bar Bushings 2002-09 Audi A4
How to remove, replace, and install a sway bar bushings on 02, 03, 04, 05, 06, 07, 08, 09 Audi A4
