
How to Replace Front Wheel Bearing 1995-2011 Ford Ranger 2WD PART 2
Created on: 2011-10-27
Check out part 2 in this video series on how to replace a front wheel bearing on your 95-11 Ford Ranger 2WD.
-
step 1 :Begining the Repair
- This is Part 2 of a two part video
- Please consult Part 1 for prior instructions
- Perform the steps outlined in Part 1
-
step 2 :Installing the Bearing
- Place the break rotor on a block of wood to work on it
- Clean the mounting area of grease
- Put the bearing race into the rotor with the thicker side inside
- Use a large socket and a hammer to set the race into place
- Check that the bearing race is set evenly
- Turn the rotor over
- Clean the mounting area of grease
- Put the second race into place with the thicker side inside
- Push the race in with a race installation tool and hammer
- Check that the race is set evenly
- Apply bearing grease to the races
- Leave only a film on the race surface
- Apply grease to the bearing
- Drop the bearing into place
- Put the bearing seal into place
- Cover the seal with a paper towel
- Push the seal in with a block of wood and a hammer
- Apply grease to the inside of the bearing
-
step 3 :Reinstalling the Brake Rotor
- Apply grease to the outer bearing
- Put the rotor into place on the axle
- Put the outer bearing into place
- Apply grease to the bearing
- Put the bearing washer on
- Attach a socket and ratchet to the washer
- Roll the rotor by hand to tighten the hub nut
- Tighten the hub nut to 3 or 4 foot-pounds
- Inset the cotter pin into the bearing
- Clean the rotor with a paper towel
- Clean the rotor with mineral spirits or break parts cleaner
- Remove and clean the brake caliper slides, if necessary
- Put the brake caliper bracket into place
- Start the two 15mm bolts by hand
- Tighten the two 15mm bolts to 80 foot-pounds
-
step 4 :Reinstalling the Brake Pads
- Put an old pad in the caliper
- Use a large C-clamp and the old pad to push the pistons back
- Install the brake pads into the bracket
- Put the caliper on
- Thread the two bolts by hand
- Tighten bolts to between 12 - 15 foot-pounds
-
step 5 :Reattaching the Wheel
- Slide the wheel into place
- Start the lug nuts by hand
- Tighten the lug nuts preliminarily
- Check for any play in the bearing
- If there is play, tighten the hub nut
- Put the dust cap on the hub nut
- Hammer on the dust cap
- Lower the vehicle to the ground
- Tighten the lug nuts to 100 foot-pounds in a crossing or star pattern
- Reattach the center cap
-
step 6 :Testing the Brakes
- Pump your brakes repeatedly until they feel firm
- Test your brakes at 5 miles per hour and then 10 miles per hour
- Road test the vehicle
Tools needed
-
A Piece of Pipe (for leverage)
Large C-Clamp
Torque Wrench
Hammer
15mm Socket
Pry Bar
Jack Stands
19mm Socket
Block of Wood
Brake Parts Cleaner
Bearing Grease
27mm socket
Race Installation Tools
Flat Blade Screwdriver
Paper Towels
Mineral Spirits
Ratchet
Floor Jack
1/2 Inch Breaker Bar
1/2 Inch Socket
Brought to you by 1AAuto.com, your source for quality replacement parts and the best service on the Internet.
Hi, I'm Mike from 1A Auto. I hope this how-to video helps you out, and next time you need parts for your vehicle, think of 1AAuto.com. Thanks.
This is part two of the two part series replacing the front wheel bearings on this '96 Ford Ranger with two wheel drive. As I said in the first one, this procedure is generally the same for most vehicles that have the roller bearings in the front. Another quick look at the tools you'll need. The sizes on this list are for the Ranger and so if you're using this video to guide you in a different type of vehicle, then probably some of the sizes, as far as the sockets and things, will be different.
In part one of this video we took care of removing the brakes and the rotor and we also had removed the races, the rear seal on the races and now we're going to pick up with reassembling the rotors and reinstalling everything. Now, we're going to clear this grease. So, I'm going to take our new bearing race, and the thicker end goes inside. This socket was just a tiny bit smaller than the race itself. Then put down there, this size is a little lower so when I first tap it, I'm going to tap it and get that side started. Just kind of check, and make sure it's going down there pretty cleanly. That's nice and solid. Just give it a couple of taps and make sure it's in there correctly. Make sure the line all the way around is nice and even and it's in there all the way. Take a nice clean paper towel, put it in, then wipe this out. You don't have to get every little speck of grease. Just make sure there's no dirt or anything in there. Then, the thicker side goes down in at first. I do have the proper bearing installation tool, the race installing tool. What you can see me do here is, I put the race down in there. I'm just giving it a couple of taps. I just want to make sure that it's going in nice and straight. Then once I'm confident that it's going in properly. I hit it harder and you do need some type of metal tool that's slightly smaller than the bearing race. You cannot do this with a wood block or anything like that but a very large socket would work just like on the front side. As I said I do happen to have the correct tools to put that in. Even after inspecting it and being confident that it's in, I'll give it a couple of more good taps to make sure.
Now take some good quality bearing grease and put it right in. You don't want to get too much on the race surface. We'll put it kind of in the middle of hub and kind of clear off the race surface with my finger. Now, for the bearing, I'll just take it, scrape it off into this channel here, and press it in. The same thing with the front side, press it in to that crack. Get it on the roller surfaces, again, not a ton here. You don't want it all thick and globby. You just kind of want to coat them, okay and then the same thing on its inside surface. Take any out that's extra. I'll just leave a film. So you can see here on the race surface itself, I'm just leaving a film. Okay, and then just drop the bearing in and again make sure on the inside of this surface, basically just a film as well. You may want to put your seal in. Put that down. Put a piece of paper towel over it, so no dirt gets down there. Then a piece of wood or something will do the same trick. There you go. Let's turn this back over. Take some grease and pack it in on the inside here. Then put a film again, just a film on the bearing race there.
So, we've got our outer bearing, with grease in the crevices. Then coated the roller bearing side Put our rotor over on. Insert the bearing. If you like, put a little bit of grease, stuff it in there again, over all and again pull out the excess. Put our washer on. Put that right back on. Now, what we're going to do, is we're going to tighten it. We're going to roll the rotor a little bit, and keep tightening it until it's pretty well seated. Just make sure that you kind of squish the grease out of the way and the bearing is going to get a good seat. Now, we're going to back it off, and then we're going to pull it probably to about 3 or 4 foot-pounds, not very tight at all. You may want to put this back on with our cotter pin down through.
Use a nice clean paper towel first. Make sure the front and back surfaces of the rotors are clear of grease. Now, use some minerals spirits or brake parts cleaner and really clean the rotor surface. Make sure there's no grease at all.
On this bracket, you want to make sure these are nice and free. If they're not, you can actually just pull them out, clean them and grease them and put them back in. We'll just speed up here as we put that bracket back on and use a two larger 15 millimeter bolts to start it. Tighten these bolts to 80 foot-pounds. Now, you want to push these pistons back into the caliper so take your old pad and just kind of throw in there like that. Use a large C-clamp. The pad takes care of making sure the pressure is on both of the pistons pushing them back in as far as they'll go. So, again, our pads are in fine shape so we'll put the old ones back in, something like that. Bring your caliper down. Now to push in on your slide bolts here with the caliper placed, get your bolts and twist and slide a little bit. Get your bolts started. These bolts don't have to be too tight. They really just hold things in place. The correct torque is probably about 12 to 15 foot pounds. I'm just going to tighten them firm with the smaller wrench.
Put the tire back on. I'm going to thread the lug nuts on by hand just to make sure that they don't cross thread. Then I'm going to tighten them preliminarily with my impact wrench. The tire is on and preliminarily tightened. You want to just take it and kind of shake it and look for any play in that bearing at all. You shouldn't see any. If you see a little play, then you'll want to tighten up your nut a little more. It looks good there. Just put our dust cap back in place. Now, we're going to torque the lug nuts to 100 foot-pounds, each, and then we'll put our center cap back on. Before road testing, make sure your brakes are working properly. Pump them up a bunch a of times to reset the pistons in the calipers and then do test stops from 5 miles an hour and 10 miles an hour before your road test.
We hope this video helps you out. Brought to you by www.1AAuto.com, your source for quality replacement parts and the best service on the Internet. Please feel free to call us toll-free, 888-844-3393. We're the company that's here for you on the Internet and in person.
Shop Products
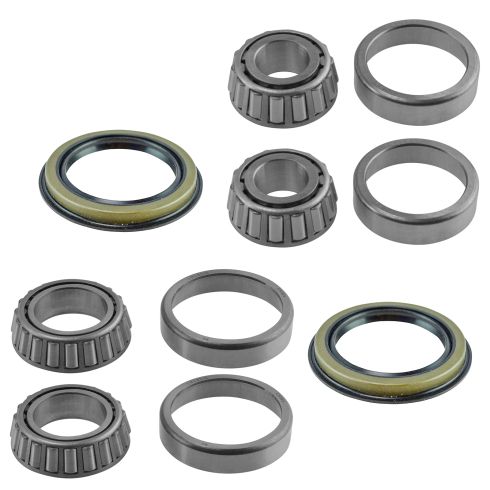
Ford Mazda Mercury Front Driver & Passenger Side 6 Piece Wheel Bearing & Seal Kit DIY Solutions HUB00783
Part Details:
- Highest Quality Materials
- Quality Tested - built to a strict level of product standards.
- Tapered Roller Bearing
- 6 Piece
- (2) Front Outer Wheel Bearings
- (2) Front Inner Wheel Bearings
- (2) Front Wheel Seals

How to Replace Wheel Bearing Hub Assembly 1999-2005 Pontiac Grand Am
Watch this video to learn how to replace the wheel bearing & hub assembly in this 99-05 Pontiac Grand Am.
