
How to Replace Front Wheel Hub Bearing 2005-16 Ford Mustang
Created on: 2020-04-07
Watch this video to learn how to install a new engineered to fit TRQ front wheel hub and bearing on your 2005-14 Ford Mustang.
Tools needed
-
Torque Wrench
Hammer
14mm Socket
15mm Socket
Pry Bar
Liquid Thread Locker
Brake Parts Cleaner
21mm Socket
CV Axle Shaft Popper Tool
Copper Anti-Seize
RTV
Ratchet
Swivel
36mm Socket
1/2 Inch Impact Gun
Once your vehicle is raised and supported safely, you're gonna remove all 5 lug nuts using a 21-millimeter socket. Remove your wheel. The next thing we're gonna do is remove these bolts right here that hold the caliper to the slider fins of the bracket. Use my 14-millimeter to take out both those bolts. I'm gonna continue with that pry bar just get this caliper out of the way. Let's get these pads out of here. Next, I'm gonna use my 15-millimeter and and take out these 2 caliper bracket bolts and remove that bracket. The next thing you would wanna do is just take one of your lug nuts, start it on one of the studs here. If the rotor is stuck on, which this one isn't, you just take your hammer and give it a little bonk to break it free. The lug nut is gonna keep it from possibly coming off and hurting you. Get the rotor right off of here. All right. So, at this point, we can see the cover right here. I'm gonna use this tool, it's got some little edges on it. I'm gonna come right along the edge where the cap meets onto the hub, grab on to it right there. Give it a little bonk, breaks it free. You wanna check your cap to make sure there's no damage that might let moisture in there. This looks great. We'll set it aside.
At this point, we're gonna remove this axle nut. Use your 36-millimeter socket. Grab your hub, pull it off of there. Next, I'm gonna take some solvent, clean up this area. Check to make sure there's no burrs or anything anywhere around this. That looks really good. If it's caught up, you might need to do something about that. Now is gonna be time to install our brand new hub. I'm gonna use a tiny bit of threadlocker. Right along the threads, slide this bearing up on here. Grab your nut. Now, we're gonna bottom this out. Torque this to 251 foot-pounds. Torqued. I used a little bit of RTV or gasket maker right along the edge. Just bonk that on there. Of course, clean up your mess when you're done. Let's put a little bit of copper never seize on here, to your rotor. Throw it up on there. I have a spare nut and then one of my lug nuts. That's just gonna hold the rotor from moving around too much on me.
Now, if you look at your mounting bolts, if you see threadlocker or a whole bunch of rust, you need to make sure you clean up those threads and then we're gonna reapply threadlocker. Now, it's time to get the bracket on here. I've got my bolts nice and clean with a little bit of threadlocker. We're gonna start them both in. Bottom them out and then we'll torque them to manufacturer specifications. Let's torque these bolts to 85 foot-pounds. Torqued. Let's get our brake pads on here. So, these little pins right here hold the pad away from the rotor. So, as soon as you release the brake pedal, they're gonna wanna separate and then the rotor is gonna be able to cool down as you drive.
Next, we're gonna grab the caliper. You're gonna notice your slider pins have the flat area and then the rounded area. You want these flat areas to be up against the flat area on the caliper. That's gonna hold them from spinning. Squeeze those pads in, of course. Start in both of these then we'll bottom them out and torque them to manufacturer specifications. Let's torque these to 25 foot-pounds. Let's get the wheel back up on here. Start on all your lug nuts and then bottom them out. Now, we're gonna bring this down and torque it to manufacturer specifications. Now, with the vehicle's wheel touching the ground but most of the weight of the vehicle off of it, we're gonna torque these in a star pattern to 100 foot-pounds. Torqued.
Shop Products


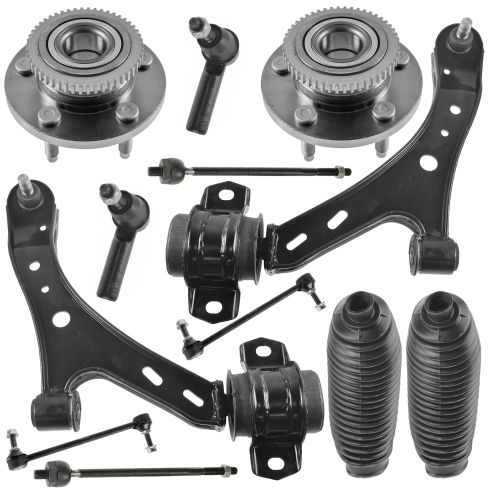
Ford Mustang Front 12 Piece Steering, Suspension, & Drivetrain Kit DIY Solutions SUS03236
Part Details:
- (2) Front Lower Control Arms with Ball Joints
- (2) Front Sway Bar Links
- (2) Front Wheel Bearing & Hub Assemblies
- (2) Front Steering Rack & Pinion Bellows
- Ball Bearing
- 12 Piece
- (2) Front Outer Tie Rods
- (2) Front Inner Tie Rods

How to Replace Rear Bearings 2001-05 Honda Civic
New Wheel Bearing & Hub Assembly from 1AAuto.com
