How to Replace Front Window Regulator 2002-08 Mercury Mountaineer
Created on: 2014-10-06
Learn how to replace the front window regulator on your 02-10 Mercury Mountaineer. This 1A Auto video will show you how to do it.
-
step 1 :Removing the Door Panel
- Turn off your courtesy lights
- Pry off the door handle trim piece with a flat blade screwdriver
- Pry up the window switch panel
- Disconnect the wiring harnesses
- Remove the 7mm bolt in the door handle
- Remove the two 7mm bolts at the bottom of the door panel
- Pry out the mirror switch with a flat blade screwdriver
- Disconnect the mirror switch wiring harness
- Lift the door panel up and off
- Disconnect the trunk switch wiring harness
- Carefully peel off the water shield
-
step 2 :Removing the Window Regulator
- Drill out the rivets that hold the window to the regulator
- Raise the window by hand
- Remove the weatherstrip
- Angle the window down and pull the window up and out
- Unclip the lock harness from the regulator
- Remove the five 11mm bolts from the regulator
- Disconnect the window motor lead
- Unclip the lock rod
- Pull the window regulator out through the door
- Remove the stud with an E5 Torx bit
- Grab the flange behind the stud with locking pliers and remove the stud
-
step 3 :Preparing the Regulator
- Remove the Torx bolt from the window motor with an E5 Torx bit
- Insert and tighten the Torx bolt to the new window motor
-
step 4 :Reinstalling the Regulator
- Push the regulator into the door
- Insert the five 11mm bolts into the regulator
- Connect the door lock rod
- Clip the lock harness to the regulator
- Connect the window motor lead
- Lower the window onto the regulator
- Pry off the speaker cover
- Remove four 6mm screws from the speaker
- Disconnect the speaker wiring lead
- Pull off the speaker
- Insert short bolts, lock washer, and nuts to hold the window to the regulator
-
step 5 :Reinstalling the Door Panel
- Put the water shield into place
- Connect the speaker wiring lead
- Put the speaker into place
- Insert the four 6mm bolts into the speaker
- Replace the weatherstrip
- Connect the trunk switch wiring harness
- Lift the door panel into place
- Replace the 7mm bolt in the door handle
- Replace the two 7mm bolts at the bottom of the door panel
- Connect the mirror switch wiring harness
- Push in the mirror switch
- Connect the wiring harnesses to the switch panel
- Push in the window switch panel
- Push in the door handle trim piece
Tools needed
-
Socket Extensions
Flat Blade Screwdriver
E5 Socket
6mm Socket
7mm Socket
Drill
3/8 Inch Drill Bit
Ratchet
11mm Wrench
11mm Socket
Brought to you by 1AAuto.com, your source for quality replacement parts and the best service on the Internet.
Hi, I'm Mike from 1A Auto. I hope this how-to video helps you out, and next time you need parts for your vehicle, think of 1AAuto.com. Thanks.
In this video, we're going to show you how to replace a window regulator on this 2003 Mercury Mountianeer. It's the same part and similar process on these Mountaineers from 2002 to 2010. We show you on the driver side, but the passenger side is a similar procedure. The items you'll need for this include a new window regulator from 1AAuto.com, flat blade screwdriver, 6mm, 7mm, and 11mm socket and ratchet with an extension, 11mm wrench, E5 socket, 3/8 inch drill bit, and drill.
You want to make sure that your courtesy lights don't stay on, so you don't drain your battery so just make sure you turn those off. Pry out from the bottom of this panel with a flat blade screwdriver, and then just slide the panel towards the front of the vehicle and off the door handle. Then lift up on the front of your switch panel, and then slide it forward and up. Then just push the tabs on these harnesses and disconnect them. For this last one, you're going to want to use a flat blade screwdriver and just push in on the tab, pull it free, and your switch panel is free.
Now you want to remove this 7mm bolt and these two 7mm bolts right here. We'll just fast-forward as Mike does that. Pry out this switch, then just pry out the tab on the harness, disconnect the harness, and just feed that back through the door panel. Lift the door panel up, pull it back, push the tab on this harness to disconnect it, and your door panel is free.
Carefully remove your water shield, and you can see Mike just uses a razor blade to separate the adhesive. You just want to remove the water shield and pull it down. This is a cable activated regulator, usually what happens is the cable breaks, and when that happens you can usually the window will fall down in your door, but you can usually grab it and move it up and down, and you want to move it to a point so you can access the rivets that hold the window.
You can see right through that hole. There's the rivet there, and there's another one right through here. You might need to have somebody to hold the window in that place. Drill out the rivets on the window clamps. Once the rivets have been drilled out, you can just separate these clamps, pull the window up, and then just remove this weather strip. Angle the front of the window down and pull the window from the back up and out. If there's any bit of the rivet left, just remove it.
Then remove these five 11mm bolts and pull this harness from the regulator. Push the studs at the top of the regulator out, and really you just unhook them. Push the regulator back. You want to maneuver it out until you can see the harness for the window motor, and then just push the tab on the harness and disconnect it. Then unclip this rod. You just push the clip off, pull the rod out, and then just lift it up and out of the way. Then just pull this clip free.
For this one, you just want to maneuver it back and forth until it pulls free. It does take a little bit of effort. Just set that aside, and now you can lift your window regulator up and out. Our stud and nut stayed here, and actually this is okay because you could either take the stud out of your new one, or if the new one doesn't come with one you could install your motor plate here and just hold the motor plate against it.
Turn this clockwise to tighten it up, and drive the stud into your motor. In a lot of cases, this won't stay behind it'll actually come apart the way it's supposed to, so I'm just going to take it apart and show you what you should do with it. I was able to loosen this, but now my star bit won't fit on there, so I'm just going to use some locking pliers and grab the flange behind, and I'll show you that in a second.
On the left is the old window regulator; on the right is the new one from 1A Auto. You can see they're identical, and they'll fit exactly the same. Just a couple of takes ago, you remember we took the stud out of the door. Most likely, the stud is just going to come out the correct way. The nut will come off of it, and then you'll just pull it out with the regulator. If that happens, you do what I'm doing here, which is taking the stud out of the old regulator and putting it into the new regulator with your E5 Torx bit. If it doesn't, like I said before, if the stud stays with the door, you could just leave it in there and then install it as your installing the regulator.
Feed your new window regulator back into the door and down. You just have to maneuver them around everything and get it to a point where you can push those studs back up through the top holes. Then replace those five 11mm nuts and tighten them up. Now push that rod back into that clip and just reclip it. Then push this clip back into this hole and reconnect this harness for your motor and reclip it to the regulator. Take your window and slide the front end in first and then angle it back. Once you get it lined up in the channel, you can just slide it down and into those clips.
To access the clips on the new regulator, we're going to have to remove the speaker, so we just remove these four 6mm bolts and pull the speaker out. Then just push the tab on the harness and disconnect it. Rather than the rivets, we have some short bolts, lock washers, and nuts. These are just extra ones that we have in the garage, but just go to the local hardware store and you can find them. Now just replace the bolt on the other side, put the nut on the back, and then just tighten both of those up.
Replace your water shield. Reconnect your speaker and push it back into place. Then replace those four 6mm bolts and just tighten them up. Then replace this weather strip.
To replace your door panel, just reconnect this harness and make sure you push the harness through for your mirror switch, and then push the door panel into place and slide it down. We'll fast-forward as Mike replaces those three 7mm bolts and tightens them up. Reconnect this switch and push it back into place. Then reconnect your switch panel, and slide the back in first, and then push the front end down. Then slide this panel back over the door handle, and push those tabs back into place. Then push in the front. You're all set.
We hope this video helps you out. Brought to you by www.1AAuto.com, your source for quality replacement parts and the best service on the Internet. Please feel free to call us toll-free, 888-844-3393. We're the company that's here for you on the Internet and in person.
Shop Products


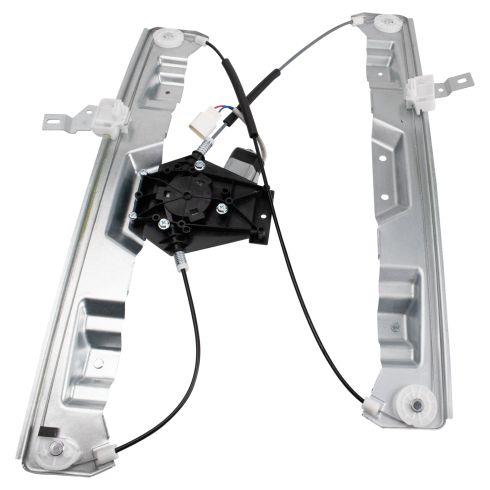
Ford Mercury Front Driver Side Power Power Window Motor & Regulator Assembly TRQ WRA51198
Part Details:
- Power
- No
- 8
- 2
- No
- 7.87 in
- No
- Galvanized Steel
- Nylon
- Yes

How to Replace Front Window Regulator 2010-15 Cadillac SRX
How to repair, install, fix, change or replace a slow, stuck, cracked or damaged window regulator on 10, 11, 12, 13, 14, 15 Cadillac SRX
