How to Replace Fuel Pump Sending Unit 2008-14 Volkswagen GTI
Created on: 2018-05-15
How to repair, install, fix, change or replace a broken, damaged, worn out, faulty or shorted out fuel pump sending unit on 08, 09, 10, 11, 12, 13, 14 VW GTI
-
step 1 :Removing the Rear Seat
- Pull the plastic clips on the seat up and off
- Pull the seat up from the front
- Push the seat back and lift it up
- Push the seat belt buckles into the seat
- Remove the seat
-
step 2 :Removing the Fuel Pump
- Pry up the fuel pump cover with a flat blade screwdriver
- Lift the tab, push back, and disconnect the wiring harness
- Start the car and let it run until it dies
- Press the tab and disconnect the lines
- Loosen the lock ring with a pry bar and a hammer
- Lift the fuel pump assembly and seal up and out
- Remove the seal from the fuel pump
-
step 3 :Installing the Fuel Pump
- Install the seal to the new pump
- Install the assembly, with the seal in first
- Tighten the lock ring with a pry bar and a hammer
- Connect the lines
- Connect the connector
- Press the fuel pump cover on
-
step 4 :Installing the Rear Seat
- Insert the buckles through the seat
- Press the rear of the seat in
- Press the front of the seat in
- Replace the clips
-
step 5 :Priming the Fuel System
- Cycle the key on and off twice
- Start the vehicle
Tools needed
-
Hammer
Flat Blade Screwdriver
Pry Bar
Paper Towels
Center Punch
Drain Pan
Cloth Rags
Trim Tool Set
Hi, I’m Mike from 1A Auto. We’ve been selling auto parts for over 30 years!
In this video, we are replacing a fuel pump in a 2010 Volkswagen GTI. If you need this part or any other parts, click the link in the description and head over to 1AAuto.com. All right. We're going to start by pulling these little plastic clips up. You're going to pull them down and then pull them up and towards you like that. Pull them down. Pull them up.
Now we're going to pull up underneath here. Grab your hands under there and pull up quick like that. And then in the back of the seat, you're going to push it back and lift. Over here, push it back and lift. I'm going to pull the seat out. Push the seatbelt buckles down. It's very tricky with the fabric from the seat. If you can get the fabric out of the way, it makes it easier. You can reach underneath and pull the fabric out of the way. You can pull the seat out. So the seatbelt buckles were getting caught right in this area. So that makes it difficult to remove. To access your fuel pump, it's right here. I'm going to take a flat-blade tool. Pull this cover off. You can use plastic trim tools, too.
As you can see, there's little clips that held that in. Now, to bleed off the pressure, we're going to take and disconnect our fuel pump first. All right. So you pull the red tab up. Ours is broken, but you're going to push back on the red tab and then pull it right up. You can see that's where the lock is when you're pushing on the red tab.
To bleed our pressure off, we're going to start the car and let it run ‘til it dies. Now we know the pressure is off on the fuel system, so when we disconnect it, it won't spray us. All right. We're going to use a blow gun to get some of this dirt away from the edges. You don't want any of the dirt going into the tank.
We're going to pull these hoses off. There's a little lock tab on the front, this little blue piece, and push down. The hose should pull right up just like so. That's the lock tab. And this is the one that would have pressure under it. A little bit of gas should probably spill out. Not too bad. Just move those out of the way. We're going to take our lock ring off. Keep note to about where it is because when you put the new one back, you're going to want to be in about the same location. I'm going to take a screwdriver, or this is a pry bar. I'm going to hammer on the lock ring to move it to the left. As you can see, it's starting to move. Release the lock tab. Pull that out of your way.
Going to take a bucket. Pull the fuel pump sender assembly out and then pull the seal up with it. Let it drain for a second. All right. Pull it out slowly. Lift it up. Put it in our bucket, and we can pull it out. I'm going to take the seal off.
This is our old pump assembly. This is our new one from 1AAuto.com. As you can see, they look very similar. There is some differences, but they both come with the fuel level sensor attached. The fuel pump is in the middle. All the wires are connected, and the positions for the fuel lines are the same. There's the return. There's the pressure and the connector. As you can see, the connectors are the same. So order our part from 1AAuto.com, and you'll be good to rock and roll.
We're going to install our seal on our pump. Just hold it up here for now. Now you're going to slip the level sensor in first, like that. Angle it in there, and you're going to have to twist it a little bit. Now, when the pump is here, you're going to push down on the seal so the seal's in there first. Push the seal all the way around. There's a lip on the bottom of the seal. It's just got to get over the ridge. Just make sure it's all the way around. Just push it down. Looks like we're in place.
You want that arrow pointing towards the back of the car. Take our lock ring. Take our hammer and our punch. Just lightly tap it. Going around, you want to make sure all these tabs are underneath the lock ring. That looks good. Now, the black one is the fuel supply, so that's the one that sends the pressure. This one here is the return, and we have the connector right here. Reconnect the connector. Push it straight down, and push that red lock down. There is a tab right here for this cover. It's going to go in this slot right here. Line that up. Push it down in place. So a little bit of fuel spilled, so I'm just going to use a little bit of a cleaner. Clean it up so it doesn't smell like gas. Put that back down.
Reinstall our back seat. You're going to feed the seatbelt buckles through the holes. Get it through the fabric. It is slightly difficult. It helps to reach underneath and pull the fabric through. Get the seat lined up. You're going to lock in the back part of the seat. Push it and push down, pull forward. And you want to check the front. Meet the front. It's lined up there. Push it down. Same over here. Lock that down. I'm going to reinsert these clips. You're going to push up underneath the seat. Get this slot to line up, and then lock it into place like that. And the last one.
It's a little bit tricky. If you angle it a little bit, it makes it a little bit easier. Get it over. Lock it in. All right. Now we're going to prime the fuel system. What we're going to do is we're going to cycle the key on and then off and then off again. Then we're going to try cranking it. It should be primed. There we go.
Thanks for watching. Visit us at 1AAuto.com for quality auto parts, fast and free shipping, and the best customer service in the industry.
Shop Products
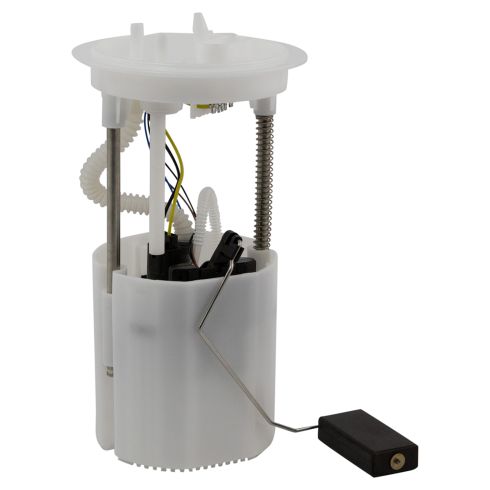
VW Audi Fuel Pump Module Assembly TRQ FPA61970
Part Details:
- No
- No
- Gas
- Strainer
- Yes
- Electric
- 50 Ohms
- In Tank
- Yes
- 116 PSI
- 1
- 7.89 mm
- 87 PSI
- 1
- No
- 39.63 gph
- 290 Ohms
- Quick Connect
- No
- 32 gph
- 36 gph

How to Replace Electric Fuel Pump 1996-2006 Ford Taurus
Learn how to replace the fuel pump in your 96-06 Ford Taurus or Mercury Sable. The experts from 1A Auto will show you in this step by step video.
