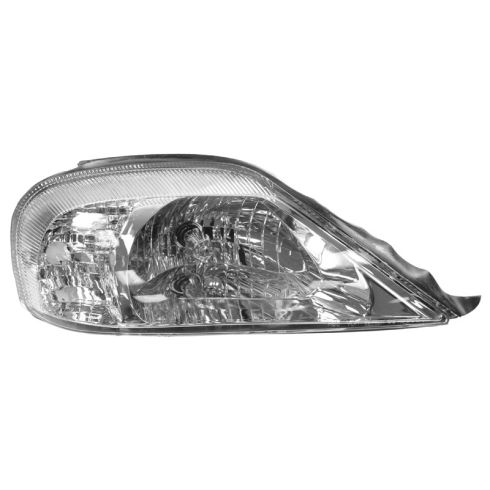
How to Replace Headlight and Bulb 2000-05 Mercury Sable
Created on: 2012-01-03
Watch this video to learn how to replace and service the headlight assembly and bulbs on your 00-05 Mercury Sable.
-
step 1 :Removing the Headlights
- Pull up on the tabs on the back of the headlight. Remove the tabs.
- Remove the 8mm bolt on the headlight.
- Pull the headlight forward.
- Disconnect the wiring harness.
-
step 2 :Changing the Headlight Bulbs
- Parking bulb twist counter clockwise. Pull the bulb free from the socket and replace. Twist clockwise to lock.
- Turn the cap on the headlight counter clockwise. Pull the connector free. Twist the ring counterclockwise. Pull the headlight free. Reverse procedure to reinstall.
-
step 3 :Replacing the Headlight
- Remove the two screws on the back of the old headlight, that secures the harness.
- Remove the harness.
- Connect the harness to the new headlight assembly.
- Plug the harness into the headlight.
- Line the light up and push into place Outside first.
- Replace the clips.
- Replace the 8mm bolt.
Tools needed
-
Socket Extensions
Flat Blade Screwdriver
Phillips Head Screwdriver
8mm Socket
Ratchet
Brought to you by 1AAuto.com, your source for quality replacement parts and the best service on the internet.
Hi, I'm Mike Green. I'm one of the owners of 1A Auto. I want to help you save time and money repairing and maintaining your vehicle. I'm going to use my 20 plus years experience restoring and repairing cars and trucks like this to show you the correct way to install parts from 1AAuto.com. The right parts, installed correctly that's going to save you time and money. Thank you, and enjoy the video.
In this video I'm going to show you how to service a headlight on this 2002 Mercury Sable. I'm going to show you both replacing both an entire assembly as well as just what you need to do if you need to replace the bulbs. The tools you'll need are and eight millimeter socket with a ratchet and extension, or an eight millimeter wrench, a flat blade screwdriver and a Phillips screwdriver. Maybe you're watching this video because you need to figure out how to replace a bulb, or you have a broken headlight, or your headlights are clouded and faded and you don't even realize it. Now the front end of this vehicle doesn't look too bad, but here it is with a new set of headlights. Let's just see that one more time. Here's it with the old headlights, and they're not too bad, but they're still kind of faded and cloudy and now a nice new set of headlights from 1A Auto. That's what it can do for you. It can take some miles off the front end of your vehicle.
To remove one of these headlights, it's actually pretty easy. There are two tabs, one here and one here, and you pull up on these. Pull right up and out, and then you want to loosen an eight millimeter bolt right here. You might want to use a screwdriver right under the tab to pry it up a little bit to get it going, and then pull it out the rest of the way with an eight millimeter socket with a ratchet extension, loosen up that bolt. Now your headlight pulls forward. There's a connector right here. What you can do is kind of pry this away from the light and then pull it out, and then there's a little tab right here. Push down on that tab and disconnect the connection and now your light is free from the car. If you're just looking to change a bulb, you're parking light bulb twists counter-clockwise. Pull it out. This bulb just pulls from the socket. Push it back in, and then to reinstall, just put it in the socket, turns clockwise. Your headlight, turn this counter-clockwise, pull it up and out. Pull this connector off from your headlight and now this ring twists counter-clockwise and comes up and off and your headlight pulls out. To reinstall just reverse the procedure, put that in, lock the ring on, plug this in. You'll secure this first and lock that one. On your old light you need to remove the harness, a couple of Phillips screws here Let's fast forward as I take off those two screws. Remove those from the light and bring your new light over. Plug in your park light, plug back in the headlight. Take your light, plug in your harness and kind of put it in place, pull some of this plastic off the edges. I usually just take this eight millimeter bolt off. You want to feed the outside line in first then get it in place. Put the cap back in and then put your 8mm bolt in here.
We hope this helps you out. Brought to you by www.1AAuto.com, your source for quality replacement parts and the best service on the internet. Please feel free to call us toll free, 888-844-3393. We're the company that's here for you on the internet and in person.
Shop Products

2000-05 Mercury Sable Passenger Side Headlight Assembly TRQ HLA74021
Part Details:
- Yes
- PC (Polycarbonate)
- Yes
- Assembly
- Standard Replacement
- Halogen

How to Replace Headlights 2011-16 Volkswagen Jetta
Watch this video to learn how to replace the headlights in a 11-16 Volkswagen Jetta.


