
How to Replace Headlight Housing 2007-13 Chevy Silverado
Created on: 2018-09-14
Watch this video to learn how to replace and service the headlight assembly and bulbs on your 07-13 Chevy Silverado.
-
step 1 :Removing the Grille
- Remove the eight push-clips with a trim tool
- Lift the panel up and off
- Remove the four 10mm bolts from the grille
- Compress the clips behind the grille with needle nose pliers
- Pull the grille out
-
step 2 :Removing the Headlight
- Remove the 10mm bolt and 7mm bolt from the fender well
- Pull the inner fender well out
- Remove the 10mm bolt from headlight
- Remove the two 10mm bolts from atop the headlight
- Slide the headlight forward
- Disconnect the wiring harness
-
step 3 :Installing the Headlight
- Transfer the wiring harnesses and bulbs from the old headlight to the new one
- Connect the wiring harnesses
- Slide the headlight into place
- Tighten the two 10mm bolts atop the headlight
- Tighten the 10mm bolt to the headlight
- Put the inner fender into place
- Tighten the 10mm bolt and 7mm bolt to the fender well
-
step 4 :Installing the Grille
- Press the grille into place
- Tighten the four 10mm bolts to the grille
- Insert the panel on
- Press on the eight push-clips to the panel
-
step 5 :Readjusting the Headlights
- Mark on a wall the center axis point of the headlight
- Back up 25 feet from the wall
- Turn the headlights on
- Turn the adjustor with a Phillips screwdriver
- Have the passenger side 2 inches below the mark
- Have the driver side 4 inches below the mark
Tools needed
-
Socket Extensions
7mm Socket
10mm Socket
Ratchet
Needle nose pliers
Hi, I’m Mike from 1A Auto. We’ve been selling auto parts for over 30 years!
What's up, guys? My name's Andy from 1A Auto. I'm going to be installing these brand new headlights on this 2011 Chevy Silverado. If you need headlights or parts for your vehicle, check out 1aauto.com.
We're going to open the hood. Right here, over near the foot rest, you can pull this lever. To release the safety, there is a little lever right here. You're going to slide it to the driver's side and lift up on the hood. Next we're going to remove these push clips. There's eight of them. They're right in these locations. Right here, here, and here. We're going to use a trim tool. You could use a flat blade screwdriver and pull up the center part, and then once the center's up, it's unlocked and you can pull it out. Do the same with the others. Once those are out, we can take this panel off. Just lift up.
Pull it out of your way. We're going to take these four ten millimeter bolts out. I'm going to use a ten millimeter socket and extension and a ratchet. Take that last one out. To pull this grille forward, I'm going to use some needle-nosed pliers. You need to take these clips and compress them, and then you can pull out on the grille. There's six of them. There's one there, one here and then there's one down here. So, you squeeze the clip, and pull out on the grille. Just like that. Right here and this one's already unsnapped and one more on the bottom here. Pull that out, and you can pull the grille straight-forward.
I'm going to turn the wheel to the left because I'm going to do the passenger side headlight. That gets the tire out of my way so that I can remove the fender well just enough so that I can access some of the bolts. Start the truck up and turn it to the left. So, there's a bolt that goes through the headlight right here that secures it. We need to access that, so I'm going to pull part of the inner fender well out. I'm going to use a ten millimeter socket and a ratchet, and I'm going to take this bolt out. Pull that one out, and then just to make it easier, I'm also going to take this seven millimeter bolt out. I'll use a seven millimeter socket and a ratchet.
Okay, I'm going to grab this side of the inner fender well. Just pull it out a little bit, and we're going to access this bolt right here. I'm going to use a ten millimeter ratchet wrench. You can use a socket and a ratchet, but it's a little difficult to get in there. It's a little bit tight. I'm just going to loosen this up. It is slotted, so you do not have to take it out completely. The headlight is slotted. Just loosen that a little bit.
Next we're going to take these two ten millimeter bolts out. Use the ten millimeter socket, extension and ratchet. I'll take this one out as well. Now we're going to grab the headlight from down below and up top. I'm just going to slide it forward. I'm going to push down on the headlight a little bit. Maneuver it out on the top part first while you push down. It's a little bit tricky. You've got to maneuver it a little bit. So, you want to push down on the headlight so that we can slide this part out. Then the headlight will slide out this way. To disconnect the electrical connector, you can grab this and slide this out. There may be a little lock tab on here, so you may have to slide that off first but then there's a button right here. Push down on the button. Slide the connector off. Pull the headlight assembly out.
Here's our old headlight assembly. Here's our new headlight assembly from 1aauto.com. As you can see, the shape is the same; the general layout of the light assembly is the same. If we look to the back, the mounting positions are the same, these little pins. This slot. This adjuster is in the same location. You do need to swap over the light bulbs and the harness assembly. We'll move that over in a second. Get yours at 1aauto.com and you'll be ready to rock 'n' roll.
Before we install the new headlight assembly, we're going to transfer this wiring harness and light bulbs over to the new one. I'm going to take a Phillips head screwdriver. I'm going to loosen up right here. We're not going to take it out completely, just got to be able to get the harness out of the way. Same with this one right here. Once that's out of the way, then we can take the light bulbs. Twist it counter-clockwise. Same with this one, counterclockwise and this one. You want to make sure you don't touch the bulbs on these, because the oils in your hand will make the bulbs burn out faster. I'll set that aside.
We'll go to the new headlight assembly. Just going to take some needle-nosed pliers and remove these little covers that keep the dust out. Pull that off. Remove those. That's fine like that. I'll take these two bulbs, this one without the gray top on it is the high beam, that's going to go in the lower section. Line that up and turn it to the right and this one, the low beam, we'll install right here. Line that up, and turn it to the right. Take the wiring harness. You need to loosen up these two hold downs to get the harness in position. Once that's in position, move to the other one. Loosen that one. Going to slide it on, and we can snug this back down.
You can kind of see where the general location was for where the harness was. Snug that down. Take this light, and then turn it to the right and this one, get it in position. Turn it to the right. Then we can take this connector, so lock in right there. Now you're ready to install your headlight assembly.
Next, we're going to install this headlight assembly. We're going to connect the wiring connector. Slide that one. If you had that locked, you're going to want to push that back down. This is where that slotted position is for the assembly and that bolt, you can take that bolt out, it's just easier to leave it in. Now we'll just slide this down. Make sure that part goes in a little bit. Push down.
Then there's these two tabs that are going to go into these two holes right there. You want to line those two tabs up. Once those are lined up, we can put our two ten millimeter bolts in up top. You're going to want to use some force and push the headlight assembly in so that you can get these two bolts in up top and snug this one down. Remember, when you're snugging these bolts down, it is in plastic so you don't want to tighten it too much.
Next, I'm going to snug this bolt up. I'm going to use my fingers first to get it started, then I'll use my ten millimeter ratchet wrench and snug it up. You can use a regular wrench, it's just easier to use a ratchet wrench if you have one available. Right, that's nice and snug. Now we can re-position this inner fender well.
Then we're going to install this seven millimeter bolt right here. We'll snug it up with our seven millimeter socket and ratchet. Next, we'll install this ten millimeter bolt right here. We'll snug it up with our ten millimeter socket and ratchet.
We're going to install the grille. These are the clips that hold the grille on, right here. Let's line those up. Once you see that they're all lined up, you can push on the grille and we'll push on the grille. It'll lock in place and we can push a little bit more to get the bolt holes to line up. Install these four bolts. Once we get those bolts in, we'll snug them down.
Next, we'll install this cover. Make sure it lines up with the holes for the push clips. Take the eight push clips and push them back in.
To adjust your new headlights, there is an adjuster right here. You're going to use a six millimeter Allen when you insert it. Turn it to the right. The headlight is going to go down. If you turn it to the left, the headlight's going to go up. Close the hood. This is a basic tutorial on how to aim the headlights on your vehicle. Find the axis of your headlights. This is usually indicated with a small dot or the headlight bulb size on the lens, if not, it's the actual center point of your headlight bulb. Transfer this mark to a vertical wall with a preferably dark color that will allow you to back up 25 feet. Pull up and find the center line of your vehicle as well as the center line of your headlight axis. Mark the wall with the height of the headlights and a straight line going across at that axis height.
Back your vehicle up 25 feet from the wall to the front edge of your vehicle's headlights. Turn your headlights on and locate the adjusting screw, usually on the backside of your headlights. You'll want to rotate this until the passenger hotspot or focus of the beam is approximately two inches below the line and the driver's side is four inches below the line. We changed the heights on each side so you can still get a good beam to the offside of the road on the passenger side and have the driver's side low enough to not blind oncoming traffic.
Thanks for watching. Visit us at 1AAuto.com for quality auto parts, fast and free shipping, and the best customer service in the industry.
Shop Products
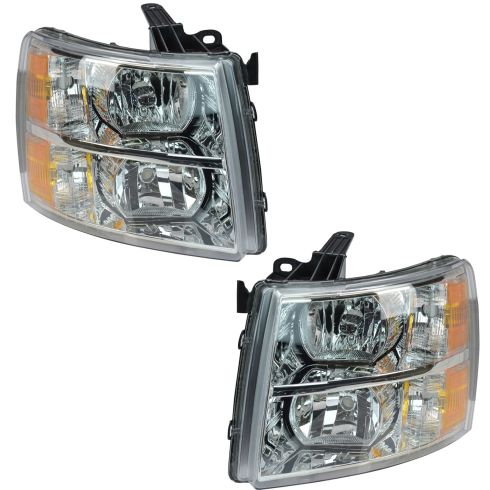
Chevrolet Driver & Passenger Side 2 Piece Headlight Set DIY Solutions LHT03544
Part Details:
- 2 Piece
- Features and Benefits
- (1) Passenger Side Headlight
- (1) Driver Side Headlight
- PC (Polycarbonate)
How to Replace Headlight and Bulb 1997-99 Cadillac Deville
Watch this video to learn how to replace and service the headlight assembly and bulbs on your 97-99 Cadillac Deville.
