
How to Replace Headlights 1990-99 GMC K1500
Created on: 2017-05-10
How to repair, install, fix, change or replace the broken, damaged, cracked, faded, cloudy, or chipped headlights on 90, 91, 92, 93, 94, 95, 96, 97, 98 GMC Sierra K1500
-
step 1 :Removing the Headlights
- Remove the two 3/16" screws from the top of the headlight
- Pull the headlight forward out of the grille
- Disconnect the headlight bulb sockets
- Repeat these steps on the opposite side
-
step 2 :Installing the Headlight
- Connect the headlight bulb sockets
- Slide the headlight into the grille
- Insert the two 3/16" bolts for the headlights
- Repeat these steps on the opposite side
-
step 3 :Aiming the Headlights
- Find the axis point of your headlight
- Line up this point with a vertical wall
- Mark the wall with the center line of the vehicle
- Mark the wall with a line level with the headlight axis
- Back the vehicle 25 feet back from the wall
- Turn the headlights on
- Adjust the passenger side headlight until the focus of the beam is two inches below the horizontal mark
- Adjust the driver side headlight until the focus of the beam is four inches below the horizontal mark
Tools needed
-
Socket Extensions
3/16 Inch Socket
Ratchet
Hi, I'm Mike from 1A Auto. We've been selling auto parts for over 30 years. We're dedicated to delivering quality auto parts, expert customer service, fast and free shipping, all backed by our 100% satisfaction guarantee. Visit us at 1AAuto.com, your trusted source for quality auto parts.
In this video, we're going to be working with our 1996 GMC Sierra. We're going to show you how to remove and replace your vehicle's headlights. If you like this video, please click subscribe. We have a ton more information on this and many other vehicles, and if you need these parts for your truck, you can follow the link down in the description over to 1AAuto.com. Here are the items you'll need for this repair.
Remove the two three-sixteenths screws securing the headlight in. These come out of the top of the grille, and we'll do that with a socket ratchet and extension. Remove the headlight from the vehicle and disconnect the headlight bulbs. Repeat these steps on the opposite side.
Here we have the old parts that we removed from our vehicle and the new parts from 1AAuto.com. As you can see, we have the pair here. This is also available as left or right if you only have one light damaged, but generally they get pretty cloudy like the ones down there, so we do recommend you replace them as a pair.
See, we have the same headlight. It even comes with new bulbs and new brackets. We don't need to change these. However, if you did, the headlight mounting plate is already on there. You could swap that out if you had to, but generally, it's just the light. It comes with two new bolts to secure the light in to that bucket, and we also have two new adjuster screws there. So if your old headlights are foggy, taking on moisture, cracked, or broken, this new part from 1A Auto is going to go on direct fit just like your original equipment and fix you up right.
Reconnect your headlights, reinstall them, and reinstall the three-sixteenths bolts.Repeat these steps on the opposite side.
This is a basic tutorial on how to aim the headlights on your vehicle. Find the axis of your headlights. This is usually indicated with a small dot or the headlight bulb size on the lens. If not, it's the actual center point of your headlight bulb. Transfer this mark to a vertical wall with a preferably dark color that'll allow you to back up 25 feet. Pull up and find the center line of your vehicle as well as the center line of your headline axis. Mark the wall with the height of the headlights and a straight line going across at that axis height.
Back your vehicle up 25 feet from the wall to the front edge of your vehicle's headlights. Turn your headlights on and locate the adjusting screw usually on the back side of your headlights. You'll want to rotate this until the passenger hot spot -- or focus of the beam -- is approximately two inches below the line and the driver's side is four inches below the line. We changed the heights on each side so you can still get a good beam to the off-side of the road on the passenger's side and have the driver' side low enough to not blind oncoming traffic.
Thanks for watching. Visit us at 1AAuto.com for quality auto parts, fast and free shipping, and the best customer service in the industry.

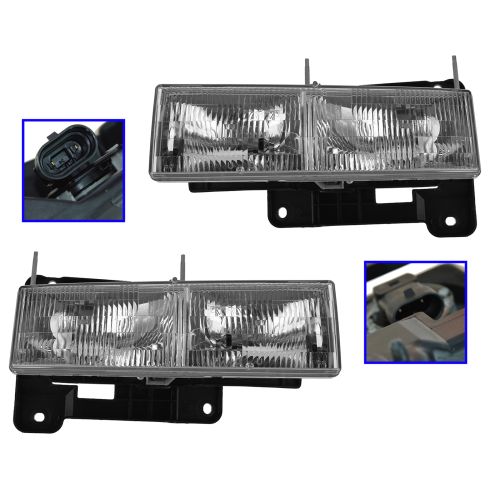
Chevrolet GMC Driver & Passenger Side 2 Piece Headlight Set General Motors OEM GMLHP00001
Part Details:
- 2 Piece
- (1) Passenger Side Headlight Assembly
- (1) Driver Side Headlight Assembly

How to Replace Headlight 1998-1999 Toyota Avalon
Watch this video to learn how to replace and service the headlight assembly and bulbs on your 98-99 Toyota Avalon.
