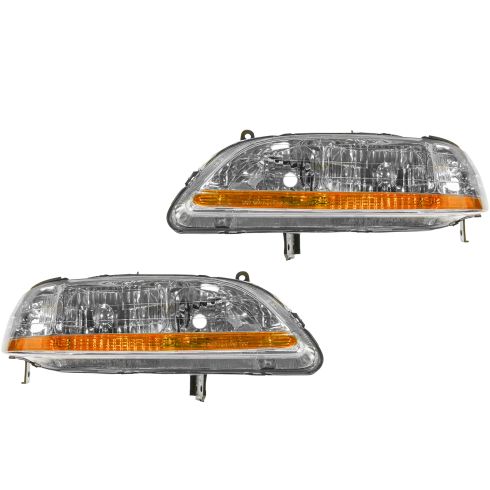
How to Replace Headlights 2001-02 Honda Accord
Created on: 2011-06-11
How to repair, install, fix, change or replace the broken, damaged, cracked, faded, cloudy, or chipped headlights on your vehicleon 98, 99, 00, 01, and 02 Honda Accord models.
-
step 1 :Handling the Bulbs
- Note: DO NOT TOUCH the bulbs- the oil from your fingers will burn into the light and foul your bulb.
- Clean with rubbing alcohol and a soft cloth if the bulbs do get touched.
-
step 2 :To replace the bulb
- Reach into the engine bay behind the headlight assembly and unplug the harness.
- Twist clockwise and pull to remove the bulb.
- Plug in the new bulb and twist and push it back in.
- Remove the battery to do the same on the other side.
-
step 3 :Remove the headlight assembly
- Remove the 8 mm and 10 mm bolts securing the bumper cover.
- Use a flat blade screwdriver to remove the push clips on the bumper cover.
- Set the bumper cover aside.
- Remove the four 10 mm bolts securing the headlight assembly and bracket.
- Unplug the harness and bulbs from the headlight assembly and set aside.
-
step 4 :Install headlight assembly
- Plug the bulbs and harness into the new headlight assembly
- Clip the headlight into place.
- Use your 10mm and 8mm sockets and ratchet and bolt the assembly and mounting back in.
- Clip the bumper cover back on and use your 10 mm socket and ratchet to bolt the bolt by the far headlight back into place.
Tools needed
-
Socket Extensions
8mm Socket
10mm Socket
Ratchet
Brought to you by 1AAuto.com, your source for quality replacement parts and the best service on the internet.
Hi, I'm Mike Green. I'm one of the owners of 1A Auto. I want to help you save time and money repairing and maintaining your vehicle. I'm going to use my 20+ years of experience restoring and repairing cars and trucks like this to show you the correct way to install parts from 1Aauto.com. The right parts, installed correctly. That is going to save you time and money. Thank you, and enjoy the video.
In this video, we're going to show you headlight replacement on this 2000 Honda Accord. It's basically, the same for any '98 to 02 Accord. The tools you'll need are: a flat blade screwdriver, 8mm and 10 mm sockets with a ratchet and extension, and that's about it.
Changing the headlight bulb is a pretty easy procedure. Just go in behind on, this is the driver side. You can see right here, actually I will do this one, a little bit easier. You just take the bulb, turn it counterclockwise, and pull it out. There is your bulb. This disconnects by pressing on a little tab right here. Press a tab and pull the headlight out. Reinstall, the new headlight goes in. Just put it in, and we turn a little bit counterclockwise, until it goes in. That is on the driver side. Passenger side, you can see, there is one of your lights, and there is the other one. It's a little more difficult to get to. You might want to take the battery out, which would be basically removing a couple of 10 mm nuts and lifting the battery out.
To replace the entire headlight assembly, you're actually going to want to remove the front bumper cover, which sounds like a big deal, but it really isn't. You can see I have my wheel turned over here. There is an 8mm bolt here, and then underneath, there is a 10 mm bolt here and then there is a series of these clips. This is on top here. One here, one here, and then there are also those clips up underneath. Let's see if we can find one here. You can see right there. I think there's probably about four or five underneath. You remove those clips and the 8mm and 10 mm bolts on each side, and it moves forward. To remove the clips, you just use a flat blade screwdriver, pry up on the middle of the clip, and that allows the whole thing to come out.
Here, I'm going to go into super high speed, as I use a ratchet socket and an extension to remove the two bolts on one side and then I move over to the other side to remove the same two bolts on the other side, and then go underneath and remove the clips. You saw me remove the clip on the top. That was a relatively easy shot. The ones that are underneath, they work the same way but generally they are filled up with a little bit of gunk so you have to work at them a little bit more to pry out the middle and then pull them out. As soon as I get done here with pulling those clips out from underneath, then we will go back and do the rest of it.
Now, you want to just take the sides, pull them down and out, see, that pretty much just came right off. This side, down and out. The cover comes off. Now, with the bumper cover off, we have 10 mm bolts. One up here, one here, and then these two underneath here. I'm just going to speed it up now as I remove those four 10 mm bolts. Ratchet off. Now, just twist each receptacle counterclockwise. Then the bolts pull out. There's the high beam, the low beam, the marker, and the parking light up underneath.
These are the original headlights. It looks like we probably had headlights replaced pretty recently. The new headlight, you can see, is even just a little more clear than the original ones. The new light is going to go in, open, mount it exactly the same as the original. These little protectors keep stuff out of the lights. The headlight's going to slide out, it's going to go in, mount and function just the same, actually better than your original. It's going to be more clear and brighter. For this vehicle, I'm going to reinstall the original one, because it is still in good shape.
Okay, reinstall. Plug our lights back in. This is just going to go in and turn clockwise. Put this bottom one in. These are our headlights. There's a little tab in the back up here. Make sure that goes into the fender, this little bracket. Put on the top bolt. Then tighten this up. You want to hold this up under the lights there. I'm going to speed it up here as I tighten it up. Like I said, just hold that bracket up under the lights. That's what holds your bumper tight to your light. Tighten those up, and then check the lights. Then, you are all set to put the bumper cover back on. Now we're going to put your bumper cover back on. Put it in place. Make sure these flaps go up under or actually up over the cover. Lift it up into place. Hold it, and bolt it in place. I'm going to speed it up here as I put the rest of those clips in. You just have to push the plastic underbody of the inner fenders, push it up into place and then make sure the pins go in correctly.
I'm going to speed up through here, putting in the bottom 10 mm screw that goes from the bottom of the fascia to the inner fender, and then the top one that goes from the fascia to the actual fender on the other side. You will see I am kind of struggling with it here a little bit. This is probably pretty common on these vehicles. This car has probably had a couple of bumps and bruises. There is a little clip that clips on to the fender that you have to move into the right spot. Basically, that is what I'm doing, is trying to move that clip into the right spot, then get the bolt through the fascia up into that clip and get it tightened up. Other than that, you're all set.
We hope this helps you out. Brought to you by www.1AAuto.com, your source for quality replacement parts and the best service on the Internet. Please feel free to call us toll-free 888-844-3393. We're the company that is here for you on the Internet and in person.
Shop Products

2001-02 Honda Accord Driver & Passenger Side 2 Piece Headlight Set DIY Solutions LHT03134
Part Details:
- 2 Piece
- (1) Passenger Side Headlight Assembly
- (1) Driver Side Headlight Assembly

How to Replace Headlights and Bulbs 2000-04 Toyota Tundra
Does your 00-04 Toyota Tundra have dim headlights? Change the bulbs, or replace the headlights. Learn how to do both in this video from 1A Auto!


