How to Replace Headlights 2003-10 BMW X3
Created on: 2020-03-09
Watch this video to learn how to install new headlights on your 2003-10 BMW X3.
Tools needed
-
Gloves
17mm Socket
8mm Socket
T30 Socket
Trim Tool Set
Safety Glasses
T25 Torx Socket
I'm gonna take the wheel off, use a 17-millimeter socket. Take these lug studs off. So, I'm gonna hold the wheel on. Take that stud off, and then grab the wheel. Take it off. We're gonna take the shield off. There's all these screws all over along here. They're 8-millimeter. There should be one there, one there, and then the same on the other side. Use an 8-millimeter socket. Take all these out. All right. And then, just hold this down, slide it back. All right. So, we wanna take the inner fender well out. Take the bolt out right here. This vehicle doesn't have that bolt. You can use a trim tool to take this push pin out. Just try one of these. Sometimes they're a little stubborn. Sometimes you gotta just cut them out and replace them. There you go. Two right here in the front, take those out.
Now, we're just gonna slide the ambient air temp sensor out and just let it hang. I'm gonna pull this push pin out right here. Just like that. If you have a rivet right there, you may have to drill it out, one of the plastic rivets. Slide this back. You can slide that back the best you can like that if you wanted to. If you wanna take the whole thing out, you can. Or just leave it like that. And there's a screw right there. Use a T25 and screw up. You can take this wheel off and do the same on this side. And then, you wanna grab this with a lot of force down here and just pull outwards. Just like that. It's clipped in right there, right there, and right there. Do the same on the other side.
There's two screws on the front, one right here, one right here. You can use a T30 to remove those. And disconnect the connector on the fog light right there. You just grab the tabs, squeeze it. There's two tabs on both sides of the connector. Slide that down. Now, we're gonna take this cover off. Use a T30. This one's broken on this side. I'm gonna take that bolt out right there. Just grab this cover, and just slide it out. And these three bolts, take those out. Use a T30 as well. When I go to take the last one out, I am gonna support the bumper because that's the last thing that's holding it on.
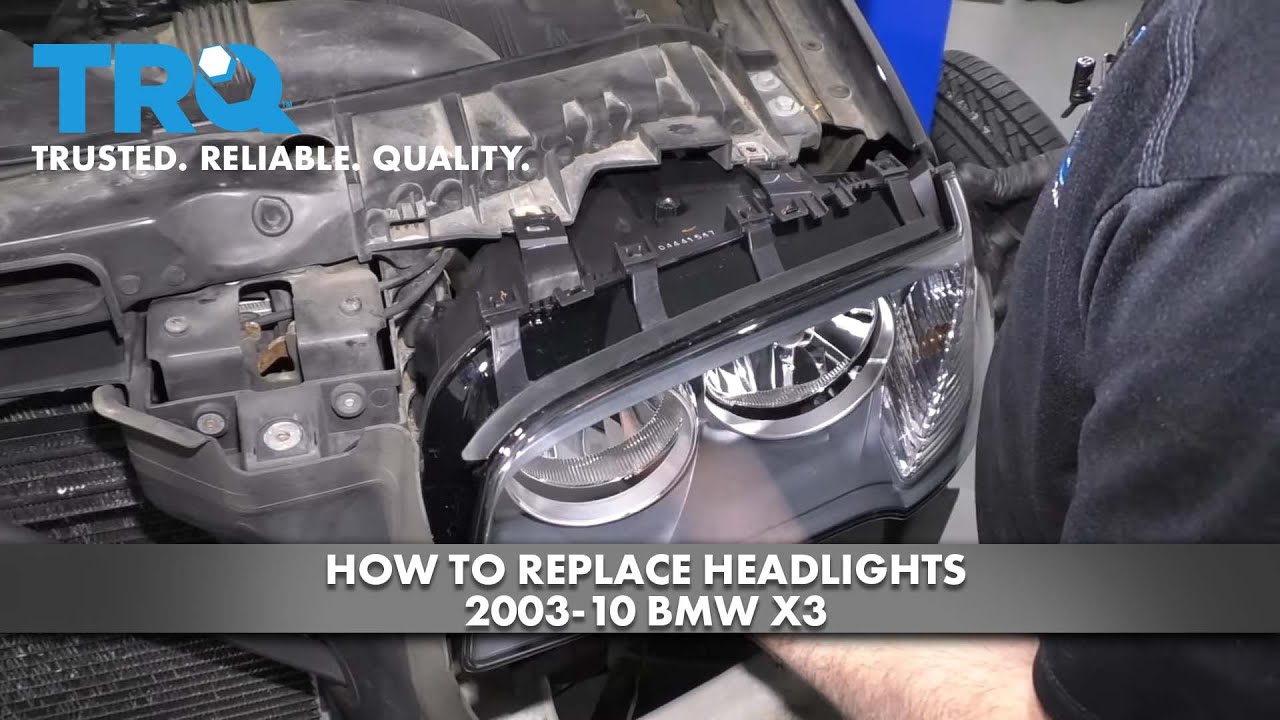
Then, you just grab the bumper and just slide it up. There's four screws we're gonna take out. There's two in the bottom, right there, right there. Two on top, right there and right there. Use a T30. Take that out. Then, grab the lens and slide it out. Disconnect the connector right here, and just push on the tab on the top and this one on the bottom, and slide that out. And there's your headlight assembly.
With the new headlight assembly, now is a good time to replace the bulbs, or you could swap them over. But it's always great to use new bulbs. Just take the new bulb, slide it in position with the connector in. And then, make sure you wear gloves while you're doing this. You don't wanna touch the bulb, the glass part, because you're gonna cause it to burn out prematurely. Just slide it in place. Locks in like that. Take this door, slide it back on. And then, slide this lock back over. Lock it in place. That was the high beam.
Here's the low beam. I'm just gonna take a pick, just slide under here. Take this door off. Take the connector. Line it up. And line the bulb up. There is a tab on the actual bulb. Push it in place. Take the door. Lock the door back down. And the side marker right here for the turn signal, pull that out. And just line this in position. That looks good. It's gonna go under these little tabs right there. And twist it clockwise. Lock it in place. You're good to go.
When you're done, you're gonna wanna make your adjustments right there. You can make the lights go up or down. I'll take the light assembly, plug it in, line it up, and lock it in place. That's good. And just line this up. That looks good up top. Take two of the bolts. Get those started up top. And get these two. Get these two bottom bolts in. Now, we wanna make sure this gap gets closed up, so we just push back on the headlight assembly, and then just snug these all up evenly. Take the bumper and slide it over. Try not to hit the paint. If you need two people, it might help out.
Let me get the sides lined up. I'm not gonna push that in yet. I wanna get the other side started. That looks good. Push that in the same on this side. And line these bolts up. Put these three in first. And tighten these down. And line this up. Get these bolts started. And put these front bolts in. Make sure you plug the fog lights in. Line that up. Lock it in place. Do the same on the other side. And take this screw. Line this up. Get it started. Make sure the bumper looks like it's lined up good. And then, snug it down. Do the same on the other side.
All right. Now, we can take this inner fender well. Just get it lined back in position. It's good right there. Make sure it looks good underneath. And you wanna make sure on the driver's side, this temperature sensor comes through. Lock that in place. Looks good right there. And reinstall the fasteners. And before I tighten all those up, I'm just gonna push the push pins in where I had to cut them before. And put these two fasteners in underneath. And then, I'm gonna tighten them all up. Now, repeat these steps on the opposite side.
Now, reinstall this panel, just to get it lined up. That's good. Take all the bolts. I'm gonna get those all started first. Now, I'll just go around and tighten them all down. And now we're gonna reinstall the wheels. Get the lug stud. Now, I'm just gonna torque these lug bolts to 110-foot-pounds. I'm gonna do it in a star pattern so that it tightens the wheel down evenly. And just go around again, double-check.
This is going to be a general tutorial on how to aim your brand new TRQ headlamp assemblies. Okay. So, looking at your brand new TRQ headlamp assembly, you're gonna see where your low beam is, and you'll see a little dot right in the center. And that is the access point, okay? So, what we're gonna do is we're gonna mark that with an erasable marker just so it's easier to see. Next, what we need to do is measure from the level ground up to this point and take note of that measurement.
Now, we're just gonna pull the car up to our wall. On our vehicle, we remember that the measurement was 28 inches for our access point. Your vehicle may be different. But that's where I'm gonna put this tape, just above that 28 inches. We'll do the same on the other side. Okay. So, let's just back the vehicle up, straight back, 25 feet from the wall. Now that we moved our vehicle 25 feet back from the wall, we're gonna start with our measurement here. That's where the headlamp center is. We're gonna go down 4 inches on the driver's side. On the passenger side, we have our line here.
What we need to do is go down 2 inches. To adjust the driver's side, we're gonna cover our passenger side headlamp. If you look at the backside of your headlamp assembly, you're gonna see something that looks like this. This is the adjustment. Some of these headlights assemblies have one, two, or even more of them, but you should at least have one. This is how we're gonna adjust the headlight beam.
Now, we're gonna lower the top part of the beam down to just below this line. When you turn the adjustment to the right, it brings the beam up, and if you turn it to the left, it'll bring the headlight beam down. And this is this way on most vehicles. Let's continue on to doing the passenger side. All right. We properly aligned our TRQ headlamp assemblies. Okay. And on the quality TRQ headlamps for our pickup truck, the procedure's gonna be the same. You're gonna find your center dot, mark it. And then, you'll measure from the level ground up to your dot.
So, once your headlamps are properly adjusted, it'll be time to adjust your fog lamps. You'll notice on the driver's side, the focal point is all the way at the bottom right now. I would like to bring it up so it meets up with approximately the bottom of the focal point of the headlight. Some fog lamps have an adjuster, others don't. The ones that do have an adjuster, you would just turn the adjustment to the left or to the right to adjust the beam up and down to where it needs to be. Now, with your TRQ headlamps and fog lamps properly aligned, you can drive down the road safely.

How to Replace Headlights 2004-07 Subaru Impreza WRX
How to repair, install, fix, change or replace the broken, damaged, cracked, faded, cloudy, or chipped headlightson 06 Subaru Impreza WRX
