How to Replace Headlights 2005-15 Toyota Tacoma
Created on: 2020-04-09
Watch this video to learn how to install new direct fit replacement headlight assemblies on your 2005-15 Toyota Tacoma!
Tools needed
-
10mm Socket
Ratchet
Trim Tool Set
Pocket Screwdriver
So, it's time to get this old grille off of here. You're going to notice you have couple push clips. You have one here and one located on the other side of the vehicle in the same area. And you're also going to have a 10-millimeter-headed bolt right here, and then, of course, one over there as well. We can start with...however you want. I'm going to go with the bolts. Use my pocket screwdriver, you should be able to pull up on the center of these. Sometimes they get stuck. Lift it right up and out, should look like that. Now that we have those out, you should be able to move this around a little bit. At this point, we're just gonna lift straight up. If you were to look at these clips, you're going to see a little tab right where my pocket screwdriver is. You need to push in on that, and then you should be able to draw this clip down by pressing, and that's gonna help unlock it for you. The next thing we're going to do is remove this push clip, use your small pocket screwdriver or your forkey tool, and pop out the center. Once you have the center coming out, the outer portion should pop out fairly easily. This can move around a little bit. Just kind of pull it, and it should slide right out. Now, looking for the mounting bolts, you're going to have one here, one there, and there should be one located right down in here. This one is actually missing it, but this is what it looks like. Use your 10-millimeter. Here we go. Go ahead and grab onto that. You should be able to wiggle it around. You're going to need to lift up on these tabs. Okay. At this point, you can wiggle this around fairly easily.
So, the next thing we're going to need to do is get under here, remove this 10-millimeter-headed bolt, and then also kind of try to get this pushpin out of there. Let's get this out of the way. Now we have a clear view right inside here. So, now, if you look in here, you're going to see the studded bolt, and then if you feel above it, you're going to feel a 10-millimeter flat-headed bolt. The flat-headed one is the one we're going to take out. Now, let's go ahead and wiggle this around. We should be able to draw it out a little bit. We're going to disconnect the wiring. All right. We've got one more that I can see. I'm just going to wiggle it.
Okay. So, now, this can move around quite a bit. Now, this is the part that's going to get interesting. There's two ways, you could take off your nice plastic bumper cover here by removing some of these pushpins and possibly a couple bolts along the way or you can use the way that I'm going to do it right now, which involves a minor amount of persuasion. I'm going to make sure that I protect my bumper cover with anything I can. I want to protect that paint, make sure I don't get any scratches. Once I've done that, I'm going to break this free from where it's stuck. I'm going to kind of tilt it like this, give it a little twist. And now, I'm just going to press down, that's going to flex this plastic bumper cover just a teeny bit, and then I can pull it up and right out.
So, now, just take your old bulbs or if you wanted to replace them, now's the time. Put them inside your headlamp unit. And then once you've done that, we'll take a look at the back. You'll see you have an adjustment here and you also have an adjustment right here, has a little tab. If yours is stuck, you can just pry it up with a small screwdriver, and to do the adjustment, you would use a Phillips head screwdriver. It's going to be time for the installation. You want to be careful for your paint. We've got our little ear here. We need to make sure that that goes in and down. We're just going to kind of work it until it seems like it's starting to want to sit. You'll probably find an area that it'll just slide right in. This one looks like it's close. Okay. Just like that. Like I said, I'm being very careful for my paint here. Now, I'm just going to try to line up all my tabs. Get the headlamp kind of sitting nice. That looks decent. All right. Let's grab our electrical and start wiring it in real quick. Make sure you get that marker light. You've got this one for your headlamps. If you want to use a little bit of dielectric grease, couldn't hurt. There we are. We've got one more. That's going to come up here. Perfect. Let's line it up with our tabs. Okay. Those are sitting nice. If you want to start in a couple of the bolts up here, we're not going to tighten them down yet, but we'll just put it so it's definitely not possible for the lens to fall. Now, it's time to do this bolt from under here. Make sure you find that little arm and then follow it to the other side and line up those holes. That's nice and tight. Get our flashlight out of here. Let's grab this wheel well, we're going to get it all lined back up. Now, we just need to get everything lined up. If you were to look at this, you're going to see it has a little flippy-do. You need to get it lined up perfectly. That little flippy-do goes in between this part of the bumper cover. Once those holes are all lined up go ahead and snug that. Don't forget your push clip.
At this point, we're going to tighten down our three upper mounting bolts. And then, of course, if we had this one. Now it'd be a perfect time to do the other side. Let's get this piece back on here. You want to pay special attention to this area right here, and, of course, the tab. Slide those in together, just like that. Slide this in. Then you should have your little push clip that should go right there. Now it's time to get the grille on here. Pay special attention to this area, that's where the piton on the bottom of the grille is gonna slide into. Come right up and over it. And we're going to pay attention to those side pieces. You want to line them up and then press the grille down. There it is. That one clipped in, do the same to the other side. Once that's in, you're going to grab your little pushpin and connect these two pieces together. Let's grab those last couple of bolts. At this point, of course, you want to recheck your headlights, and then, of course, you'd also want to align your headlights. Once you've done all that, go ahead and close the hood and take it for a road test.
This is going to be a general tutorial on how to aim your brand new TRQ headlamp assemblies. Okay. So, looking at your brand new TRQ headlamp assembly, you're going to see where your low beam is, and you'll see a little dot right in the center, and that is the access point, okay? So, what we're going to do is we're going to mark that with an erasable marker, just so it's easier to see. Next, what we need to do is measure from the level ground up to this point and take note of that measurement. Now, we're just going to pull the car up to our wall. On our vehicle, we remember that the measurement was 28 inches for our access point. Your vehicle may be different, but that's where I'm going to put this tape, just above that 28 inches. We'll do the same on the other side. Okay. So, let's just back the vehicle up straight back 25 feet from the wall. And now that we moved our vehicle 25 feet back from the wall, we're going to start with our measurement here. That's where the headlamp center is. We're gonna go down 4 inches on the driver side. On the passenger side, we have our line here. What we need to do is go down 2 inches. To adjust the driver side, we're going to cover our passenger side headlamp. If you look at the backside of your headlamp assembly, you're going to see something that looks like this. This is the adjustment. Some of these headlight assemblies have one, two, or even more of them, but you should at least have one. This is how we're going to adjust the headlight beam. Now, we're going to lower the top part of the beam down to just below this line. When you turn the adjustment to the right, it brings the beam up. And if you turn it to the left, it'll bring the headlight beam down. And this is this way on most vehicles. Let's continue on to doing the passenger side.
All right. We properly aligned our TRQ headlamp assemblies. Okay, And on the quality TRQ headlamps for a pickup truck, the procedure is going to be the same. You're going to find your center dot, mark it, and then you'll measure from the level ground up to your dot. So, once your headlamps are properly adjusted, it'll be time to adjust your fog lamps. You'll notice on the driver side, the focal point is all the way at the bottom right now. I would like to bring it up so it meets up with approximately the bottom of the focal point of the headlight. Some fog lamps have an adjuster, others don't. The ones that do have an adjuster, you would just turn the adjustment to the left or to the right to adjust the beam up and down to where it needs to be. Now, with your TRQ headlamps and fog lamps properly aligned, you can drive down the road safely.
Shop Products

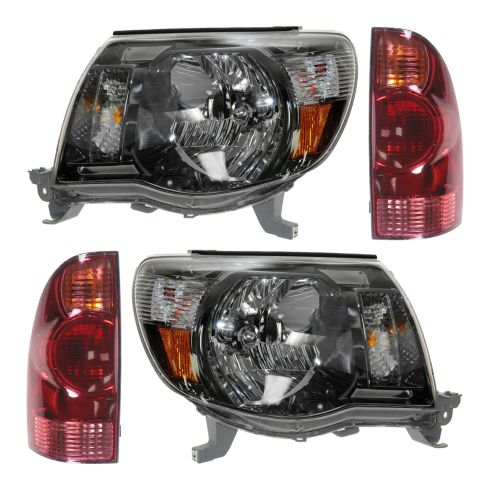
Toyota Tacoma 4 Piece Lighting Kit TRQ LKA55952
Part Details:
- (2) Tail Lights
- 4 Piece
- (2) Headlight Assemblies

How to Replace Headlight and Bulb 1997-99 Cadillac Deville
Watch this video to learn how to replace and service the headlight assembly and bulbs on your 97-99 Cadillac Deville.


