How to Replace Hood Release Cable 2002-06 GMC Envoy XL
Created on: 2014-09-17
If the hood release cable and lever need to be replaced, check out this video for instructions on how to replace it yourself
-
step 1 :Removing the Hood Latch
- Apply penetrating oil to the hood latch
- Apply white grease to the latch
- Mark the latch position with a marker
- Remove the three 10mm bolts from the hood latch
- Pull the hood latch up and out
- Pry the latch cable out of the latch with a flat blade screwdriver
-
step 2 :Removing the Latch Handle
- Pry off the driver side kick panel by hand
- Pull back the floor insulation
- Remove the 10mm nut from the latch handle
- Pull the latch handle off of the stud
-
step 3 :Removing the Latch Cable
- Tie wire or string around the hood end of the latch cable
- Remove three 10mm bolts from the headlight panel
- Unclip the cable with a flat blade screwdriver
- Pull the cable through the engine bay
- Remove the 10mm bolt from the battery ground strap
- Pull the ground strap aside
- Remove the two 7mm bolts from the panel beneath the dash
- Pull down the panel beneath the dash
- Unclip the wiring harnesses from the panel
- Set the panel aside
- Pull the insulation aside
- Pull out the latch cable grommet
- Pull the hood release cable through the firewall as an assistant guides it through the engine bay
- Pull the latch cable out
- Untie the wire from the latch cable
-
step 4 :Threading the New Latch Cable
- Tie the wire to the new latch cable
- Feed the cable through the firewall as an assistant pulls the string to guide the cable
- Apply hand soap to the cable grommet
- Push the grommet into place as the assistant pulls on the cable
-
step 5 :Reinstalling the Latch Handle
- Put the latch handle onto the stud
- Fasten the 10mm nut onto the latch cable
- Clip the wiring harnesses onto the panel underneath the dash
- Push the panel into place
- Insert the two 7mm bolts into the panel
- Push the kick panel into place
-
step 6 :Installing the Latch Cable
- Pull the latch cable through its route
- Push the latch cable into its clips
- Put the battery ground wire into place
- Insert the 10mm bolt into the ground wire
- Thread the latch cable to the hood latch mounting area
- Insert the three 10mm bolts into the headlight panel
-
step 7 :Installing the Hood Latch
- Untie the wire from the cable
- Clip the cable into the latch
- Put the latch into place
- Insert the three 10mm bolts into the latch
-
step 8 :Aligning the Hood Latch
- Line up the latch with the marks from Step 1
- Tighten the three 10mm bolts
- Close the hood
- Make sure the hood is lined up evenly
- Test the latch handle
- If there is too much tension at the handle, raise the latch
- If there is too little tension, lower the latch
- Apply white grease to the latch and the striker
Tools needed
-
Soapy Water
Wire or String
Flat Blade Screwdriver
Rust Penetrant
7mm Socket
White Grease
10mm Socket
Ratchet
Assistant
Marker / Writing Utensil
Brought to you by 1AAuto.com, your source for quality replacement parts and the best service on the Internet.
Hi, I'm Mike from 1A Auto. I hope this how-to video helps you out, and next time you need parts for your vehicle, think of 1AAuto.com. Thanks.
In this video, we are going to show you how to replace the hood release cable on this 2003 GMC Envoy XL. It's the same part and similar process on the regular Envoys from 2002 to 2009. The items you'll need for this are a new hood release cable from 1AAuto.com, a 7 and 10 millimeter socket and ratchet, a flat-blade screwdriver, and white grease.
First it's always a good idea if you are replacing your cable, it's probably because there is something wrong with your latch mechanisms, so clean it off with a lot of good penetrating oil. Then use some white grease or something to grease it up, to make sure it's good and free. Take a marker or maybe a piece of chalk and mark where your latch is. There are three 10 millimeter bolts.
As you pull it up out, you can see how the latch works. You pull the cable inside and that de-latches the system, so if your cable was broken or your handle was broken and you needed to get under the hood, it's possible you could reach from underneath, find this lever, and pull it to unlatch the hood. Probably the last resort would be to try and get through the grille, and you might have to break the grille. At 1A Auto, we do sell the grille as wel,l but you could break the grille and get through. Again, move that lever, but all you want to do to take it off is move it back like this, press the cable down in, and slide it up and off. Then there are a couple of little tabs here. Pull on it. Press, and then press on the other tab.
Pull up on this panel to release the clips. Just do this all the way along the panel, and then push this panel off right here. Then it's free. Pull down the insulation and then just remove this 10 millimeter nut. We'll fast-forward as Mike does that. Once you remove it, just pull the switch off of that stud.
Bring your cable up and out and you want to secure wire or string. This insulated wire is not the best, but I can usually get it on there well enough. You'd really rather have just some bare wire or a good strong string and just really put it on there and tie it tight so that you can feed the cable through and the string stays on it.We are going to remove these three bolts. That will just allow us to pull the panel out a little bit and feed the wire through. There are two clips that hold the hood release cable. One's there; just snap that one off. Then one's right here. I just want to take them apart. Just use a screwdriver, put it in there, and pry them apart. Now just feed the cable up and through here and just keep progressing it down. Pull back your headlight and pull it through this area. We'll just fast-forward as Mike continues to do this all the way to the back of the engine bay. The cable feeds through this little ground strap, so it's better for the ground strap and the project if you just remove this 10 millimeter bolt and get it out of there.
Now, remove this 7 millimeter bolt right here, and that one right there on the opposite side and we'll fast-forward as Mike does this. Now, pull the panel down and unclip this harness then push in on the tab from this side right here. Slide that switch back and off. Then, just set this panel out of the way. Reach up here and pull back this insulation. Then pull back this insulation and you can see that grommet right there. That's the grommet for your hood release cable. Just pull the grommet through that hole. Once you've pulled it through, just pull your hood release cable back and have someone making sure that it doesn't catch on anything in your engine bay. Just keep pulling it through. Then, at this point, it will most likely get caught because it tries to go down through the hole there, so just reach up and angle it out. Then untie your wire.
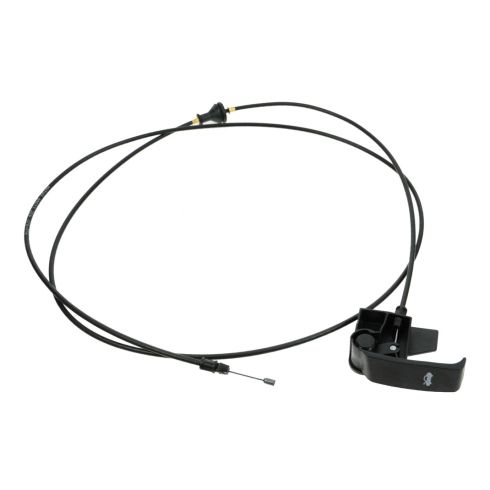
On the left is the old hood release cable, on the right is the new one from 1A Auto. You can see they are identical and will fit exactly the same. Tie the wire onto your new hood release cable. I'll be feeding it up through this end and you'll need a helper to just kind of pull. You don't want them to pull hard on the wire, but you want them to just give some tension on the wire as you feed it up through and make sure it goes through the hole. Give it a little pull. Hold up. Alright, keep going. We'll fast-forward here. I'm just reaching up where the grommet goes through, just making sure that the cable goes up through correctly. I just put a little hand soap on my finger and I'm going to reach up in here, pull the insulation back, and just put a little bit of hand soap on the grommet, making it easier to get it into the body of the vehicle. Now, I have my helper on the other side. I'm having him pull on the cable some, while I try and set this grommet into the body of the vehicle. If you're still having trouble, you can barely reach in here, get hold of the grommet. My hand fits in here. Most people's hands should fit. Just pull on the grommet, and pull it through.
This right here goes into that long slot. Put it in place. Use a long 10 millimeter socket. We'll just fast-forward here as I tighten up the handle, put the harnesses back in place on that panel and put that panel back up in place. Put the 7 millimeter bolts that hold it in, as well as the kick panel. Now, feed the hood release cable back through all the same places it went before and just pull your wire and we'll feed it through. Then, just push it back into these clips and re-clip them. For this one back here, it helps to just use a flat-blade screwdriver since it's kind of hard to get your hand in there. Just pry at it until it closes up. We'll fast-forward as Mike replaces that ground wire and the bolt that holds it into place and tightens it up. Now, just continue to feed your hood release cable back through and into place. Once you've got the hood release cable to this point, you can replace those three 10 millimeter bolts right here. You just tighten them up.
Re-clip the wire into this latch and then push it back into place until it snaps in. Then put the latch back into place and replace those three 10 millimeter bolts.
Now, once you've got it fairly tight, just a good preliminary alignment is to line it back up with those marks you made in the beginning and tighten it up. Then what you want to do is, you want to close the hood and open the latch. You want the hood down so it's lined up with the corners of your fenders and when you pull the latch, you don't want to feel a lot of tension. You want to be able to pull it pretty smooth. When you pull the hood release lever, you should feel a little bit of a catch in that it should pull pretty smooth. If you feel too much tension, you'll want to just raise this up just a little bit and that should release some of the tension. Then, if you don't feel enough tension at all and your hood is too high, then you want to move this down some. Once the hood is down, make sure that the lines here are lined up pretty well. Then you can pull your latch. I think I've got a little too much tension so I am going to raise it up just a little bit. Put a little bit of grease on your latch up here and then, spray-on grease is a little better, but try and grease any of the moving points down in here.
We hope this video helps you out. Brought to you by www.1AAuto.com, your source for quality replacement parts and the best service on the Internet. Please feel free to call us toll-free, 888-844-3393. We're the company that's here for you on the Internet and in person.
Shop Products

How to Replace Hood Release Handle 1995-99 GMC Sierra K1500
How to remove, install, or replace a broken, snapped, rusted, or jammed hood release cable on 96 GMC Sierra K1500
