
How to Replace Idle Air Control Valve 2001-04 Ford Focus
Created on: 2019-07-17
If the air idle control valve (IACV) is jammed or leaking, check out this video and find out how to replace it yourself
-
step 1 :Removing the Idle Air Control Valve
- Disconnect the wiring harness
- Remove the two 8mm bolts from the valve
- Remove the valve
-
step 2 :Installing the Idle Air Control Valve
- Clean the rubber gasket on the intake valve mating surface or replace it if needed
- Insert the valve into place
- Tighten the two 8mm bolts to the valve
- Connect the wiring harness
Tools needed
-
8mm Socket
Ratchet
Hey friends, it's Lenny here at 1AAuto. Today I'm working on a 2001 Ford Focus and I want to show you how to replace an idle air control valve. It's going to be a very easy job and I want to be the guy that shows you how to do it. If you need that or any other part, you can always check us out at 1AAuto.com. Thanks.
Okay, so right you under here we have our electrical connector. You're going to squeeze the top area of it with your index finger and then pull it right off. We always take a look at our electrical connectors. Make sure you don't see any funny colors. That looks great. We'll set it aside. Right here's the air intake valve. There's the bottom bolt right there, eight millimeter. The top one's directly above it, just on the other side of the valve. I'll show you what I'm talking about just one second. Okay, so I'm going to use my eight millimeter. I'm going to come up under here. Just going to get it on there.
Just going to get this bolt out of here. I'll show you what it looks like. Let's see if I got it loose enough, yeah. They don't make them very easy to get to, there it is. That's the lower bolt. I started with the easier of the two. And now I'm going to try to do the upper. It looks like the other camera might be in the way, but I'm going to give it a try. Let's see if I can get this up on there. It's coming right out. Just going to take this completely out. There we are, both bolts, okay. Grab the valve, there it is.
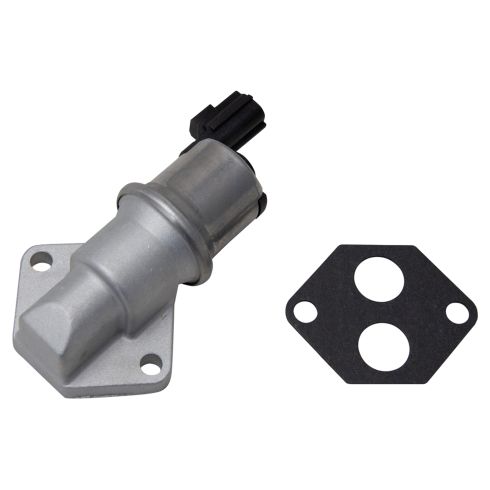
Okay friends, a quick product comparison for you. Over here we have our original idle air control valve out of our 2001 Ford Focus. And over here we have our brand new quality 1AAuto part. The auto part comes with a brand new gasket, which is very important. You want to make sure that you have a brand new gasket in there, make a good seal. The connectors are the same. It's got the same holes, same mounting holes. As you can tell they're both the exact same. I don't see any reason why this wouldn't be a quality part to go ahead and install into the vehicle. So I'm going to do it. If you need this or any other part, you can always check us out at 1AAuto.com. Thanks.
Okay, so right up on the back side of that intake right there or I guess it would be the engine side. You can see that there's rubber O rings or a rubber gasket. You just want to make sure that that's clean. As long as it's not clean, I mean as long as it is clean and it's not torn or you know have a whole bunch of debris all over it or anything, you can go ahead and reuse that. So all I'm going to do is wipe it down with a rag, nice clean rag. Then I'm going to go ahead and install my IAC valve and we will dispose of the gasket that came with the new IAC valve properly.
Okay, so I've got my IAC valve. I've got one bolt in the top there. I'm just going to get my socket on there, so it's ready for me. I'm going to put up into the vehicle. Try to line it up with the hole. And then I'm going to just start in the top bolt. I'm not going to tighten it down or anything. I just want to give it a couple good threads. And then I'm going to start in the bottom bolt as well. Once they're both started, then we can go ahead and try snugging them up.
Of course getting it lined up isn't going to be the easiest. Just going to bottom bolt these bolts out. They're both started in. This top one, just going to use the same socket, bottom one. Okay, both those are bottomed out. Take a look, looks good. I'm going to grab my small 1/4 inch ratchet. Get up in here. You can start with the top or bottom, whichever you'd like. Okay, feels like it's pretty snug. You're just screwing into plastic. So you don't want to go too tight. You'll just have to use your best judgment in this predicament. Where you could put it too tight, you could strip it out. If you have it too loose, you're going to cause other issues where the bolt could vibrate out. That feels good, just moderate thumb pressure on that. There we are.
Okay, time to connect the electrical connector. You can use a little bit of Sil-Glyde or silicone paste if you'd like. Just press it in. Listen for the click. Give it a little tug. It feels good. All right, easy peasy.
Thanks for watching. Visit 1AAuto.com, your place for DIY auto repairs, for great parts, great service, and more content.
Shop Products

How to Replace Idle Air Control Valve 2-7L 2001-06 Chrysler Sebring Dodge Stratus
Watch this video and learn how to replace a worn out or defective idle air control valve
