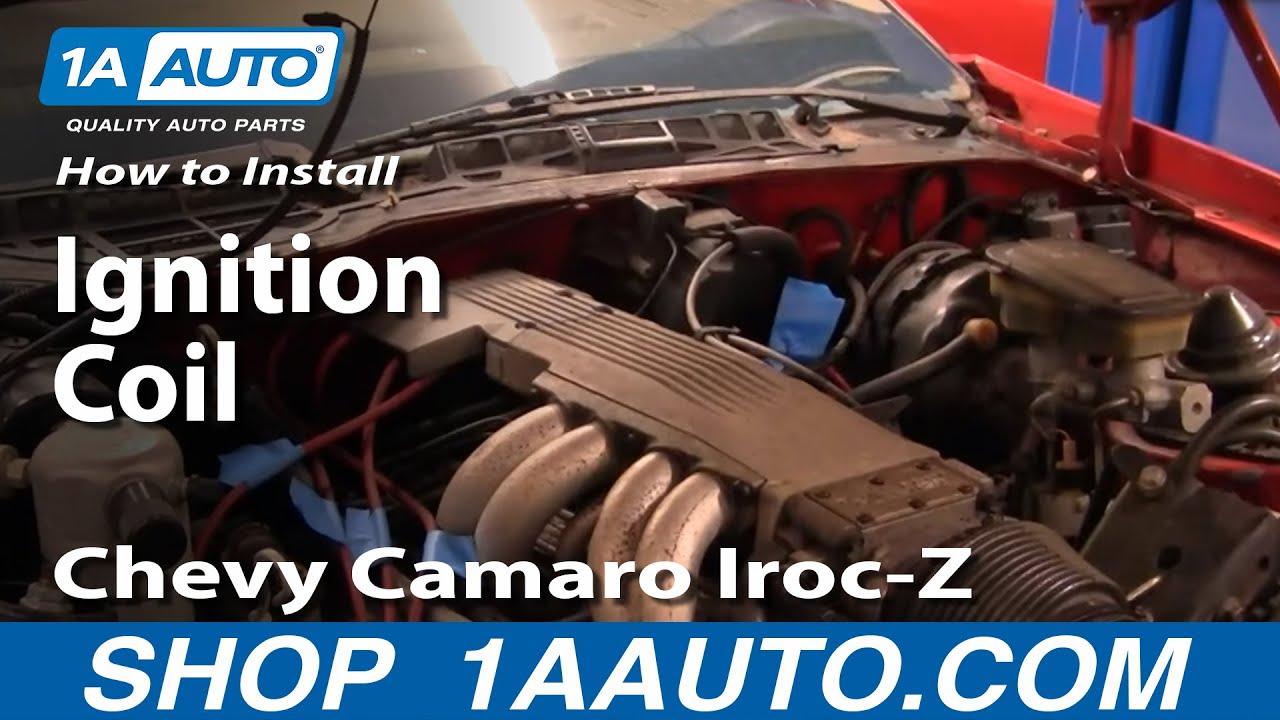
How to Replace Ignition Coil 1974-87 Chevy Camaro PART 1
Created on: 2011-07-25
Check out part 1 in this 1A Auto video series showing you how to replace the ignition coil on your 74-87 Chevy Camaro.
-
step 1 :Disconnecting the Battery
- 1:17
-
step 2 :Labeling the Spark Plug Wires
- Use painter's tape to make tags for each spark plug wire
- Determine which cylinder each wire corresponds to
- Mark each tag with the number of the corresponding cylinder
-
step 3 :Disconnecting the Spark Plug Wires
- Disconnect the wires from the plugs, from underneath the vehicle
- Use a flat blade screwdriver to remove the wires from the plastic holders
- Pull the wires free of the engine
- Remove three screws from the distributor cover with the T20 Torx driver
- Remove the distributor cover
- If you are only replacing the spark plug wires, replace them one at a time
-
step 4 :Removing the Distributor Cap
- With a flat blade screwdriver, carefully unclip the wiring harnesses
- Remove the four ¼ inch bolts from the distributor cap
- Lift the cap off and remove it
-
step 5 :Removing the Distributor Rotor
- Remove the two 1/4 inch bolts from the distributor rotor
- Remove the Distributor rotor
-
step 6 :Installing the New Rotor
- Attach the new rotor, sliding the notch onto the tab
- Insert and tighten the two ¼ inch bolts
-
step 7 :Preparing the New Distributor Cap
- Unbolt and remove the cover from the old distributor cap
- Put the coil diode into the new cap
- Insert the rubber washer into the new cap
- Insert the old coil into the new cap if it is still working
- Otherwise, insert a new coil
- Attach the coil wires
- Bolt the coil into place
- Bolt the cover onto the new distributor cap
-
step 8 :Completing the Repair
- This is Part 1 of a two part video
- Please consult Part 2 for further instructions
- Perform the steps outlined in Part 2
Tools needed
-
Socket Extensions
Flat Blade Screwdriver
T20 Driver
8mm Wrench
1/4 Inch Socket
Painter's Tape
Ratchet
Marker / Writing Utensil
Brought to you by 1AAuto.com, your source for quality replacement parts and the best service on the Internet.
Hi, I'm Mike Green. I'm one of the owners of 1A Auto. I want to help you save time and money repairing or maintaining your vehicle. I'm going to use my 20-plus years experience restoring and repairing cars and trucks like this to show you the correct way to install parts from 1AAuto.com. The right parts installed correctly: that's going to save you time and money. Thank you and enjoy the video.
This is video one of two, replacing the distributor cap, coil and rotor as well as the spark plug wires on this '86 Camaro Iroc-Z, procedure is basically the same for any '82 to '92 Camaro or Firebird with the 305 or the 350 V8 and I also recommend that you replace the spark plugs at the same time. To see spark plug replacement, check out our other videos
You will need a tape and a marker, jack and jack stands because you will want to get and remove the wires from the plugs from underneath, T20 Torx driver, 1/4 inch socket with ratchet extension and a small flat blade screwdriver. First thing you're going to want to do is to disconnect your battery. You'll need an 8mm wrench as most cars have side post terminals. The first step here is we put tape on all of our wires and we're going to label our wires. The reason we want to do that is so that when we take the cap and the wires off, we're going to take them off all at once. We can then take the new cap and put wires on it that are the same length and label them as well so that we can reroute the wires to the right place. The way a V8 engine works is on the left side or the driver's side, it's cylinders one, three, five and seven; and on the right side, two is at the front, then four, six and eight. All the cylinders have a number.
What we'll do is we'll go down here, we'll feel where the first wire comes out and then we'll carefully trace it back and it's this wire here, that's a number two. Then we'll go to the second wire and carefully trace it back. It's this middle one, so that's four. Then continue, so the third wire is going to be six on this side and the fourth wire will be eight. Then we'll label the other side one, three and five. Seven on this vehicle routes in behind the engine so we'll just leave that one unmarked, knowing it's seven.
Now you want to go up underneath and disconnect your wires by twisting the boots a little bit and then pulling them off. Okay, we're just going to hit fast forward here as I remove the plug wires from the plugs and if your stomach is a little queasy, you might want to not look as I just move the camera around for different angles so you can see the wires and stuff.
There are a few holders, just use a flat blade screwdriver to pry one end and pull the wires out, and set those aside. There's another one right here. Okay and just fast forward again, pull those keepers out then just pull the wires up and free of any components of the engine so that when you lift the distributor cap off with the wires it will come right out. Same thing on the other side. One note, the wires were routed totally incorrectly on this engine on the driver's side, they should go down behind the engine.
Now you want a T20 Torx driver and there's three screws to remove the cover over your distributor. At this point if you're just replacing your wires, what I prefer to do for one thing I prefer to replace the cap, router and wires at the same time. If you're just going to replace the wires just do them one at a time, take this one off. Number four, compare it to your new wires, get the same length, put the new one on and then route it down and plug it into the number four wire and do that one at a time, that way you know you plugged them all in correctly. Using a small screwdriver, you want to do this carefully because one of the biggest reasons these cars don't run is because somebody doesn't take these apart carefully and then they don't plug in correctly. You want to carefully work your screwdriver in there and then push down. Then the same thing for this one, you want to pry off the tab, push it down some and then work your screwdriver into the back and I'll need my other hand to do this. These bolts are a 1/4 inch. I've got a 1/4 inch socket with an extension and ratchet. You can see that the bolts have two ribs here and those help you locate it and you feel back in here and you feel for those ribs and then you know to stick your socket and ratchet right in between them.
We'll fast forward through removing those two bolts on the driver's side. On this one, the injection unit is in your way so I'd use a larger extension. We use that larger extension as well as some super high speed wrenching. We switch back to the two inch extension and get that rear 1/4 inch bolt out. Here, I just route my wires underneath one of the cables there and then lift the cap up and off. Okay, here's the rotor. There's a 1/4 inch bolt right here and another one just opposite it over here. We'll just fast forward here a little bit as I undo those bolts.
Over here, we have our old cap. It's a little hard to see but there's definitely some corrosion on these contacts. On the new cap, you can see nice new contacts. Same thing with the rotor here, this is all rough, kind of corroded.
First we'll put the new rotor on, it does have a notch in it here, which corresponds to a little cutout on there so you really can't put it on incorrectly. I guess you could but you'd have to really force it. You just want to make sure that notch is in the right place. Okay, fast forward as we start those and tighten those bolts and you want to tighten them firm but you don't need to make them extremely tight, you don't want to break the plastic.
We're going to put a new coil onto our new cap, we're going to take this cover off the old one. The coil in the cap will come with a little diode, put it down in the cap first and then you put the rubber washer on top like that. You don't have to put a new coil in your vehicle and actually this thing has ... I can see there's a little stamp that says, 05/03/86 so that's probably the original coil from this car. Since we're doing everything else, eliminate any doubt. Set your new coil in. Red goes on this side; yellow on this side, our ground wire. Here we're going to fast forward through putting those four bolts on that hold the coil. Again, tighten them firm, they don't need to be extremely tight and then put the cap back and tighten those. This is where we'll end part one and check out our other video with the same name with part two.
We hope this helps you out. Brought to you by www.1AAuto.com, your source for quality replacement parts and the best service on the Internet. Please feel free to call us toll-free, 888-844-3393. We're the company that's here for you on the Internet and in person.
Shop Products
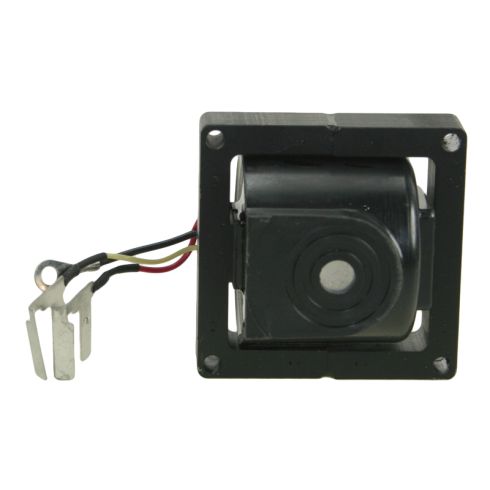
Ignition Coil TRQ ICA61700
Part Details:
- No
- No
- Male
- Male
- No
- 7 Ohms
- 0.49 Ohms
- 3
- 30000 VDC
- Pressure Contact
- Direct Replacement
- Black

How to Replace Spark Plugs Ignition Coils Spark Plug Wires 2008-12 Jeep Liberty
Ignition coils help your vehicle's engine run efficiently, cleanly, and smoothly. Rough running, lower than expected mileage, or trouble codes are sure signs that it's time to replace yours. Since worn spark plugs can damage ignition coils, it's best to replace those at the same time. And, since this model also uses spark plug wires, those should be replaced as well. This video shows you how to install new quality TRQ ignition coils, TRQ Performance spark plug wires, and new spark plugs on your 2008-12 Jeep Liberty. • Check here for more videos on the 2008-12 Jeep Liberty: https://www.youtube.com/playlist?list=PLJVpHWuCEUX9CAHC1hzA-wBtLP-tJwrFO
