How To Replace Ignition Coil 2003-12 Volvo XC90 25T
Created on: 2012-08-30
In addition to the ignition coils, this video will also show how to change the spark plugs
-
step 1 :Removing the Engine Cover
- Open the hood
- Remove the two T25 Torx bolts from the intake hose brackets
- Pull the intake hose aside
- Remove the eight T30 Torx bolts from the engine cover
- Twist off the oil cap
- Pull off the engine cover
- Twist on the oil cap
-
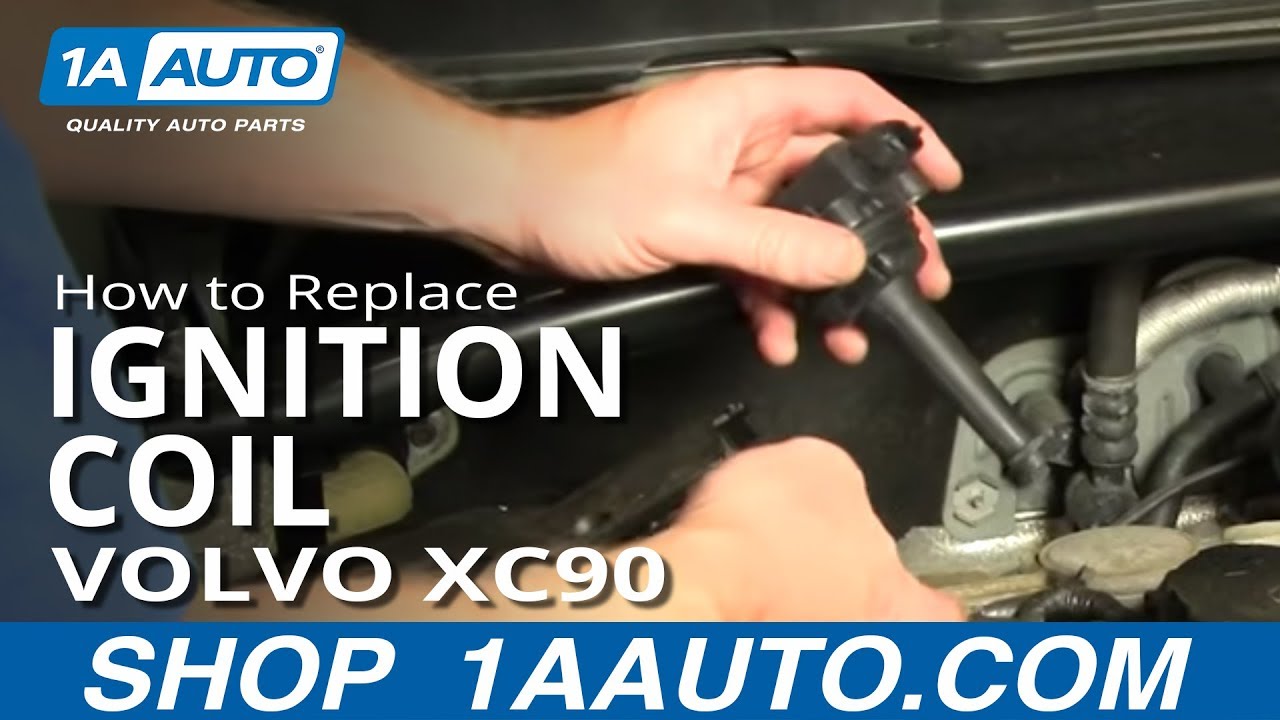
step 2 :Removing the Ignition Coils
- Disconnect the wiring harnesses from the ignition coils
- Remove the 10mm bolt from each ignition coil
- Pull out the ignition coils
-
step 3 :Replacing the Spark Plugs
- Remove the spark plugs with a spark plug socket and ratchet
- Install the new plugs with a spark plug socket and ratchet
-
step 4 :Installing the New Ignition Coils
- Connect the wiring harnesses to the new ignition coils
- Push the ignition coils onto their spark plugs
- Insert the 10mm bolt into each ignition coil
- Tighten the 10mm bolts to 7 to 8 foot-pounds of torque
-
step 5 :Reinstalling the Engine Cover
- Twist off the oil cap
- Put the engine cover into place
- Latch on the engine cover
- Twist on the oil cap
- Insert the eight T30 bolts into the engine cover
- Move the intake hose into place
- Insert the two T25 bolts into the intake hose brackets
Tools needed
-
Socket Extensions
Torque Wrench
T30 Driver
5/8 Inch Spark Plug Socket
10mm Socket
Ratchet
T25 Torx Driver
Brought to you by 1AAuto.com, your source for quality replacement parts and the best service on the Internet.
Hi, I'm Mike from 1A Auto. I hope this how-to video helps you out, and next time you need parts for your vehicle, think of 1AAuto.com. Thanks.
In this video, we show you how to replace an engine ignition coil. Obviously, if you replace one, we do recommend replacing them in groups of five or six depending on if you have the T5 or the T6.The tools you'll need are a T25 and T30 Torx driver sockets, a 10 millimeter socket, and a ratchet with a 2 inch extension, although the 2 inch extension is not 100% necessary. You can get by without it.
Pop your hood. Pull a lever right down in here. Then there's a little tab you can reach under right here. Pull that up. Pull your hood up. Looking at the engine, your coils are underneath this cover here. You will need a T25 Torx bit, and also a T30 Torx bit with a 2 inch extension and a ratchet. I do have an air ratchet here. It makes things go a little faster. First we're going to start with the T25 Torx bit. We're going to remove two screws: one here and one here. Those hold this tube in place. Now we've mounted our T30 Torx bit with our extension, and we're going to remove the eight screws that hold this, and this cover on. I'm going to speed it up here as I remove those eight T30 Torx screws. Obviously, I'm using air ratchet, which makes it faster. Since I'm speeding it up about four times, it makes it look really fast, but obviously a ratchet will work just fine. Now you can see there's a little cut out clasp right here. Pull it out and lift this up. Just kind of separate that out, take your oil cap off, and then just pull this cover right off. I'm just going to put the little cap back on just to keep any debris from getting in there.
Your coils are all right here, and some of them you may need to disconnect or unplug. Each one is held in by one bolt. Let's do this first one here with a 10 millimeter socket. Remove that bolt. The coil comes up and out at that point. If you're having to change the plugs, just the next step is a plug socket, and right down in there is the plug. To change out your coil, like I said, there is a little tab here. I'm just going to lift up on it with my fingernail and disconnect.
Here's a new coil from 1A Auto. We recommend replacing these every 100,000 to 120,000 miles. It's going to bolt, or clip, right in. Make sure it goes down on the spark plug. Push it right down in. You want to make sure you start this in and it grabs, so you don't cross-thread it in the aluminum. Once it gets tight, you want to make them firm but not too tight, probably about seven to eight foot-pounds. Replace the other ones.
Take your cap back off. Lift up on the tube. Slide that under. Slide that through there, get it down in place. Put this into place. Latch it right in there, and it's got another latch on this side. Latch that down. So we don't bore you here, as we put it back together, we'll kick it into high gear. Just thread those eight T30 Torx bolts in by hand, and then tighten them up with your wrench. Once you've got those in, when you tighten them, they don't have to be extremely tight. You just want them nice and firm so they hold that plastic cover down. Then reposition your intake tube and put the two T25 screws back in that hold that in place.
We hope this video helps you out. Brought to you by www.1AAuto.com, your source for quality replacement parts and the best service on the Internet. Please feel free to call us toll-free, 888-844-3393. We're the company that's here for you on the Internet and in person.
Shop Products


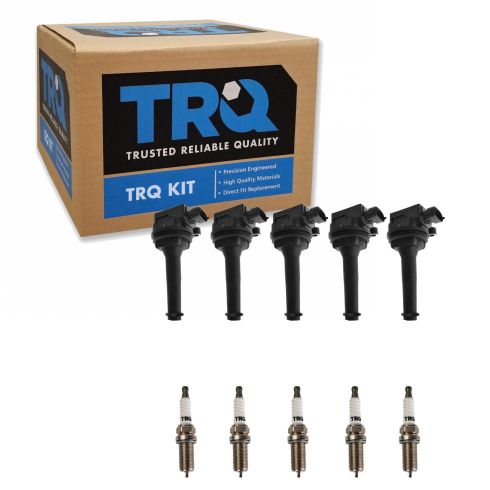
Volvo C70 S60 S70 S80 V70 XC70 XC90 10 Piece Ignition Kit TRQ ICA71767
Part Details:
- 10 Piece
- (5) Spark Plugs
- (5) Ignition Coils
- Direct Replacement
- Black
- Iridium
How To install Replace Ignition Coils 2-5L 2002-06 Nissan Altima
Learn how to replace ignition coils on your 02-06 Nissan Altima. 1A Auto will guide you with this video.
