
How to Replace Ignition Lock Cylinder 2006-10 Ford Explorer
Created on: 2016-11-10
Learn how to correctly replace the tumblers and the ignition lock cylinder with the help of our experts in this how-to video
-
step 1 :Removing the Ignition Lock Cylinder
- Insert the key into the lock cylinder
- Turn the key to the ON position
- Push the D10 pin underneath the steering column with a pick
- Remove the cylinder
-
step 2 :Removing the Tumbler
- Insert the tool into the back openings of the lock cylinder
- Put the key in partway
- Rotate the cylinder fully clockwise
- Remove the door
- Remove the cylinder without dropping the tumblers
-
step 3 :Removing and Installing the Tumblers
- Pull the tumblers out one by one in a staggered order and place them on the template provided as you find them in the cylinder
- Lay out the new tumblers in the same order as the old ones
- Insert a spring into the opening
- Place grease on the tumbler
- Insert the tumbler until it locks into place
- Repeat the steps for the remaining tumblers
-
step 4 :Installing the Tumbler
- To test, collapse the tumblers with your finger
- Insert the key, and see if the tumblers sit flat
- Insert the tumbler into the cylinder
- If it fits, remove the tumbler and apply grease
- Reinsert the tumbler into the cylinder
- Rotate the key hole until the tumbler seats in fully
- Hold the backside, and test the key for rotation
-
step 5 :Reinstalling the Ignition Cylinder
- Align the D10 pin with the channel inside of the cylinder
- Rotate the cylinder to the on position to compress the D10 pin
- Test your ignition
Tools needed
-
Flat Blade Screwdriver
Needle nose pliers
Pick
Hi, I'm Mike from 1AAuto. We've been selling auto parts for over 30 years! We're dedicated to delivering quality auto parts, expert customer service, and fast and free shipping, all backed by our 100% satisfaction guarantee. We've created thousands of videos to help you install our parts with confidence. That saves you time and money, so visit us at 1AAuto.com, your trusted source for quality auto parts.
In this video, we're going to be working with our 2006 Ford Explorer. We're going to show you how to remove and reinstall the ignition cylinder in your steering column, as well as how to re-key it so you can still use your OEM key.
If you like this video, please click subscribe. We have a ton more information on this truck, as well as many other makes and models. If you need this part for your car, you can follow the link down in the description over to 1AAuto.com.
Here are the item's you'll need for this repair: needle nose pliers, pick tool, flat head screwdriver
Insert your key into the lock cylinder, and click it to the on position—that is the first click. The second click is the run position, third is cranking. We'll put it to that number one on position, and push the pin through the access hole. The D10 pin that you're looking to access is here. We've removed the lower portion of the steering column to show you this. This can be easily accessed through the opening in the bottom of the steering column with a long, straight pick. Remove the cylinder from the column.
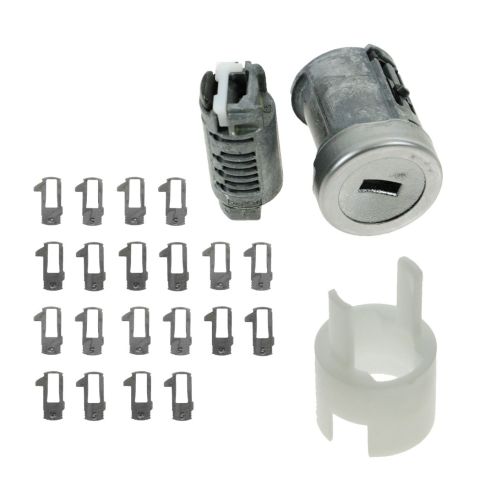
Using the special tool included with the kit, place this into the openings on the back of the lock cylinder. Once it's fully seated, put your key in part way, and rotate it fully clockwise. Remove the special tool, and carefully remove the cylinder from the housing, being sure not to drop any of the tumblers. Using the pattern provided with our kit, and a small pair of needle nose pliers, we'll set the keyhole end facing our keyhole end here. We'll remove our tumblers by pulling them straight out. Each tumbler has a small number on it. You can see that our first one is number two. Our second is a number three, and these are staggered like top, bottom, top, bottom, top, bottom, top. Be sure to face them that way as well. One. Three. Another one. Another one. A three. We'll now place our old tumbler off to the side.
We'll get out our new tumbler here. You can tell the top and bottom from these holes, which is where we'll install the springs for our new tumblers. Again, we have four on the top, three on the bottom. It'll go this way. The packages are numbered with what number tumbler's inside, as well as getting a small packet of springs. I've now laid our new tumblers in the same pattern as our old tumblers.
We've got our new cylinder set the right way. We have a new set of tumbler springs here. We'll start by installing the tumbler spring into this opening in the top. We'll take our first tumbler, and put a little bit of grease on it. The only reason I'm doing this with my bare hands here is because these are very small parts, and they're difficult to work with with gloves on. Coat that grease on there a little bit, and install it with this tab going over the spring. Push down until it locks in there. Repeat these steps for the remaining tumblers.
Now, to ensure that everything is in place, you'll see how all these tumblers spring in and out. Hold them all collapsed, because the cylinder isn't here to hold them in place. We'll install our key, and as long as the tops of all of our tumblers sit nice and flat, they'll go into our cylinder. This is backwards mind you, but it'll go in there and rotate smoothly. If we had the wrong number in somewhere, it would sit too high, either on one end, or come too far out on the other, and it would bind up inside of the cylinder, or it wouldn't go in at all.
Now, we'll put a nice coat of grease on the outside of our cylinder here, all over the tumblers. Your key is designed for this stuff, so don't be afraid to really use a lot of it and keep this cylinder from wearing out. Keep it moving nice and smooth for a long time. Line up D10 tab here, into its slot in the cylinder. You'll have to push down the tumblers one by one to insert the tumblers back into the cylinder.
Now, you can see here that it's not going in fully, so we'll use a small flat blade screwdriver to rotate the keyhole until it allows us to seat it in fully. We'll then rotate it until it locks. Make sure you hold the backside here, so your cylinder doesn't fall out. Make sure your key goes in, rotates normally, because we'll need to put it back into the on position to reinstall into our column. Be sure to align the D10 pin with the channel inside of the cylinder, rotate to the on position, and that pin will compress. Now, we're good to go using our original key.
Thanks for watching. Visit us at 1AAuto.com for quality auto parts, fast and free shipping, and the best customer service in the industry.
Shop Products

How to Replace Ignition Lock Cylinder Case Housing 1997-2003 Chevy Malibu
Learn how to replace the ignition lock cylinder in this 1A Auto tutorial video.
