How To Replace Inner Tail Light Bulb 2008-14 Buick Enclave
Created on: 2014-12-03
Check out this video for quality and detailed instructions on how to replace or service the inner tail light and bulbs on your 08-14 Buick Enclave.
-
step 1 :Removing the Trunk Panel
- Pry off the pull handle on the trunk panel with a flat blade screwdriver
- Pry up the center of the trim button by the rear latch and remove them with a flat blade screwdriver
- Remove the two 7mm bolts below the pull handle
- Pry off the support piston
- Pry out the top panel
- Pry off the lower panel
- Disconnect the wiring harnesses
-
step 2 :Servicing the Bulbs
- Twist the bulb socket counterclockwise out of the light
- Pull the bulb off of the socket
- Push on the new bulb
- Twist the bulb clockwise into the light
-
step 3 :Removing the Tail Light
- Remove the 7mm nuts from the tail light
- Remove the tail light
-
step 4 :Reinstalling the Tail Light
- Insert the tail light in place
- Tighten the three 7mm nuts
-
step 5 :Reinstalling the Trunk Panel
- Line up the panel into place
- Connect the wiring harnesses
- Push in the clips around the panel
- Push the support piston in place
- Press in the retaining clips
- Insert the pull handle in place
- Remove the 7mm bolts
- Push on the pull handle trim piece
Tools needed
-
Flat Blade Screwdriver
7mm Socket
Ratchet
Brought to you by 1AAuto.com, your source for quality replacement parts and the best service on the Internet.
Hi, I'm Mike from 1A Auto. I hope this how-to video helps you out, and next time you need parts for your vehicle, think of 1AAuto.com. Thanks!
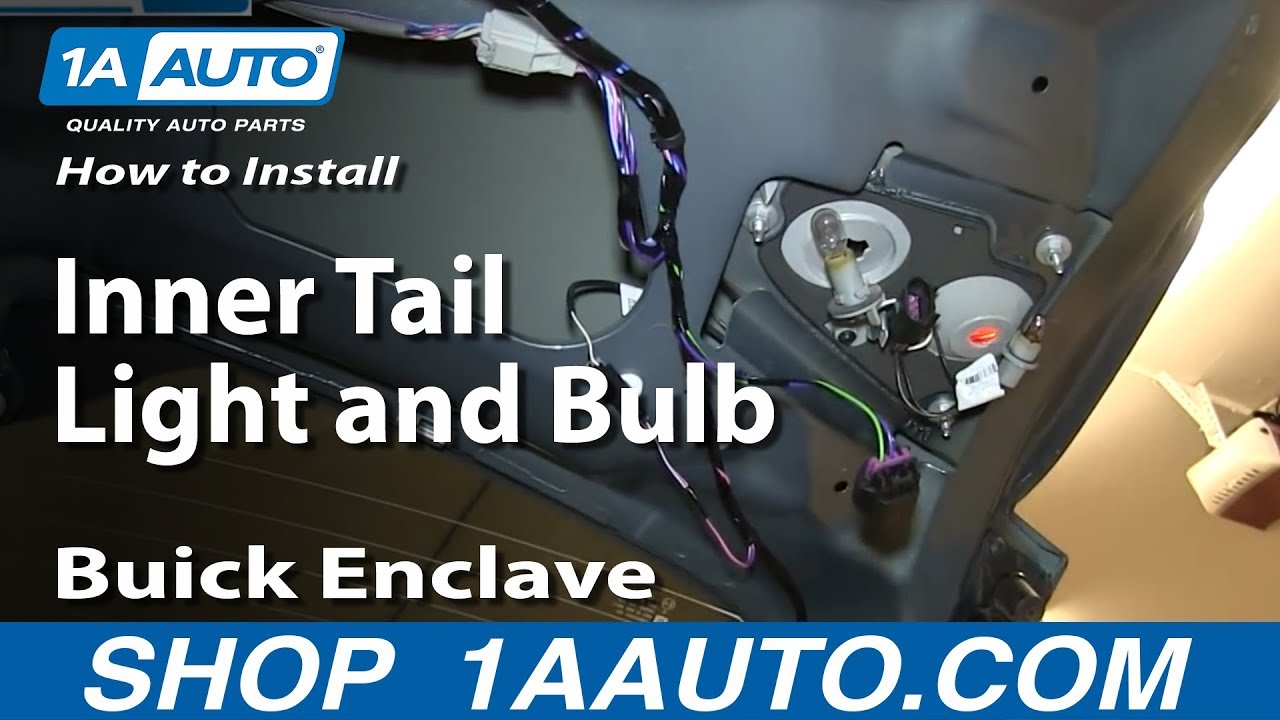
In this video, we're going to show you how to service the bulbs as well as replace the entire inner tail light assembly on this 2010 Buick Enclave. We show you on the driver side but the passenger side is the same procedure. The only tools you need for this is a flat blade screwdriver and a 7mm socket and ratchet.
Pry off the panel on this pull handle. Then pry out the center of these two clips. Pull it out and then pry out the bottom part. Inside here, there are two 7mm bolts. Go ahead and remove both of those. Using a flat blade screwdriver, pull out on the clip at the top of this support piston and pull it aside. Then pull out on this top panel. You just want to do this all the way along it and it will release the clips. It pulls free.
Then you want to do the same thing for the lower panel: just pull down and that will release all those clips. Once you get it most of the way down, push the tabs on both of these harnesses and disconnect them.
Now, to service the bulbs, you just twist the socket out counterclockwise. Pull the bulb out, push your new one in. This one's the same thing, but it's a little easier to work with if you disconnect the harness on the assembly.
Same thing: bulb pulls out, you can push your new one in. Then you would just twist these sockets back in clockwise. If you're looking to replace the entire assembly then you just want to disconnect that harness and then remove those three 7mm nuts.
Now, just carefully push the inner tail light through. Take your new inner tail light and set it down into place. Then replace those three 7mm nuts. Reconnect the harness. You want to line up the clips on this panel and push it back up into place. Once you get started, make sure it's not caught underneath the latch. You can feed it the rest of the way back up. You want to do all but the lower clips so that you can still access the harnesses and reconnect them.
Now hit those clips on the bottom back into place. Then take this upper panel, line up the clips, and just push the clips back into place. Line up the piston and push it back onto the stud. Then push the lower part of these clips in and then the center to lock them into place. Feed the pull handle back into place with a bolt already through it so that you can get it started. Get those two 7mm bolts started and then tighten up. Then take that panel and push it back into place.
We hope this video helps you out. Brought to you by www.1AAuto.com, your source for quality replacement parts and the best service on the Internet. Please feel free to call us toll-free, 888-844-3393. We're the company that's here for you on the Internet and in person.

How to Replace Tail Light 2001-05 Honda Civic
How to install, repair, fix, change or replace a broken, damaged, burned out, cracked, faded, cloudy or chipped tail light / brake light on 01, 02, 03, 04, 05 Honda Civic
