
How to Replace Lower Ball Joint 1988-2002 GMC Sierra 1500
Created on: 2020-05-19
Watch this video to learn how to install a new lower ball joint on your 1988-02 GMC Sierra.
Tools needed
-
Torque Wrench
Hammer
Socket Extensions
Rust Penetrant
Pry Bar
Jack Stands
Pickle Fork
Socket Driver
Copper Anti-Seize
Wheel Chocks
Center Punch
Ratchet
Floor Jack
Swivel
36mm Socket
1/2 Inch Impact Gun
3/8 Inch Socket
22mm Socket
Once you have your vehicle safely raised and supported, we're gonna remove this center cover right here. This will expose those lug nuts. You can see six lug nuts. We're gonna remove all six of them using a 22-millimeter socket. Just gonna take one lug nut, leave it on there, just so the wheel can't fall off on me. Remove the wheel. So, now that we can see everything, we're just gonna hit this with some penetrant right down along here. I like to get up along the top, and right along in here. Obviously, we're gonna be removing the outer tie rod end from the knuckle here, because we're gonna have to remove the knuckle. Anytime you're doing front-end work, you're gonna have to get an alignment. So this is gonna be where your adjustment is for your toe. We need to spray down this whole area. This is gonna help the alignment person down the line. Awesome.
Now I'm just gonna turn the wheel a little bit here, and that's so I can get to this slider pin and this one right here, because we're gonna remove the caliper and hang it safely. Use your 3/8 socket. It's an Allen head. Slide the caliper off of here. And now we're gonna hang it from something, using something as simple as a bungee cord, or a hanger, or whatever you have, just as long as you're not putting any pressure on this rubber flex hose. Just put some penetrant on this area. And then I'm gonna put that nut on there, just a couple threads. That's because next, I'm gonna take my little hammer here, I'm gonna give this a couple bonks. When it comes down, I wanna make sure that nut catches it, and keeps me from potentially getting hurt.
So now, right along here, you're gonna notice there should be some push clips. This one's actually missing, but theoretically, you would probably pull that out of the way. And then you can see right here where your ABS wire is gonna connect in. You need to disconnect that by pulling right here. Slide that up and away. Next, we're gonna get this out of its holding spot, take out this bolt right here, pull all these out, and remove that as well. So now, we're gonna use a little forky tool, or you can even try to stick a screwdriver or pry bar behind here, and we're just gonna try to pull this off of the frame. This is what's holding it in. Remove this mounting bolt. Now let's grab this cable. Carefully pull it off these clips. Now we're gonna remove this nut. The bolt comes through from the bottom, so you're gonna have to hold the bolt head, and then remove this nut. Let's get this rotor off of here.
Next thing we're gonna do is remove this 36-millimeter axle nut. Behind there, there's a little washer. Get that off of there as well. The next thing you wanna do is spray this area. Let that seep in there, and then you're gonna take a punch and your hammer, and go right in the center, and give this a couple bonks until it breaks free. I can see it moving. That means I'm good. You definitely don't wanna use the hammer right on the axle, just in case you damage the threads. Let's just wrap this up so it's not hanging and potentially getting damaged.
The next thing we wanna do is come down to the lower ball joint, and you're gonna see this little cotter pin right here. It's kind of just a locking mechanism. It keeps the nut from turning. Remove it. Now we're gonna remove that nut. Just put that back on there, a few threads. Now it's time to remove the upper ball joint nut. We're gonna do the same thing with that cotter pin, get it out of there, and then remove the nut. So, now we're just gonna turn the knuckle all the way to the right. I'm gonna come through here with my wrench, and see if I can get this nut to break free. Nice. We're gonna remove this one completely. The next thing I'm gonna do is take my hammer and I'm gonna carefully try to bonk right here on the knuckle. Okay, this whole area right here is the knuckle, but I wanna get as close to the ball joint stud as possible so hopefully, it will break free and drop down a little bit. There we are we are. I'm just gonna press through this axle a little bit. Awesome.
So now, for this next part, it's super important to make sure that your ball joint nut is on there a few good threads. You wanna make sure that there's no way that this can fall down or come off on its own, because the next step is actually gonna be one of two things. You can either bonk directly on the knuckle, like we did with the upper, and hope that it vibrates free from the stud right here, or, of course, you can go with a pickle fork. The reason why I didn't use this pickle fork up top was because obviously, I'm not replacing that ball joint. If I use this, it's gonna damage the ball joint, and you have to replace it at that point. Okay. So, that broke free. This is looking great. I'm gonna hold this up. Remove the nut. And now I'll just carefully slide this right off of here. The next thing we're gonna do is take our wrench and hold under here on the nut side, and then we're gonna use the 18-millimeter socket up on top, and we're gonna remove the bolt side. Now I'm just gonna use a piece of scrap that I happened to find laying around, just so I can hold this axle up and out of my way. Remove all these bolts. We'll recycle these. Remove the lower ball joint.
Now it's gonna be time to install our lower ball joint here. It's gonna slide right inside there. If you wanted to use some Never-Seez, you could, but it's not necessarily needed. When you slide it through, you're gonna line up all those holes, and then you can take your bolts and your locking nuts. These are locking nuts. You can tell because they're oblong. Slide it right up and through. We're gonna do the same to all. So now, we're gonna use our wrench. Hold the bolt on the bottom side and we'll snug up these nuts. Just gonna bottom it out. Now we're just gonna make sure these are tight. I like to tighten them to approximately 100 foot-pounds.
Now it's gonna be time to get the knuckle back up on here. Just gonna start it into the bearing. Slide it over the stud on the lower ball joint. I'm gonna lift it up, and then I'm gonna start on the nut for the lower ball joint. That should hold it so it can't fall down. Take a break. Now we're just gonna bottom out this lower ball joint nut. This should wanna slide up, and the axle should slide through the wheel bearing. Now we're gonna go ahead and put this down through, and we're gonna start the upper ball joint nut. Let's put a bar over the top of the control arm and under the frame, so that way there, we can press down on this control arm. Start it right in there. Now I'm gonna take that upper ball joint nut, gonna start it right on that stud. Now we'll use our wrench and we'll tighten it up. So now, we're gonna turn this till it bottoms out. Okay. That's pretty good right there. Let's move back down to the lower ball joint nut here. We're gonna torque that to 94 foot-pounds. Now that's torqued.
The next thing you wanna do is pay attention to the castle nut slots, and you also wanna look at the stud of the ball joint to find where that cotter pin hole is. You line up the slot with the hole, which if you were to come over here, you'd be able to see. If you look right here, you can tell that it's almost lined up. The problem is, is to torque it to where it was supposed to be, it went a little bit past. So, the next thing you have to remember is you definitely don't wanna loosen, because then it will be under torqued. What you actually wanna do is continue tightening until it lines up with the next slot. Little bit more. That looks great. Let's grab our cotter pin and put it through there. Now, these are locking pins. It's super important to make sure you have it bent over completely. That way there, you're 100% sure there's no way this nut can come free. So, the next thing we would do is torque this upper ball joint nut. The torque for it is 74 foot-pounds, but as you can tell, the axle's kind of in the way. I'm just gonna use my wrench. I'm gonna make it nice and tight, and make sure the slot lines up with the hole.
Yeah. That's nice and tight. I'm gonna look for the slot. Okay. Looks like it comes through for me, and it comes through in that direction. Make sure that there's no way that this locking clip cotter pin can come out. Next, we're gonna get this ABS wire off of here. This part's gonna go right under here. Runs up along these. And then, of course, you have the mounting area, and then where it clicks in. Let's make sure we get all that together. Your little push tab. You definitely wanna make sure your ABS wire is secured, because if it's moving around in any way, there's a potential for it to get damaged, and you definitely don't want that.
Now, be careful when you're tightening this, because it will wanna turn, and if it turns too far, you could potentially put a tug on your wires. The wire's not rubbing on anything. This looks good. There we go. Make sure all the push clips are in. This looks great. The next thing you wanna do is make sure that your mating surface between your hub and your rotor is clean. Once it is, go ahead and put that rotor on there. I like to start on one of the lug nuts so the rotor can't move around, potentially fall off. It also helps keep rust from getting in there. Let's get our caliper up on here. Push those sliders. You should feel them kind of wanna latch into where the hole is. We're gonna start them both in before we fully tighten either of them up. Okay. I bottomed out. Tighten a bit more. Let's get the tie rod end in here.
Now we're gonna bottom this out, but don't tighten it too much, because the torque is only 40 foot-pounds. Okay, so we torqued it to 40 foot-pounds. The next thing you wanna look at is the slotted area to the hole, and make sure you line those up in a tightening manner. You definitely don't wanna loosen, once again. Next, you're gonna put your washer on the axle and then, of course, the nut. Let's bottom this out. You don't wanna over-tighten this, because you'll mess up the bearing, so we're just gonna bottom it out, and then we'll torque it to manufacturer specifications.
Okay, so the next thing we need to do is torque this axle nut. But a great way to do that is to grab the wheel, put it back on here. We're gonna put on all the lug nuts, and then we'll get it down so it's touching up against the ground. We'll torque the lug nuts and the axle nut at the same time. Now we're gonna torque the axle nut to 165 foot-pounds. Torqued. Torque your lug nuts to 120 foot-pounds. Torqued. Let's grab that center cover. Make sure you line up the holes with the lug nuts, or else you're gonna know it when you go to bonk it on.
Shop Products


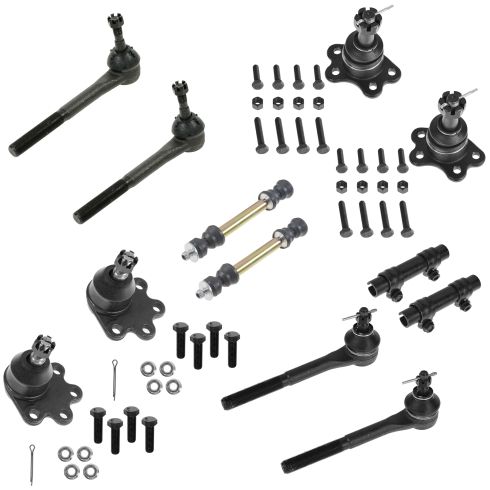
Chevrolet GMC Front 12 Piece Steering & Suspension Kit TRQ PSA59368
Part Details:
- 12 Piece
- (2) Front Tie Rod Adjusting Sleeves
- (1) Front Heavy Duty Sway Bar Link Set
- (2) Front Lower Ball Joints
- (2) Front Outer Tie Rods
- (2) Front Upper Ball Joints
- (2) Front Inner Tie Rods

How to Replace Front Lower Ball Joint 2003-08 Toyota Matrix
This video shows you how to install new, quality TRQ ball joints on your 2003-2013 Toyota Matrix.
