
How to Replace Lower Ball Joints 2003-11 Honda Element
Created on: 2018-12-19
How to repair, install, fix, change or replace loose, worn, or creaking ball joints on 03, 04, 05, 06, 07, 08, 09, 10, 11 Honda Element
-
step 1 :Removing the Wheel
- Loosen the 19mm lug nuts with the vehicle on the ground
- Raise the vehicle with a floor jack
- Secure the vehicle on jack stands
- Remove the lug nuts
- Pull off the wheel
-
step 2 :Removing the Sway Bar Link
- Remove the lower sway bar link nut with a 14mm wrench and 5mm Allen bit
- Pry the sway bar link to the side with a hammer and pry bar
-
step 3 :Removing the Lower Ball Joint
- Straighten out the cotter pin with needle nose pliers
- Loosen the castle nut with a 17mm socket and breaker bar
- Secure the rotor in place with a pry bar
- Remove the axle nut with a 36mm socket and breaker bar
- Press a pickle fork into place with a hammer to separate the ball joint
- Tab out the end of the CV shaft with a hammer
- Secure the axle shaft to the strut with a bungee cord
- If the ball joint had a snap ring, remove it with snap ring pliers
- Hammer the ball joint out of the spindle
- Remove the ball joint
-
step 4 :Installing the Lower Ball Joint
- Insert the ball joint into the spindle with a ball joint press
- Install the snap ring with snap ring pliers
- Insert the CV axle into the spindle
- Tighten the snap ring around the ball joint
- Insert the CV axle into place
- Tighten the castle nut
- Torque the castle nut to 51 foot-pounds
- Insert the cotter pin into place and bend an end down
- Snip off the ends of the cotter pin
- Torque the axle nut to 181 foot-pounds with a pry bar and torque wrench
-
step 5 :Installing the Sway Bar Link
- Pry up the sway bar into place
- Tighten the lower sway bar link nut with a 14mm wrench and 15mm socket and ratchet
- Torque the swar bar link nut to 29 foot-pounds
-
step 6 :Reattaching the Wheel
- Slide the wheel into place
- Start the 19mm lug nuts by hand
- Tighten the lug nuts preliminarily
- Lower the vehicle to the ground
- Tighten the lug nuts to 80 foot-pounds in a crossing or star pattern
Tools needed
-
14mm Wrench
Socket Extensions
Torque Wrench
Hammer
15mm Socket
Ball Joint Press
Pry Bar
17mm Socket
Jack Stands
19mm Socket
5mm Hex Wrench
Pickle Fork
Side Cutters
Snap Ring Pliers
Bungee Cord
Ratchet
Floor Jack
1/2 Inch Breaker Bar
36mm Socket
Hi, I'm Mike from 1A Auto. We've been selling auto parts for over 30 years.
Hello, everyone. Sue here from 1A Auto. And today on our '06 Honda Element, I'm going to show you how to remove and replace a lower ball joint in the front lower control arm. If you need that part or any other part for your car, click on the link below, and head on over to 1aauto.com.
To remove the tire, you need a 19mm socket. I have the vehicle. It has weight on it, so that I can loosen up each lug nut as I go around.
I'm using a two-post lift, but at home you can use a jack and jack stands. Now I have it up in the air. I'm just going to remove all the lug nuts. Okay. Discard the hubcap.
With a 14mm wrench and a number five Allen socket, I'm going to put the 14mm wrench on the nut, and then I'm going to install the Allen head in the stud with the cut-out. And then I'm going to loosen up. You get yourself at a good spot and you feel like a ratchet wrench is going to work and then you can move onto that. Take the Allen head socket off, and you should be able to get this right off.
I'm going to take a pry bar and see if I can pull that right out of the cut out. There we go. Nice. So I'm going to remove the cotter pin and discard that. And I'm going to take the castle nut off. That's a 17mm socket. Going to slide that right on there and break it free. Discard that. Now, I'm going to use the air to actually take this axle nut off. I tried to use a half-inch breaker bar. I didn't have the strength behind me. The actual specs for this is 181 foot-pounds, and it's pretty rusted so let's loosen it up.
There we go. Now, it's important to say that you should always use a new axle nut. In 181 foot-pounds, I should have been able to break free. But I can see here that someone's taken this off before because it's got two pinch holding it. That's not factory set. So someone's taken this off, and if they didn't torque that to 181 and they used an air gun, that will do damage to the pressed-in bearing and also warp the hub. So there's a keynote there.
Now I'm going to use a pickle fork to break the ball joint free from the control arm. And if you're not replacing your ball joint and you're going to reuse the ball joint, you've gotta be really careful and not to tear this boot on the ball joint. Luckily for me, this boot's already torn so I don't have to worry about trying to save it. But if your boot is in good shape and your ball joints are in good shape, just be careful. Work your pickle fork underneath the boot without pinching the boot.
There it is. So now I can separate my control arm from the ball joint spindle. I'm just probably going to pull down like that and push that knuckle out of the way. Now, we're going to tap the axle spindle through. There we go. Let's bring it down waist level. So I'm going to grab the CV shaft, and I'm going to hold it there. Pull my knuckle completely out of the way.
Now I need this to stay clear, so this is where I'm going to get a bungee cord. There we go. Now that's up out of the way. I used a pry bar earlier to break it free. I got it down so now I can discard the boot. This is a factory ball joint. It's still a Honda ball joint, and I'm looking everywhere. I do not see a snap ring at all. So apparently the factory ones do not have a snap ring. If this was already replaced with an aftermarket ball joint, it would have a snap ring around here, which you'll see when we install our new one. We will be reinstalling the snap ring.
So now we're going to use an air chisel hammer to hammer that ball joint out of the knuckle. Here we have the new lower ball joint for our '06 Honda Element from 1A Auto. It comes with a new castle nut. It's got the splines to be pressed in on the knuckle. Comes with a lock--a snap ring. It'll go in on this way. Snap in around that groove, and it comes with a new cotter pin. Put the tie-rod in spindle net. This is actually the factory ball joint. It does not require a snap ring. As you can see, it has a castle nut in the old cotter pin.
If you need this part or any other part for your car, click on the link below and head on over to 1aauto.com. So we're going to install the new lower ball joint. We're going to slide it right into the knuckle seating. And then we're going to get our ball joint press and pull that right through. So now we have our ball joint press set up. We're going to squeeze this ball joint down inside that knuckle.
Now with a pair of snap ring pliers, we're going to install the snap ring. Okay. There you go. Right into place. So now we're ready to put the CV axle back in so the ball joint's in them. I'm just going to pull out the knuckle like that to line this spindle up inside the hub bearing. I can turn that by hand so the splines up, which they fell right into place. I'm going to stop the nut just to make sure that doesn't fall. Come pull back out of the spindle. What I do is I like to make sure it's seated in there.
And now I'm going to put the new castle nut on. The newcastle nut is an 18mm socket. And I'm going the wrong way. There we go. I'm going to snug this up. Pull that ball joint spindle right down through. Once I feel that snugging, the torque is 51 foot-pounds. I'm going to torque it up. Now, let's see if the control cotter pin has any lineup holes. And it's fine. Yep, I can put the new cotter pin in.
I like to put the cotter pin so that the opening is on the inside there. So that way when I bend it down and lock it into place, I can cut it easily and it won't cut people that are just doing simple oil changes or anything like that, any front end brakes. Sometimes these cotter pins can be more dangerous than they appear. And then I'll fold it and flip that up. Now we're going to put the axle nut back on with a spindle nut.
That's a 36mm socket. The torque on this is 181 foot-pounds. So I'm going to lower it down. Use my pry bar and torque it down. Remove the pry bar. So I'm going to take a pry bar, and I'm going to slide it up through here so that I can lift that up and line up the sway bar. Beautiful. Put the new nut on. As you can see, we ended up replacing the sway bar link so there's no Allen head on the end of the new one. Instead, it's a 14mm on the inside and a 15 on the nut side.
I'm going to tighten this down. So now we're going to torque the nut to 29 foot-pounds. I'm going to mount the tire again. And the reason I put the tire on before I tighten the top of the strut is because I want the weight of the vehicle on the suspension to assure that I'm not pulling up on that strut cap. That can warp the studs on the outer edge. I want the vehicle weight down holding it up and then I can get a true torque and tightening of it.
Grab your hubcap because this particular Honda does not have extra wide cutouts for three lug nuts. So at the top of the rim on the hub and put your lug nuts on. So the wheel torque, I got the weight of the vehicle down on the tire, and I'm going to torque up the wheels. And the wheel torque in a factory spec is 80 foot-pounds.
Thanks for watching. Visit us at 1aauto.com for quality auto parts, fast and free shipping and the best customer service in the industry.
Shop Products
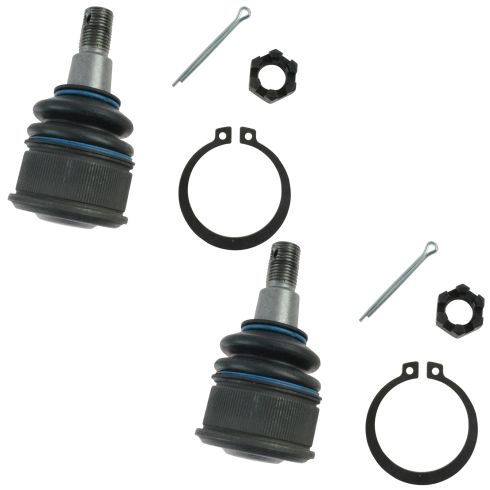
Honda Element Front Driver & Passenger Side 2 Piece Ball Joint Set TRQ PSA63085
Part Details:
- 2 Piece
- (1) Front Passenger Side Lower Ball Joint
- (1) Front Driver Side Lower Ball Joint

How to Replace Front Lower Ball Joint 1993-95 Toyota Corolla
Check out this video from 1A Auto to learn how to replace the front lower ball joint on your 93-95 Toyota Corolla. Save money and do it yourself!
