
How to Replace New Alternator 1997-2001 Toyota Camry
Created on: 2016-07-07
If the alternator is bad or dead, this video will show how to remove and install it and also the serpentine belt
-
step 1 :Removing the Serpentine Belt
- Loosen the negative battery terminal with a 10mm wrench
- Remove and isolate the terminal
- Loosen the 14mm bolt that mounts the alternator to the engine
- Loosen the 12mm bolt underneath the adjusting screw
- Turn the adjusting screw counterclockwise to drop the belt
- Familiarize yourself with the route of the serpentine belt
- Pull the belt off the alternator
- Release the tensioner
- Pull the belt off by hand
-
step 2 :Installing the Alternator
- Remove the 8mm nut from the retainer and transfer it to the new one if needed
- Insert the alternator into the bracket
- Hand-tighten the 14mm bolt
- Hand-tighten the 12mm adjusting screw
- Do not tighten them all the way
- Press the wiring harness onto the bracket
- Connect the wiring harness
- Insert the terminal wire into place
- Tighten the 10mm bolt to the terminal wire
- Replace the terminal wire cover
-
step 3 :Removing the Alternator
- Pry off the alternator terminal cap
- Make sure the battery is disconnected
- Remove the 10mm nut
- Pry out the wiring harness from the alternator
- Move the wiring harness out of the way
- Remove the 12mm bolt from the back of the adjustor
- Remove the 14mm bolt that mounts the alternator
- Work the alternator out of the pivot bracket by hand or with a small pry bar
-
step 4 :Installing the Serpentine Belt
- Loop the belt around the crank pulley
- Bring it under the A/C compressor
- Pull the belt over the alternator
- Loosen the adjustor if needed
- Tighten the 12mm adjustor bolt clockwise
- Tighten the 12mm bolt beneath the adjustor bolt
- Tighten the 14mm bolt that mounts the alternator to the engine
- Reconnect the 10mm negative battery terminal
- Start the vehicle and listen for slipping or squeaking
Tools needed
-
12mm Socket
Socket Extensions
14mm Socket
Pry Bar
8mm Socket
10mm Socket
Ratchet
Brought to you by 1AAuto.com, your source for quality replacement parts and the best service on the Internet.
Hi, I'm Mike from 1A Auto. I hope this how-to video helps you out, and next time you need parts for your vehicle, think of 1AAuto.com. Thanks.
In this video, we're going to show you how to replace an alternator. This is a Toyota Camry 1998. The procedure is pretty much the same for Toyota Camrys between 1997 to 2001.
Items you will need include new alternator from 1AAuto.com, 8-14 millimeter sockets and wrenches, ratchet and extension, and a small pry bar.
Open the hood and secure the hood prop. Your alternator is used to adjust the tension of the serpentine belt, either tighter or looser, and also to slack it enough to be removed.
Using a 14mm socket and ratchet, loosen the bolt where the alternator mounts to the engine. This will allow the alternator to pivot when adjusting the adjuster screw. Using the 12mm socket and ratchet, loosen this bolt into the alternator, and then adjust your adjusting screw down to remove the belt. Turn the adjusting screw counterclockwise to loosen it. You may have to push down on the alternator a little to get it to move.
Once you have enough slack, remove the serpentine belt from the pulleys. You may have to twist it sideways to clear between the pulleys and the body. Put your fingers underneath the cap on the alternator terminal, pop the cap off.
Using a 10 millimeter socket and ratchet, be sure the battery is disconnected, remove the nut from the power terminal of the alternator. Remove the cable and place it off to the side. Push down on the top of the connector at the back of the alternator. Remove the connector.
Using a small flat blade screwdriver, carefully pry out on the retainer for the alternator harness and move it out of the way. Using a 12 millimeter socket, finish removing the bolt on the back of the adjuster on the alternator. With a 14 millimeter socket and ratchet finish removing the bolt at the pivot point of the alternator. Work the alternator out of the pivot bracket either by hand or with the help of small pry bar.
Here we have our old part which we removed from our car and our new part from 1AAuto.com. As you can see, the alternators are identical in size. They have the same pulley. They're both an 80 amp output rating. We have the same connector on the back as well, as the same top post here for our battery cable. You will have to change over the old wire loom bracket retainer if you would like. Your alternator is responsible for charging your battery, as well as being the power source of your vehicle when the engine is running. It doesn't come from your battery once the engine has been started.
Some symptoms of a bad alternator include a noise from a bad baring. If the alternator itself fails, you can overcharge or undercharge the vehicle while driving. You would notice a high or low gauge at that point, a low state of charge in your battery, as well as sulfated plates, or the vehicle is shutting off while driving.
If your old alternator has failed, caused the vehicle's battery to become damaged, shut off while the engine is running; or you have a bad baring, then this brand new replacement alternator from 1A Auto is going to go in direct fit just like your original equipment and fix you up right.
Your new alternator may not come with the wire retention bracket on it. If that's the case, you can use an 8 millimeter socket and ratchet to remove the nut holding the old one on. Take your old retainer and remove the nut from your new alternator in the same location. Install the retainer onto the stud. Reinstall your nut. Now you’re ready to install your new alternator in the vehicle.
Reinstall the pivot portion of the alternator into the pivot bracket here. Start your 14 millimeter bolt. Start the bolt in by hand. Leave it loose just so you won't lose the alignment. It's easier to line up the other side. Line up the block here on the adjusting screw. Send your 12 millimeter bolt through. Start it into the back of your alternator. Now you can bring the rear 14 millimeter bolt back a little tighter. Make sure you don't tighten it all the way, because we still have to install the serpentine belt and adjust it properly.
Reinstall the wire harness retainer onto the bracket that we switched over from the old alternator. Reconnect the plug at the back with the clip facing up. Install the terminal wire with the tabs facing down. Reinstall the 10 millimeter nut. Tighten it down with a socket and ratchet. Reinstall the cover.
The serpentine belt will be installed around the crank pulley, over top of the alternator pulley, and under the AC compressor. Be sure that the belt is seated properly onto the grooves of each pulley. Using a 12 millimeter socket and ratchet, turn the tension bolt clockwise to add tension to the belt. Lock down the adjusting block with the same 12 millimeter. Using a 14 millimeter socket and ratchet, clamp down the pivot point bolt.
Reinstall the negative batter terminal. Tighten it down with your 10 millimeter wrench. Start the vehicle and check that the belt does not squeal or slip.
Thanks for tuning in. We hope this video helped you out. Next time you need parts for your car, please visit 1AAuto.com. Also check out our other helpful how-to and diagnosis videos.
Shop Products
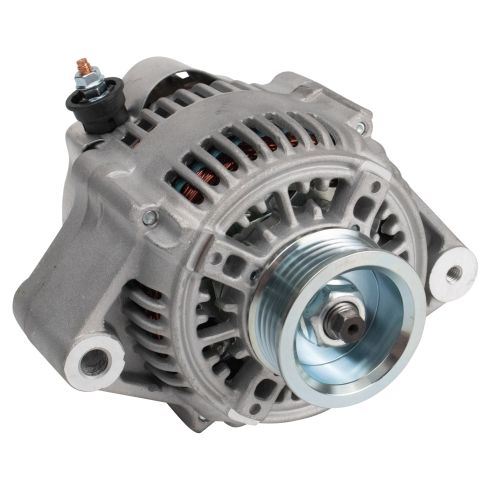
Toyota Camry Rav4 Solara Alternator TRQ ALA94468
Part Details:
- Yes
- 12 VDC
- 80 A
- Serpentine
- 24 mm
- NIPPONDENSO
- Clockwise (Right)
- No
- 4
- 57.5 mm
- No
- Internal
- Yes
- No
- 2.28 in
- 0.94 in

How to Replace Alternator 1996-99 Buick LeSabre
Check out this helpful video from 1A Auto on how to replace the alternator on your 96-99 Buick LeSabre.
